Speed increaser service & repair, Figure 8, Figure 10 – Alamo HYDRO 15 User Manual
Page 121
Section 7 - 11
HYDRO 15 (Service Manual) 09/06
© 2006
Alamo Industrial
Speed Increaser Service & Repair
4.
Install the bearing spacer.
(figure 4
item
35).
Install the bearing spacer
(figure 9)
now
in the open cover end of the housing, The
bearing spacer is installed into the opening
befor the bearing cup is installed. Make cer-
tain the bearing spacer is installed flat and
seated against the open cover.
5.
Install the Bearing Cups into the housing
half. Use a bearing driver to install bearing
cups (
figure 4 item 19)
. Install the bearing
cup from the inside of the bearing housing
until it is seated against the bearing spacer
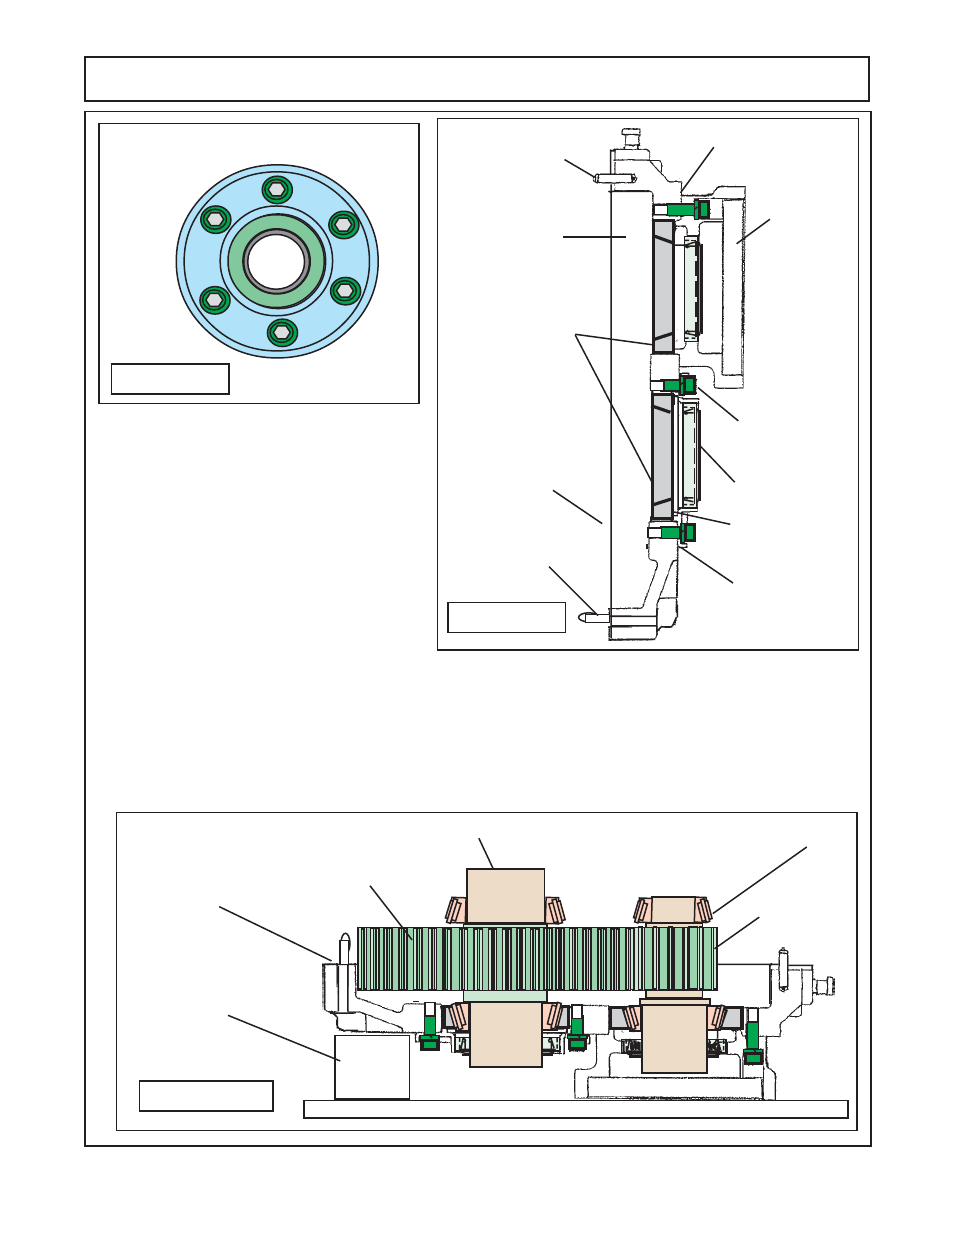
FIGURE 8
Correct Bolt
Torque Pattern
1
2
3
4
5
6
FIGURE 9
123
123
123
123
123
123
123
123
123
Pump Mount
Flange
Open Cover
Housing Half
Breather half
(pump mount
half)
Housing Half
Cover Gasket
Installs here
Bearing Cups
Cover Gasket
Cover Gasket
5/16" Allen
Head Bolts &
Lockwashers
Dowel Pin
Dowel Pin
Bearing Spacer
in the open cover end. The other bearing cup is seated against the pump mounting flange
(figure 9)
.
DO not
drive bearing in so far the open cover is damaged.
NOTE:
the bearing cups for the pump mount flange and the
open cover side are the same size.
6.
Install the bearing Cones
(figure 4 items 14 & 20)
the bearing cone
item 14
is smaller than the other 3 and
will only fit the PTO side of the small gear shaft. Bearing cones will be seated against shoulder at gear
(figure
10).
Make certain seal ID is coated with light coat of grease. Insert the shafts into the housing and through the
seals
(figure 10).
Install the housing gasket onto the housing half.
12
12
12
12
12
12
123
123
123
Small Bearing Cone Item 14
Small Gear
& Shaft
Large Gear
& Shaft
PTO Splined Side
1234567890123456
1234567890123456
1234567890123456
1234567890123456
1234567890123456
1234567890123456
1234567890123456
1234567890123456
1234567890123456
1234567890123456
1234567890123456
1234567890123456
1234567890123456
1234567890123456
12345678901234567890123456789012123456789012345678901234567890121234567890123456789012345678
12345678901234567890123456789012123456789012345678901234567890121234567890123456789012345678
12345678901234567890123456789012123456789012345678901234567890121234567890123456789012345678
12345678901234567890123456789012123456789012345678901234567890121234567890123456789012345678
FIGURE 10
Sitting on Block to Make it
Sit on Table Level
Install Housing Gasket Here