Tire - wheel - hub service & repair, Figure 10a, Figure 13 – Alamo HYDRO 15 User Manual
Page 131: Figure 12, Figure 11
Section 8 - 7
HYDRO 15 (Service Manual) 09/06
© 2006
Alamo Industrial
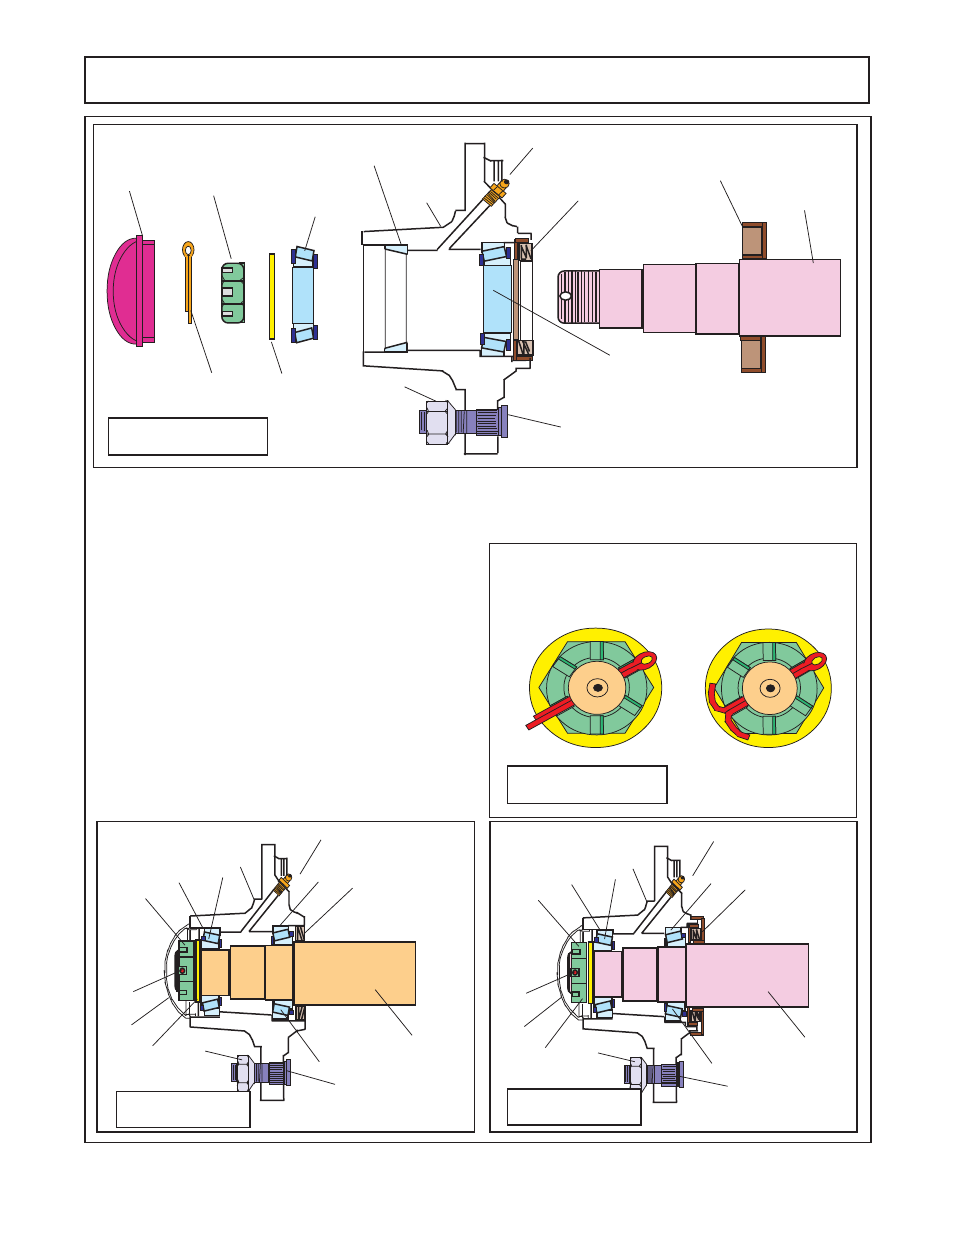
Tire - Wheel - Hub Service & Repair
Seal Protector
Axle Spindle
Three Piece
Seal
Grease Fitting
Inner Bearing
Cone & Cup
Hub
Outer Bearing
Cone
Outer Bearing Cup
Lug Nut
(Coned)
Wheel Stud
Spindle
Washer
Bearing
Adjusting
Nut
Cotter
Pin
Dust
Cap
FIGURE 10A
123
123
123
123
123
123
123
123
123
123
123
123
123
123
Whl Hub Asy
(3 piece Seal)
9.
Install cotter pin
(item 3),
Push Cotter Pin into hole until the head (loop in cotter pin) is no higher that the
washer
(figure 11).
Bend the cotter pin outward
(figure 11)
, it may require the ends of the cotter pin to be cut,
if so use a pair of diagonal cutters. DO NOT Cut cotter pin so short the ends can not be bent over
(figure 11).
Make certain the cotter pin doesn't stick outward so
far that it rubs the dust cap that is to be installed.
Whl Hub Asy - 3 piece Seal
FIGURE 13
8
1
2
3
4
5
6
7
9
10
11
12
13
14
Whl Hub Asy - 1 piece Seal
FIGURE 12
8
1
2
3
4
5
6
7
9
10
11
12
13
14
Cotter Pin
Installed
Cotter Pin
Installed & Bent
FIGURE 11
10.
Install dust cap
(item 2).
The Hub can be
greased now if wanted, Pump grease in through
fitting until grease comes out the front between
rollers of outer bearing cone. Carefully drive dust
cap
(item 2)
onto up aligning the dust cap rim with
the edge of hub. Carefully drive the dust cap onto
hub until it is seated into the recess of the hub
(figure 12 & 13)
. Caution dust cap must be installed
squarely and driven on until they are fully seated.
When Assembled look at figure 12 & 13, this is
what it should look like.