Tire - wheel - hub service & repair, Figure 5 – Alamo HYDRO 15 User Manual
Page 128
HYDRO 15 (Service Manual) 09/06
© 2006
Alamo Industrial
Section 8 - 4
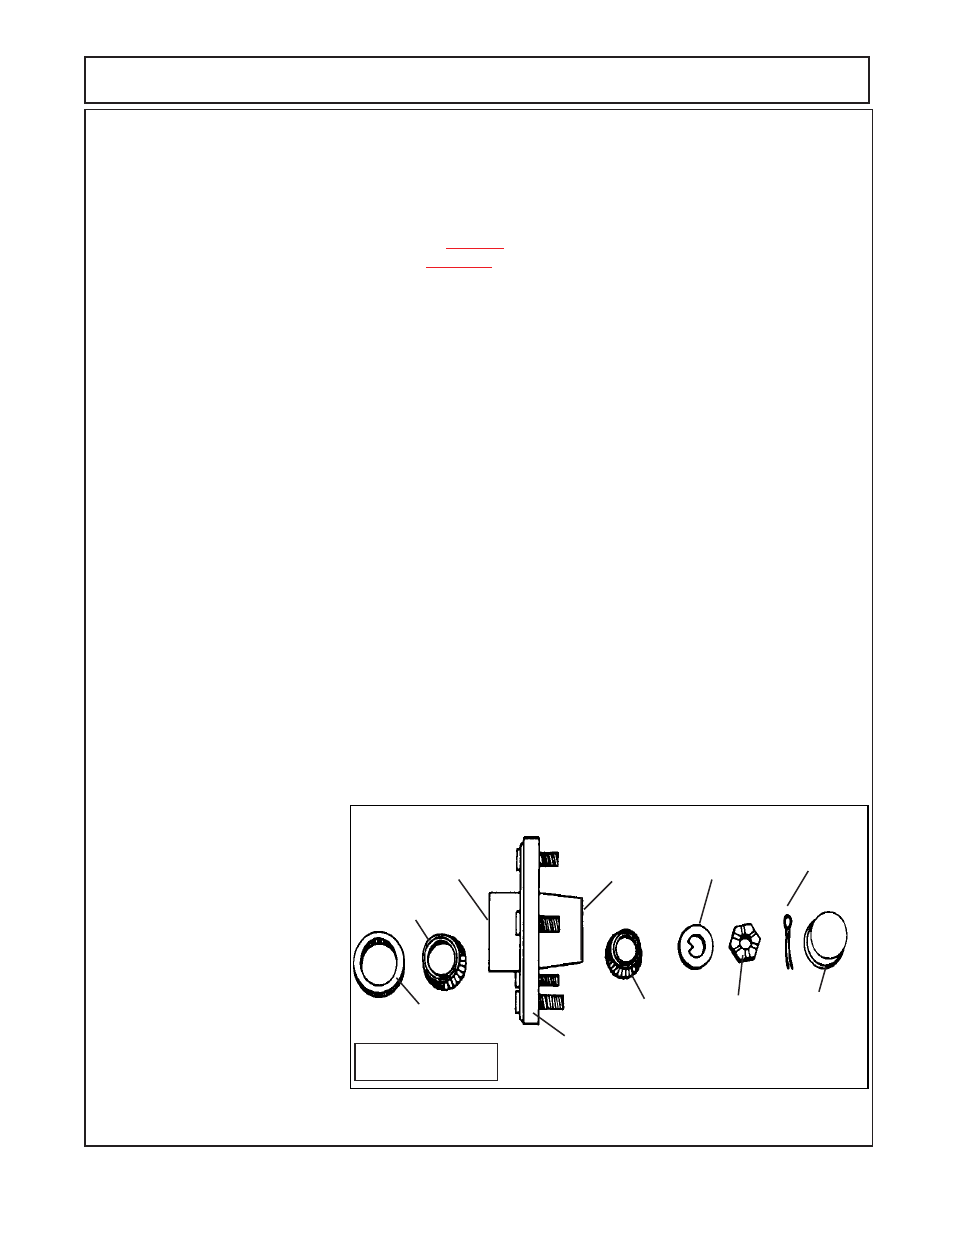
5.
Pull the hub
(item 1)
out slightly while
holding your hand against end of spindle at attaching nut end,
this will allow you to catch the outer bearing cone
(Item 6).
6.
Continued to pull outward on the hub and the hub
(item 1)
will slide off with inner bearing cone
(item 7)
and wheel seal
(figure 3 & 4 item 8)
staying in hub.
7.
Wheel Seals, there are two different types.
Old type
1 piece seal
(figure 3 item 8)
which consist of the
standard type seal as shown in
figure 3 & 5.
New style
3 piece seal
(figure 4 item 8)
consist of, 1 - inner seal
adapter, 1 - inner seal and a outer seal protector which
drives onto the spindle
(figure 4 & 6).
The same type
seal that is removed from the hub must be the type that is replaced.
Parts between these two hubs will not
interchange,
identify which hub you have by the type seal in it before ordering replacement parts. The 3 piece
seal components, seal adapter, seal and seal protector are
not available as individual pieces,
they can only be
ordered as part of the replacement seal assembly.
Remove Seal from Hub,
seal use a soft pin
(wood or plastic)
to drive into the hub from the front side and
against the inner bearing cone, this will drive the inner bearing cone and seal out. If working with the three piece
seal, the seal adapter should come out with the bearing cone.
8.
Bearing Cups, the bearing cups
(items 9 & 10)
can be inspected while still in the hub. If bearing cups are
serviceable and bearing cones are serviceable, then there is no reason to remove the bearing cups from the
hub. If the bearing cup or bearing cone is un-serviceable and either needs replacing then both should be
replaced at the same time, do not use used bearing cups or bearing cones against new bearing cups or bearing
cones.
9.
Grease fitting, it is not required to remove the grease fitting
(item 12)
unless it is damaged or grease cannot
be pumped through it.
Some grease fittings are the drive in type and some are the screw in type. You will be
able to ID these by looking at area where grease fittings enter wheel hub. Drive in grease fittingswill pull out
by clamping them and pulling upward on them.
10.
Clean all components bearings, nut, washer and hub itself. Inspect all components including the wheel
studs
(item 11)
in hub. If wheel studs need to be replace it is recommended that the old stud bepressed out
and the new one pressed in.
11.
Inspect the bearing cups
(item 9 & 10)
, they should not have noticeable wear, scratches, pitting or any
other damage that will make them un-serviceable. If the bearing cups need to be replace the old ones should
be pressed out and new ones pressed in. If the bearing cones are damaged and should be replaced, the
bearing cups should be replaced also or vice versa.
It is not recommended
that old and new bearing cups and
cones be mixed.
Tire - Wheel - Hub Service & Repair
12.
If hub and components are
washed with solvent (or similar
substance). The component
should be dried with clean filte-
red compressed air.
DO NOT
spin bearing with compressed
air to dry them as this damages
the bearing surface. The inside
of the hub must be cleaned, after
cleaning hub pump small amount
of grease grease through grease
fitting and make certain it is clean
and free of solvent when it comes
out.
Dry all solvent and clean all
Dust Cap
Cotter Pin
Slotted Nut
Washer
Outer
Bearing
Cone
Outer
Bearing
Cup
Inner
Bearing
Cup
Inner
Bearing
Cone
Seal
Wheel Hub
w/ Studs
FIGURE 5
grease from hub ID.
Lay all the components out as inspected, replace components as need
(figure 5).