Wing lift & fold cylinder repair – Alamo HYDRO 15 User Manual
Page 84
HYDRO 15 (Service Manual) 10/06
© 2006
Alamo Industrial
Section 5 - 10
6.
With the cylinder rod weldment still clamped in vice
(figure 5)
slide the cylinder head
(figure
5 item
4)
off the rod. Inspect and clean the cylinder rod, check the cylinder rod for any bend,
scratches, metal flaking, rust spots or pitting. Use a straight edge (figure 4) to check for bends in
rod. Check rod clevis mounting pin hole for wear or distortion. Check the threads and piston seat
surface. If rod has been cleaned and is dry make certain to coat it with a light coat of oil.
7.
Inspect the cylinder head general condition and the threads where it screws into the barrel
(figure 5).
When working on the cylinder head never clamp it in a vice as it is made of aluminum
and could be damaged, be careful when removing old seals not to damage thread on OD of cylinder
head. Remove the Seals from the Cylinder Head.
First
remove the O-Ring and back up washer
(figure 5 item 4A)
, when removing these note
that the back-up washer is on the outward side with the O-Ring inward toward ID of Barrel.
Second
remove the snap in rod wiper seal
(figure 5 item 4B)
, make a note of the lip on seal
that it is pointing outward to enable the lip to wipe the dirt from rod.
Third
remove the inner Rod seal
(figure 5 item 4C)
by prying it out on one side until it is across
the ID of the cylinder head, push the seal on out of the head using a nylon (plastic) rod and a light
hammering on end of rod. Clean and inspect cylinder head. Check the ID of the cylinder head to
make certain it is still round and without excessive wear.
8.
Inspect the general condition of the piston
(figure 5 item 6)
. Remove the U-Cup Seal
(figure
5 item 6C)
from the piston, make a note of which way the U-Cup seal came off the piston. Insect
the groove for the seal make certain it is not scratched or worn. Make certain the piston has nut
been struck and is deformed. Check the OD of the piston to make certain it is not scored or worn
excessively around the OD, if it is it is recommended that a second look is taken at the cylinder head
ID.
9.
Inspect the threads of the locknut
(figure 5 item 7)
, if they appear to be damaged, take a second
look at the threads on the cylinder rod clevis weldment
(figure 5 item 3)
. It is recommended that
the piston locknut
(figure 5 item 7)
be replaced and not re-used.
WING LIFT & FOLD CYLINDER REPAIR
3.
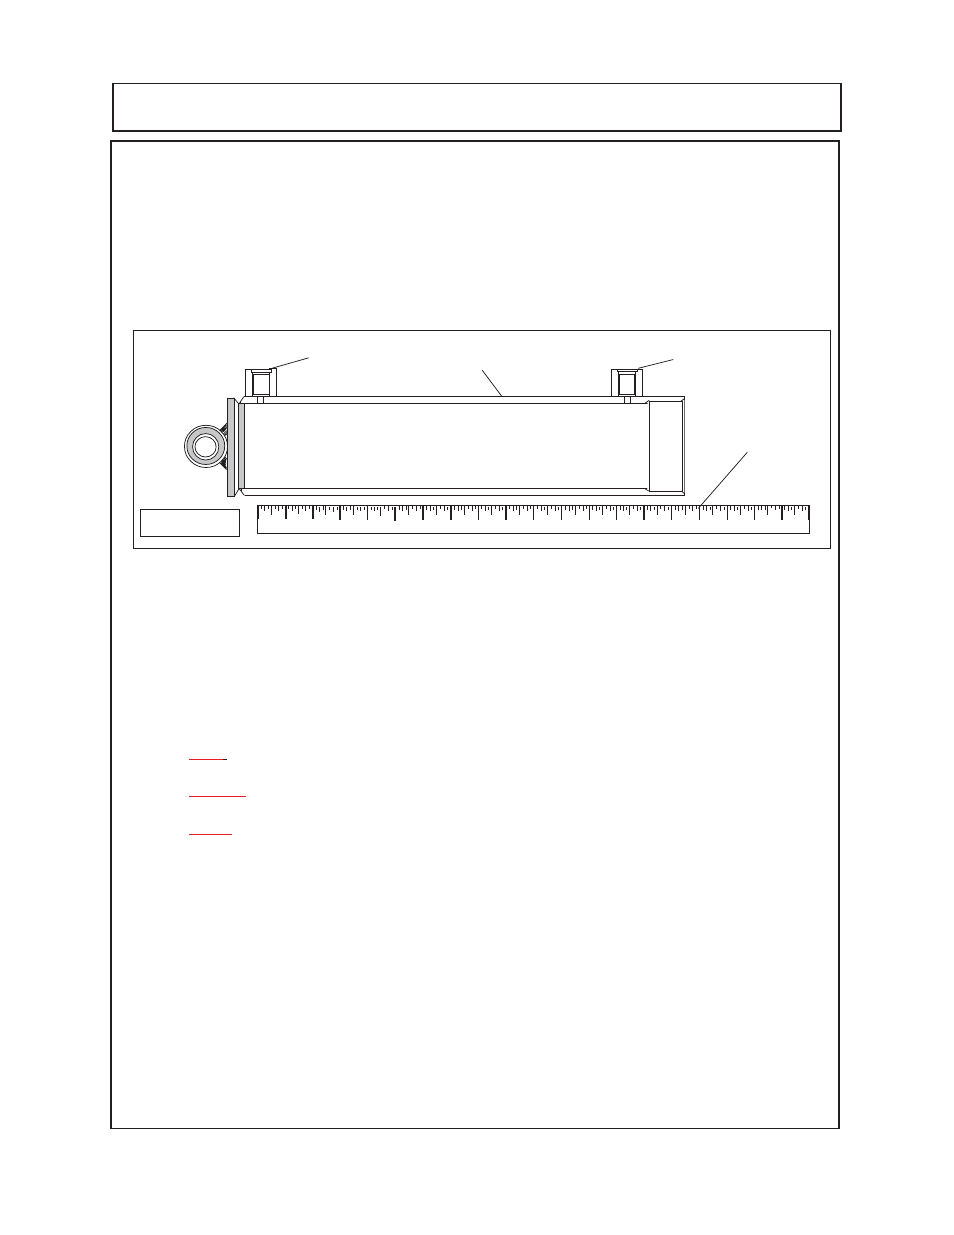
Using a straight edge
(figure 4)
check the OD of the barrel in several places, look for high or
low spot in the tube. Also use the straight edge top check the ID in several places, check to make
certain there are no over sized wear places in tube.
4.
If the barrel has minor scratches or a glaze on the ID the barrel can by lightly honed useing a
cylinder hone with the proper honing liquid, the hone will need a long shank.
DO NOT over hone
the ID of the Barrel and DO NOT damage the threads for the cylinder head with the hone.
If honeing
the barrel the barrel will have to be cleaned again.
5.
Inspect threads in hose ports
(figure 4 item 2)
of barrel, if O-Ring Boss is used in ports insect
the area machined to seat O-Rings. Make certain the ports are clean and free of debris.
12
12
12
12
12
12
12
12
12
12
12
12
12
12
12
12
12
12
12
12
1234567890123456789012345678901212345678901234567890123
1234567890123456789012345678901212345678901234567890123
1234567890123456789012345678901212345678901234567890123
1234567890123456789012345678901212345678901234567890123
Figure 4
5
Straight
Edge
2
2
123456
123456
123456
123456
123456
123456
123456
123456
123456
123456
123456
123456
123456
123456
123456
123456
1234
1234
1234
1234
123
123
123
123