Fader control, Setup, Copy – Teac DM-24 User Manual
Page 56: Source (pre/post and source) settings, Linked aux sends, Fader control setup copy, 7 – module operations—aux sends
7 – Module operations—Aux sends
56
TASCAM DM-24 Reference Manual
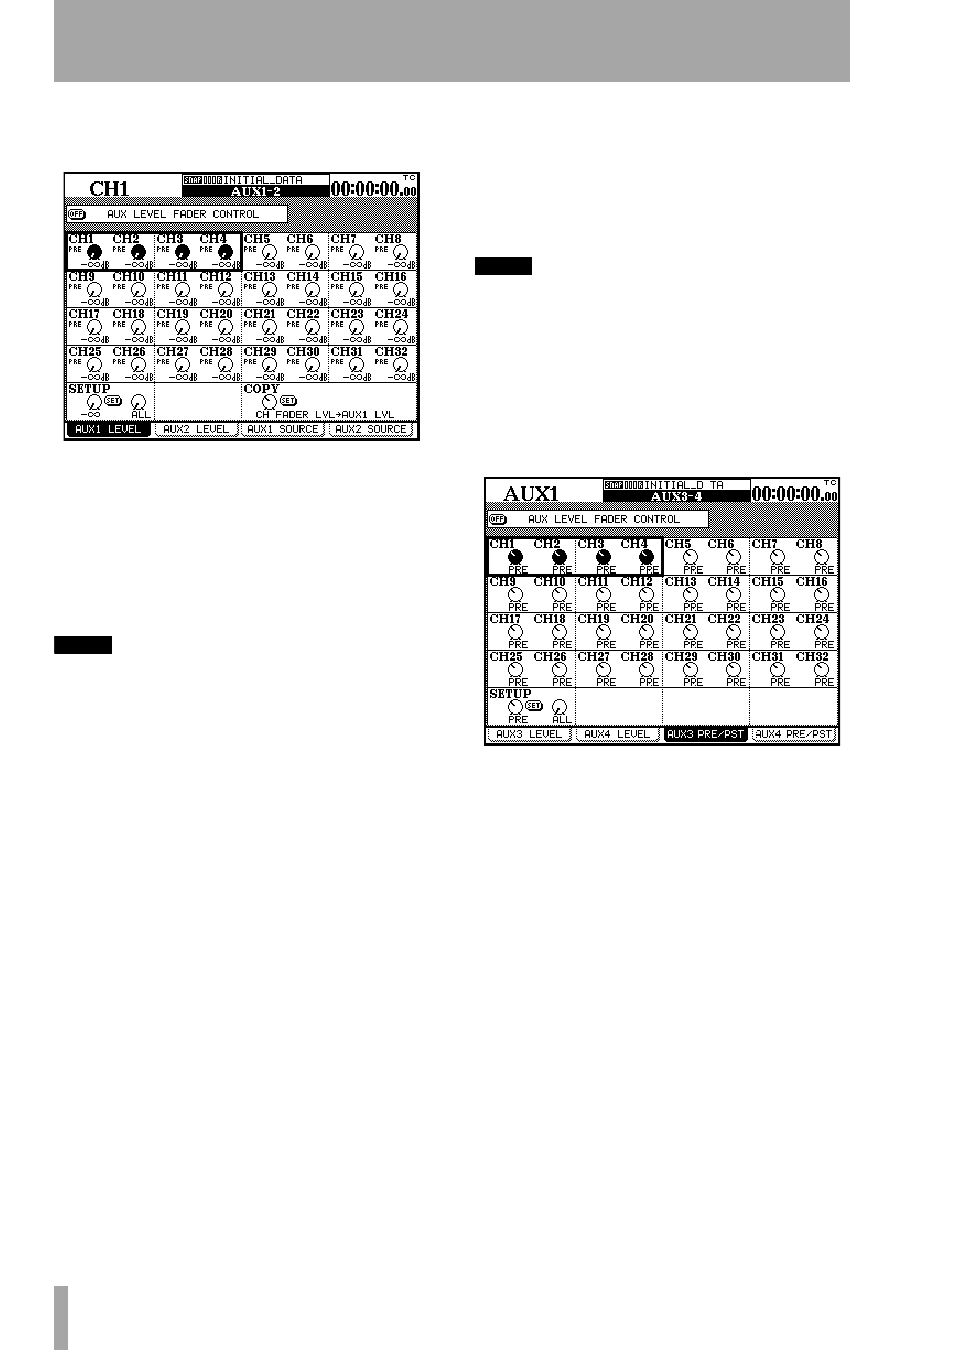
If they are not linked, a screen similar to the follow-
ing appears:
Using the cursor keys to move a cursor consisting of
a box highlighting four on-screen controls around the
screen. Alternatively, press the
SEL
key for a given
channel to jump the cursor to the appropriate position
on the screen.
The four controls correspond to the four PODs. If
two channels are linked (as with channels 9&10 and
11&12 on this screen), only PODs 1 and 3 are active.
NOTE
The rotary encoders, if selected to control aux send lev-
els, are also valid controls for the selected channel or
pair of channels.
Fader control
At the top of the screen is a button
which allows the faders to be used for setting the aux
levels (as described in “Using the faders to change
values” on page 14).
Setup
A master level can be applied to selected
channels by moving the cursor to the bottom left
position setting the desired value with POD 1 and
pressing
ENTER
.
The scope of the setting is determined using POD 2:
either
ALL
,
EVEN
(even-numbered channels),
ODD
(odd-numbered channels),
1-8
,
9-16
,
17-24
or
25-32
.
When
ENTER
is pressed, a popup message appears
(
Ch parameters setup?
). Press
ENTER
again to con-
firm, or a cursor key to cancel.
Copy
It is possible to copy the fader settings to the
aux levels, or the other way round (aux levels to
fader). This can be used as a starting point for mixes,
setting up an initial monitor mix to mirror the stereo
output, for example, which can then be adjusted as
necessary.
Move the cursor to the bottom right of the screen,
and use POD 1 to select the
CH FADER LVL->AUXx LVL
or the other way round (
AUXx LVL->CH FADER LVL
).
Press
ENTER
when the source/destination selection
has been made, and press
ENTER
again to confirm
the copy (cursor keys cancel).
NOTE
See also “UTILITY copying” on page 62.
Source (pre/post and SOURCE) settings
As the tabs at the bottom of the display show, there
are four screens available through the soft keys (or
repeated presses of the appropriate
AUX
key. The two
LEVEL
screens are identical. The
SOURCE
screens (aux
1 and 2) and
AUXx PRE/PST
(other aux sends) appear
like this:
Use the cursor to navigate around the screen and the
PODs to select either
PRE
or
POST
(pre-fader or post-
fader aux sends). For aux sends 1 and 2, the
RETURN
source is also available for channels 1 through 16.
Setup
A master pre-post setting can be applied to
selected channels by moving the cursor to the bottom
left position setting the desired value with POD 1 and
pressing
ENTER
.
The scope of the setting is determined using POD 2:
either
ALL
,
EVEN
(even-numbered channels),
ODD
(odd-numbered channels),
1-8
,
9-16
,
17-24
or
25-32
.
Linked aux sends
Two aux sends are linked in
the same way as for channels—with the MASTER
fader layer active press and hold the
SEL
key of one
aux channel and press the
SEL
key of an adjacent
send. Aux sends 1&2, 3&4, and 5&6 can be linked in
this way. No other linking is possible.
When they are linked in this way, naturally they share
the same level (the faders are linked) and any input to
the linked aux send is panned.