Modular service tool sd, Setting the operating mode and energy saving timer, Setting the energy saving timer – Orion System VCC-X Controller User Manual
Page 12
MODULAR SERVICE TOOL SD
12
VCC-X Operator Interface SD
Setting the Operating Mode
The Operating Mode is displayed on the last line of the Main Screen
as shown below. The factory default setting for the Service Tool is
LS (Low Speed) Stand Alone Mode. LS Stand Alone Mode is
the correct confi guration for the VCC-X Controller when in Stand
Alone Mode.
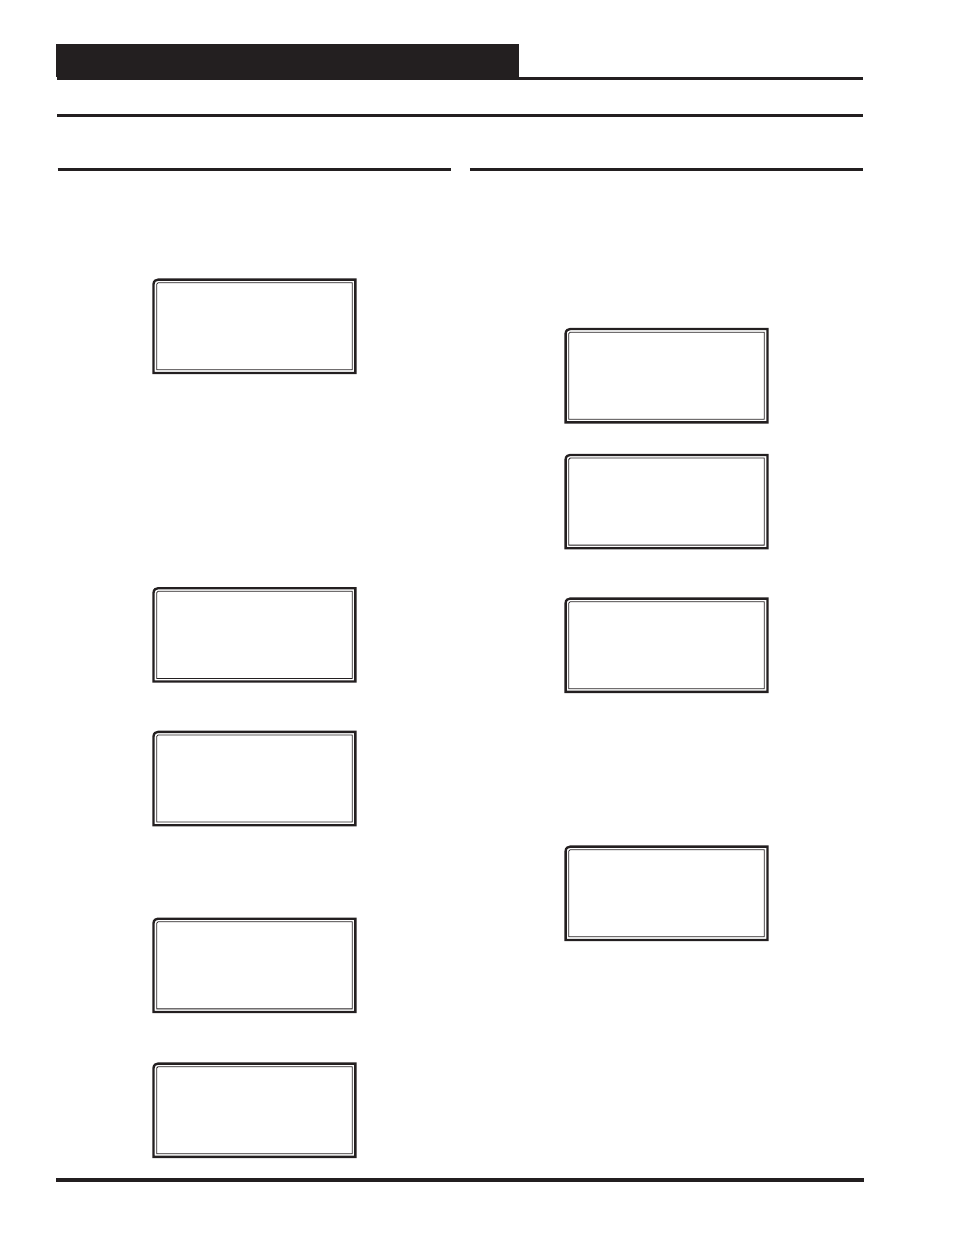
Service Tool SD vX.XX
Wednesday Operations
01/16/15 02:21 PM
LS Stand Alone *00*
If you are using this Service Tool on a communications loop and have
an installed MiniLink PD or CommLink, you will need to change
the setting to LS (Low Speed) Network Mode.
If you are using a VCC-X Controller that is set for high speed, you
will need to change the setting to HS (High Speed) Stand Alone
Mode or HS (High Speed) Network Mode.
If your display indicates a different mode than the one you need,
press
<2>
at the Setup Screen shown below. You may have to press
to access this screen.
1) Set Time & Date
2) Communications
NEXT) More Options
ESC) Exit Menu
T
he Communications Screen will appear as shown below.
Stand Alone Mode
Lo Speed Connection
Use Left/Right Arrow
To Change Selections
Press
<
>
or
<
>
to select the proper mode of operation.
When you have made your selection, press
.
The following
screen will appear.
You Have Changed The
System Mode
Press Any Key To
Continue
Press any key to continue. The Setup Screen will appear as shown below:
1) Set Time & Date
2) Communications
NEXT) More Options
ESC) Exit Menu
Setting the Operating Mode and Energy Saving Timer
Setting the Energy Saving Timer
The Modular Service Tool has a built-in timer that can be pro-
grammed to shut the Service Tool off after a specifi ed period of
time if no buttons are pressed. This is a very useful feature if you
are powering the Service Tool from the internal batteries.
To set the Energy Saving Timer, press
at the fi rst Setup
Screen and
<3>
at the second Setup Screen shown below. (You may
have to press
to access these screens).
1) Set Time & Date
2) Communications
NEXT) More Options
ESC) Exit Menu
3) Energy Saving
4) Update Software
NEXT) More Options
ESC) Exit Menu
The Energy Saving Screen will appear as shown below:
Energy Saving
Automatic Power Down
Minutes: xx
Press ESC to Exit
Enter the number of minutes you want the Service Tool to stay ac-
tive before it automatically powers down and press
. To
cancel the automatic power down, enter
<99>
and press
.
After you have entered a number between 1 and 99 minutes, press
to exit the screen.
The Setup Screen will appear again as shown below:
1) Set Time & Date
2) Communications
NEXT) More Options
ESC) Exit Menu
- VCB-X Controller VCB-X VCB-X Modular Service Tool VCM Controller Operator Interfaces SD VCM-X/RNE Controller VCC-X Modular System Manager SD Modular System Manager SD Quick Start VCM-X/RNE Controller Operator Interface SD SA E-BUS Controller VAV II Controller v.1 CAV II Controller v.1 MUA II Controller v.1 VAV II Controller v.2 CAV II Controller v.2 MUA II Controller v.2