SkyTrak 6036 Service Manual User Manual
Page 190
Engine: Cummins 4BT3.9
7.12
Model 6036 Legacy
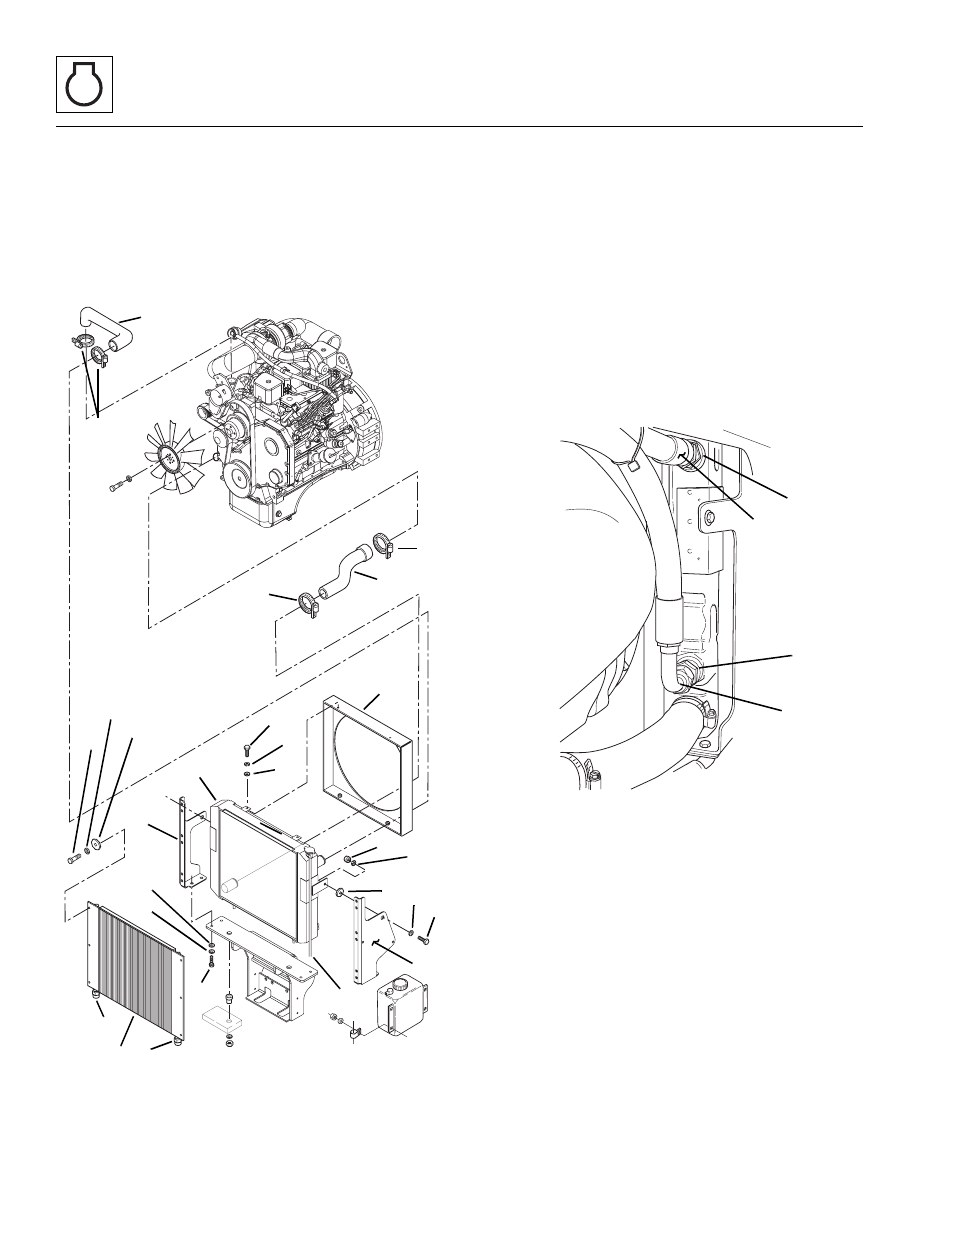
b. Radiator and Oil Cooler Installation
1. If replacing the radiator, install the right (Fig. 7-11,
22) and left (21) side support brackets by installing
the plain washer (27), hex-head capscrew (26),
radiator isolator mount (25), lockwasher (23) and hex
nut (24) to the new radiator.
2. Install radiator (Fig. 7-11, 19).
Figure 7-11 Coolant System Components
3. Install the shroud (Fig. 7-11, 20) on the radiator (19).
4. Install the radiator (Fig. 7-11, 19), shroud (20) and
side support brackets (21 and 22) to the vehicle.
5. Install the two upper radiator capscrews (Fig. 7-11,
16), lockwashers (17) and plain washers (18).
6. Install the four lower radiator support bracket
capscrews (Fig. 7-11, 13), lockwashers (14) and flat
washers (15).
7. Connect the radiator overflow tube (Fig. 7-11, 12) to
the radiator.
8. Install transmission oil input (Fig. 7 -12, 1) and
output (2) hoses to the radiator fittings (3 and 4).
Figure 7- 12 Transmission Oil Hose Connections
9. Install the six oil cooler capscrews (Fig. 7-11, 9),
lockwashers (10) and flat washers (11).
10. Install oil cooler input (Fig. 7-11, 6) and output (7)
fittings to the oil cooler (8).
11. Install and tighten both clamps (Fig. 7-11, 4) on the
radiator input (upper) hose (5).
12. Tighten clamps (Fig. 7-11, 1 and 2) on the radiator
return (lower) hose (3).
13. Open the radiator cap (not shown) and fill the
radiator (Fig. 7-11, 19) completely with a 50/50
mixture of ethylene glycol and water. Replace and
tighten the radiator cap. Add coolant to the overflow
bottle (Fig. 7-14, 2) until the bottle is 1/4 to 1/2 full.
This overfilling will compensate for any air trapped in
the cooling system.
MA9120
4
2
3
1
5
6
7
8
12
18
9
17
11
10
16
20
19
15
14
13
21
22
24
23
25 27
26
1
2
3
MA9130
4