Manueller weißabglelch, Adjusting the white balance manually, Manueller weißabgleich – Panasonic NVDS33EG User Manual
Page 83
Attention! The text in this document has been recognized automatically. To view the original document, you can use the "Original mode".
©
fcÄd
^
W.B
3 E I O
DEUTSCH
ENGLISH
Manueller Weißabglelch
Benutzen Sie den manuellen Weißabgleich-Modus für
alle Beleuchtungstypen außerhalb des Bereichs O
(-> 166), da der automatische Weißabgleich-Modus nur
für die Beleuchtungstypen innerhalb dieses Bereichs
Bilder mit natürlichen Farben gewährleisten kann. Für
optimale Farbwiedergabe unter fast allen
Beleuchtungstypen empfiehlt es sich, den Weißabglelch
für jede einzelne Szene manuell durchzuführen.
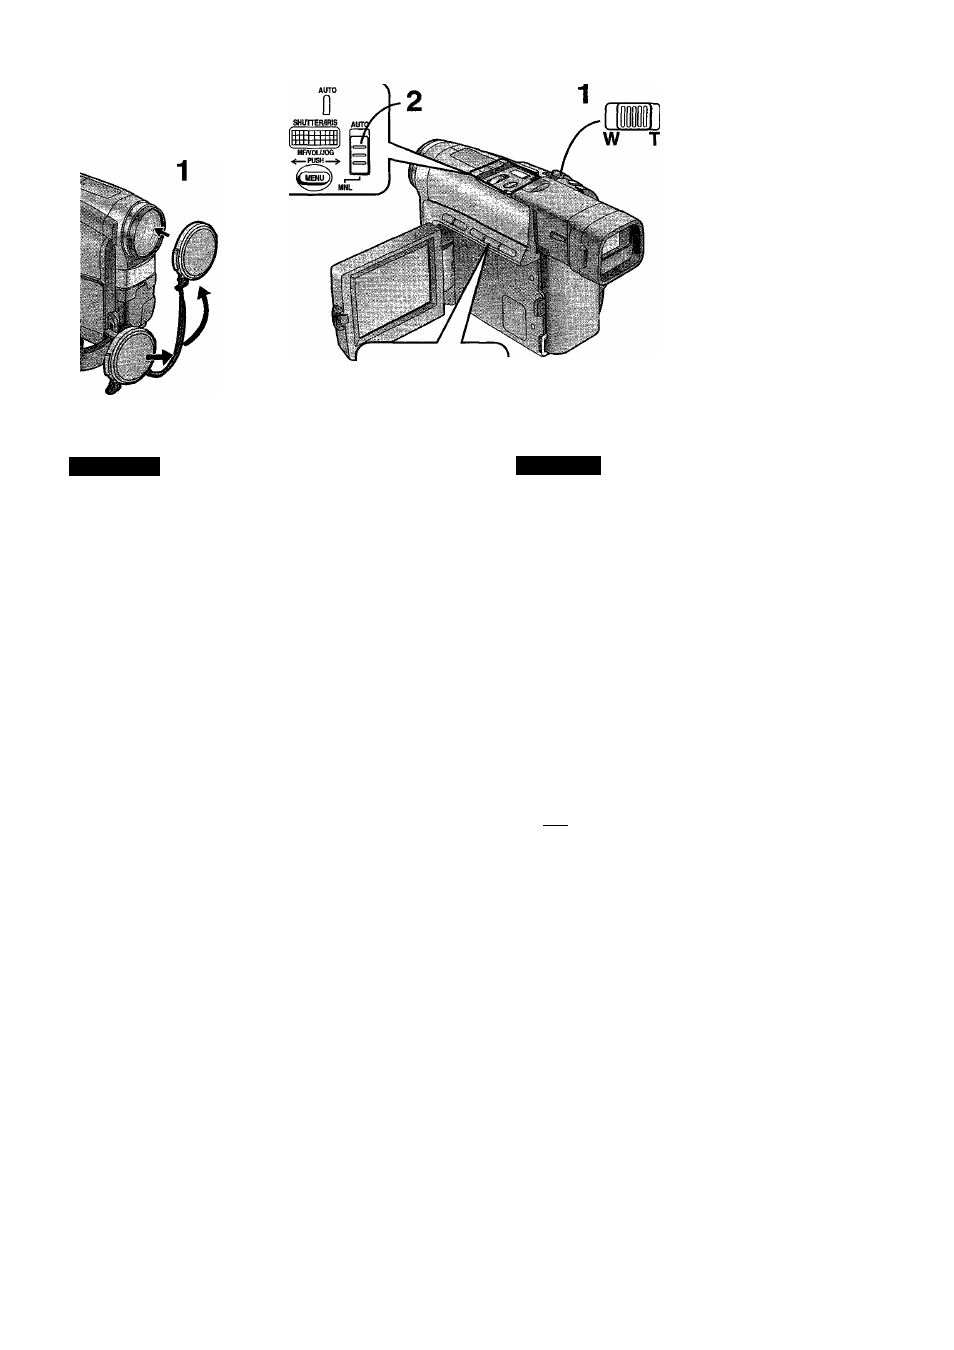
1
Den Objektivdeckel aufsetzen und
heranzoomen, bis der ganze Bildschirm
weiß wird.
2
Den Modus-Wahlschalter auf [MNL]
einstellen.
Die Anzeige [MNL] erscheint.
3
Die Taste [W.B] so lange gedrückt halten,
bis die Anzeige [i^] © zu blinken aufhört
aber weiterhin leuchtet.
•Der Weißabglelch ist jetzt beendet. Falls Sie
diese Einstellung später erneut verwenden
möchten, beispielsweise nach Benutzen des
automatischen Weißabgleichs, können Sie sie
abrufen, indem Sie die Taste [W.B] dreimal
drücken. (In diesem Fall blinkt die Anzeige [tÄd].)
• Wenn die Anzeige [tSd] unter schwacher
Beleuchtung dauernd blinkt, kann der
Weißabglelch nicht manuell eingestellt werden.
•Wenn Sie [EFFECT1] im Menü [CAMERA
MENU1] auf [GAINUP] eingestellt haben, oder
wenn Sie [EFFECT2] auf [SEPIA] oder [B/W]
eingestellt haben, ist es nicht möglich, den
Weißabglelch durchzuführen.
•Der manuelle Weißabglelch kann nur
durchgeführt werden, wenn der Camerarecorder
im optischen Zoombereich (1 x - lOx) ist. Wenn
Sie versuchen, den Weißabglelch im Digital-
Zoombereich zu durchzuführen, blinkt die
Anzeige [täd].
Zurückschaiten auf automatischen
Weißabgleich
Die Taste [W.B] wiederholt drücken, bis keine der
Weißabgleich-Modusanzeigen ([-;?c], [-^(-], [tÄd]) mehr
angezeigt ist. Oder den Modus-Wahlschalter auf
[AUTO] stellen.
Adjusting the White Balance
Manually
Use the Manual White Balance Adjustment Mode for all
types of lighting outside the range Q 166), as the
Auto White Balance Adjustment Mode can only ensure
natural colours for the types of lighting within that range.
For optimum results under almost any type of lighting,
we recommend that you adjust the white balance
manually for each new scene.
1
Attach the Lens Cap and zoom in untii the
entire screen becomes white.
2
Set the Mode Selector Switch to [MNL].
The [MNL] Indication appears.
3
Keep the [W.B] Button pressed until the
F
n
*
xi
1 Indication 0 stops flashing and
remains lit.
•The Manual White Balance Adjustment is now
finished. If you want to use this setting again later
on, for example after having used Automatic
White Balance Adjustment, you can recall it by
pressing the [W.B] Button 3 times. (In this case,
the [t
5^i] Indication flashes.)
•When the [tAd] Indication remains flashing under
weak illumination, the Manual White Balance
Adjustment cannot be set manually.
• If you have set [EFFECT1] on the [CAMERA
MENU1] Menu to [GAINUP], or you have set
[EFFECT2] to [SEPIA] or [B/W], it is not possible
to adjust the white balance.
• Adjusting the white balance is only possible when
the Movie Camera is set within the optical zoom
range (1 x - lOx). If you try to adjust it in the
digital zoom range, the [fc"^i] Indication flashes.
Returning to the Auto White Balance
Adjustment Mode
Press the [W.B] Button repeatedly until none of the
White Balance Mode Indications ([^^^], [-'»c], [tAd]) are
displayed any more. Or, set the Mode Selector Switch
to [AUTO].
-84-