Cycle parameters – HEIDENHAIN TNC 640 (34059x-05) Cycle programming User Manual
Page 465

Compensating workpiece misalignment by rotating the C axis
(Cycle 405, DIN/ISO: G405)
14.7
14
TNC 640 | User's Manual Cycle Programming | 1/2015
465
Cycle parameters
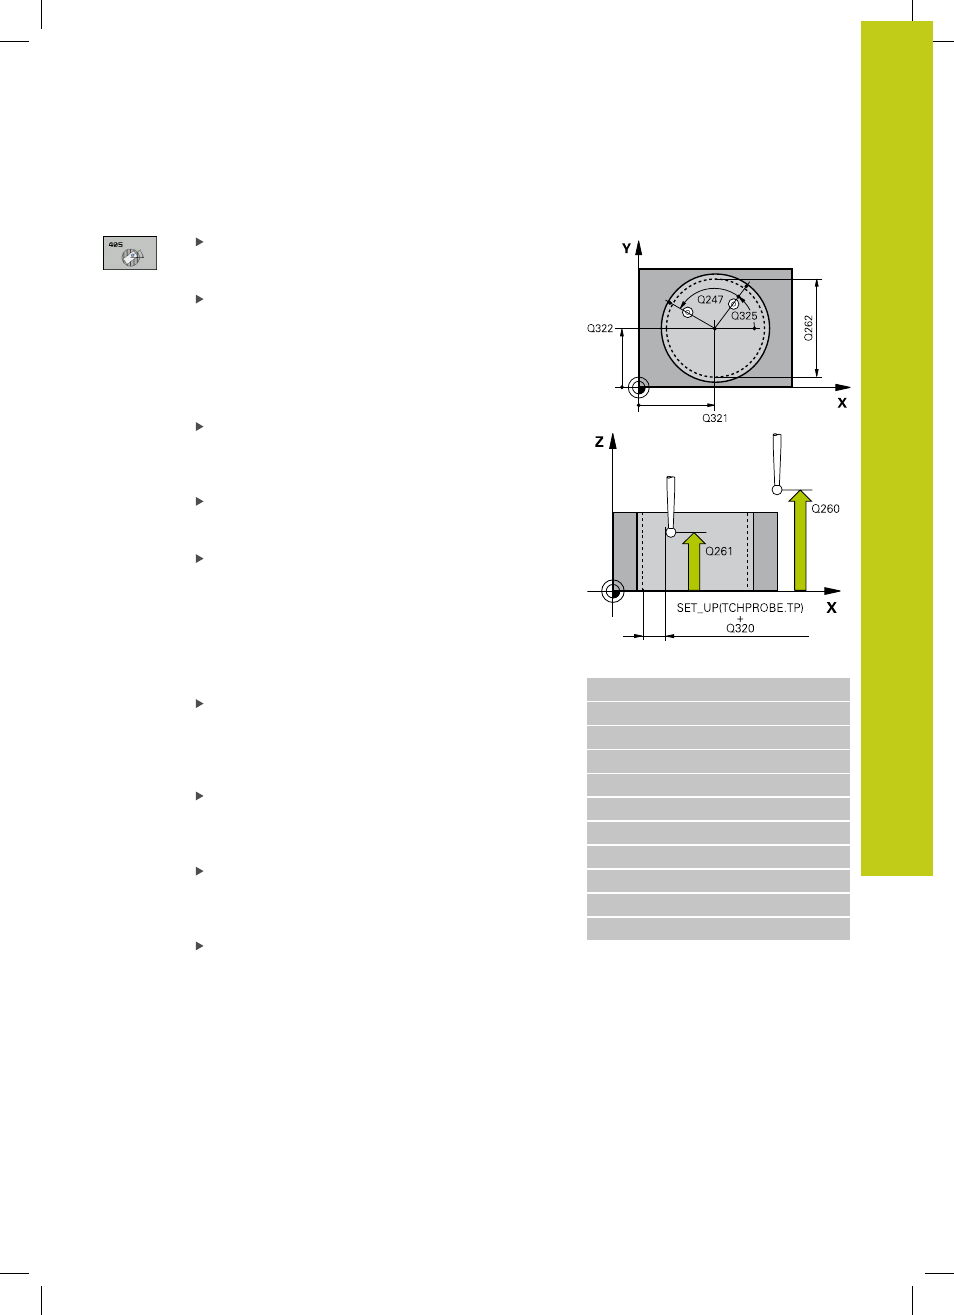
Center in 1st axis Q321 (absolute): Center of the
hole in the reference axis of the working plane.
Input range -99999.9999 to 99999.9999
Center in 2nd axis Q322 (absolute value): Center
of the hole in the minor axis of the working plane.
If you program Q322 = 0, the TNC aligns the hole
center to the positive Y axis. If you program Q322
not equal to 0, then the TNC aligns the hole center
to the nominal position (angle of the hole center).
Input range -99999.9999 to 99999.9999
Nominal diameter Q262: Approximate diameter
of the circular pocket (or hole). Enter a value that
is more likely to be too small than too large. Input
range 0 to 99999.9999
Starting angle Q325 (absolute): Angle between the
reference axis of the working plane and the first
touch point. Input range -360.000 to 360.000
Stepping angle Q247 (incremental): Angle between
two measuring points. The algebraic sign of the
stepping angle determines the direction of rotation
(negative = clockwise) in which the touch probe
moves to the next measuring point. If you wish to
probe a circular arc instead of a complete circle,
then program the stepping angle to be less than
90°. Input range -120.000 to 120.000
Measuring height in the touch probe axis Q261
(absolute): Coordinate of the ball tip center (=
touch point) in the touch probe axis in which
the measurement is to be made. Input range
-99999.9999 to 99999.9999
Set-up clearance Q320 (incremental): Additional
distance between measuring point and ball tip.
Q320 is added to
SET_UP (touch probe table). Input
range 0 to 99999.9999
Clearance height Q260 (absolute): Coordinate in
the touch probe axis at which no collision between
touch probe and workpiece (fixtures) can occur.
Input range -99999.9999 to 99999.9999
Traversing to clearance height Q301: definition
of how the touch probe is to move between the
measuring points:
0
: Move at measuring height between measuring
points
1
: Move at clearance height between measuring
points
NC blocks
5 TCH PROBE 405 ROT IN C AXIS
Q321=+50
;CENTER IN 1ST AXIS
Q322=+50
;CENTER IN 2ND AXIS
Q262=10
;NOMINAL DIAMETER
Q325=+0
;STARTING ANGLE
Q247=90
;STEPPING ANGLE
Q261=-5
;MEASURING HEIGHT
Q320=0
;SET-UP CLEARANCE
Q260=+20
;CLEARANCE HEIGHT
Q301=0
;MOVE TO CLEARANCE
Q337=0
;ZERO RESET
