Cycle parameters – HEIDENHAIN TNC 640 (34059x-05) Cycle programming User Manual
Page 457

BASIC ROTATION over two studs (Cycle 402, DIN/ISO: G402) 14.4
14
TNC 640 | User's Manual Cycle Programming | 1/2015
457
Cycle parameters
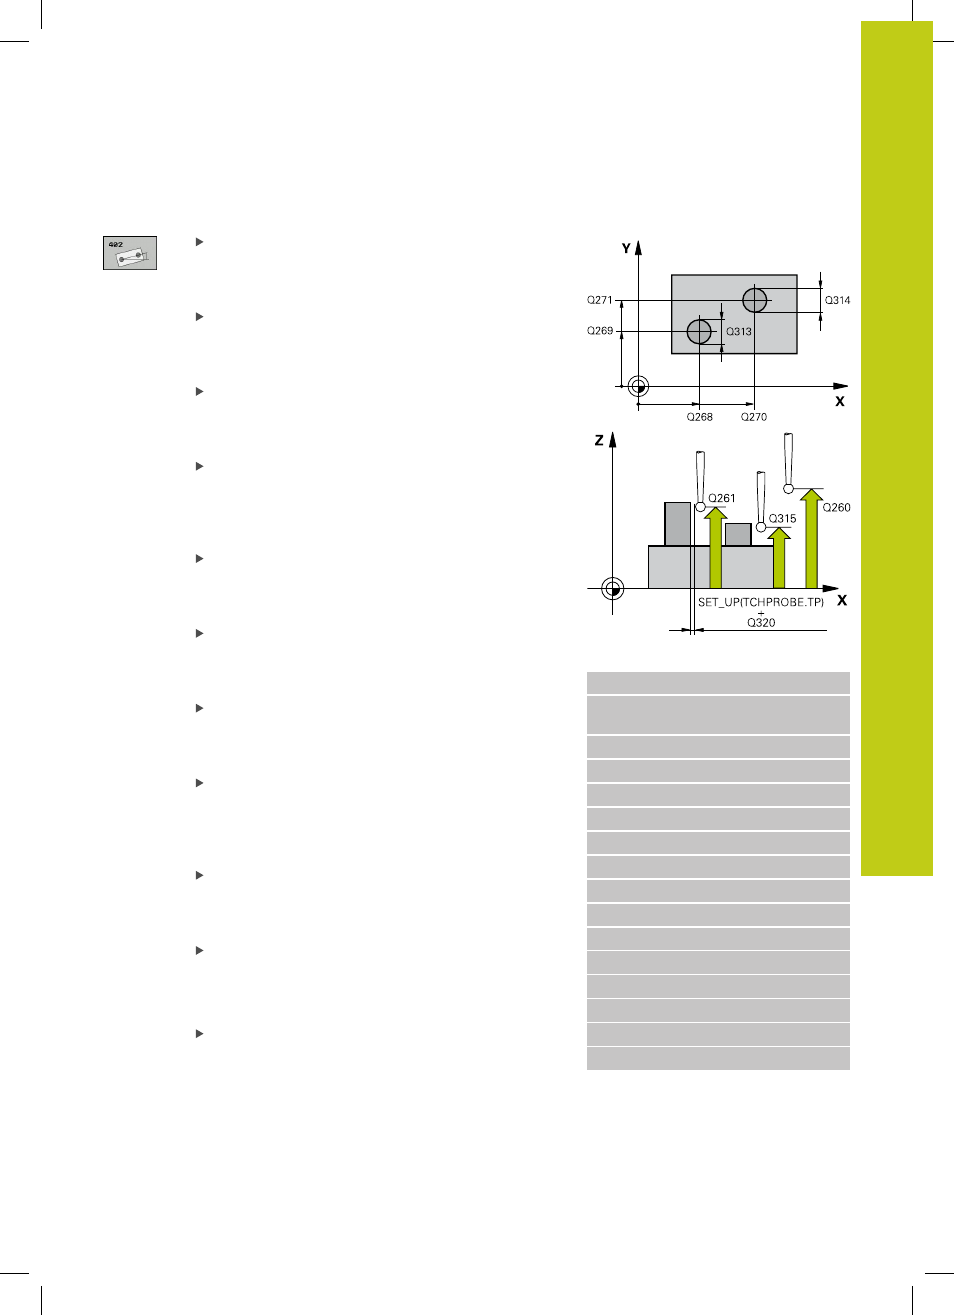
1st stud: Center in 1st axis Q268 (absolute):
Center of the first stud in the reference axis of
the working plane. Input range -99999.9999 to
99999.9999
1st stud: Center in 2nd axis Q269 (absolute):
Center of the first stud in the minor axis of
the working plane. Input range -99999.9999 to
99999.9999
Diameter of stud 1 Q313: Approximate diameter
of the 1st stud. Enter a value that is more likely
to be too large than too small. Input range 0 to
99999.9999
Measuring height 1 in the probe axis Q261
(absolute): Coordinate of the ball tip center (=
touch point in the touch probe axis) at which stud
1 is to be measured. Input range -99999.9999 to
99999.9999
2nd stud: Center in 1st axis Q270 (absolute):
Center of the second stud in the reference axis
of the working plane. Input range -99999.9999 to
99999.9999
2nd stud: Center in 2nd axis Q271 (absolute):
Center of the second stud in the minor axis of
the working plane. Input range -99999.9999 to
99999.9999
Diameter of stud 2 Q314: Approximate diameter
of the 2nd stud. Enter a value that is more likely
to be too large than too small. Input range 0 to
99999.9999
Measuring height of stud 2 in the probe axis
Q315 (absolute): Coordinate of the ball tip center (=
touch point in the touch probe axis) at which stud
2 is to be measured. Input range -99999.9999 to
99999.9999
Set-up clearance Q320 (incremental): Additional
distance between measuring point and ball tip.
Q320 is added to
SET_UP (touch probe table). Input
range 0 to 99999.9999
Clearance height Q260 (absolute): Coordinate in
the touch probe axis at which no collision between
touch probe and workpiece (fixtures) can occur.
Input range -99999.9999 to 99999.9999
Traversing to clearance height Q301: definition
of how the touch probe is to move between the
measuring points:
0
: Move at measuring height between measuring
points
1
: Move at clearance height between measuring
points
NC blocks
5 TCH PROBE 402 ROT OF 2 STUDS
Q268=-37
;1ST CENTER IN 1ST
AXIS
Q269=+12
;1ST CENTER 2ND AXIS
Q313=60
;DIAMETER OF STUD 1
Q261=-5
;MEASURING HEIGHT 1
Q270=+75
;2ND CENTER 1ST AXIS
Q271=+20
;2ND CENTER 2ND AXIS
Q314=60
;DIAMETER OF STUD 2
Q315=-5
;MEASURING HEIGHT 2
Q320=0
;SET-UP CLEARANCE
Q260=+20
;CLEARANCE HEIGHT
Q301=0
;MOVE TO CLEARANCE
Q307=0
;PRESET ROT. ANGLE
Q305=0
;NO. IN TABLE
Q402=0
;COMPENSATION
Q337=0
;ZERO RESET
