Front, View, Rack – Dell TL2000 User Manual
Page 59: Showing, Rails, Installed, Library, Side, Screws, Remove
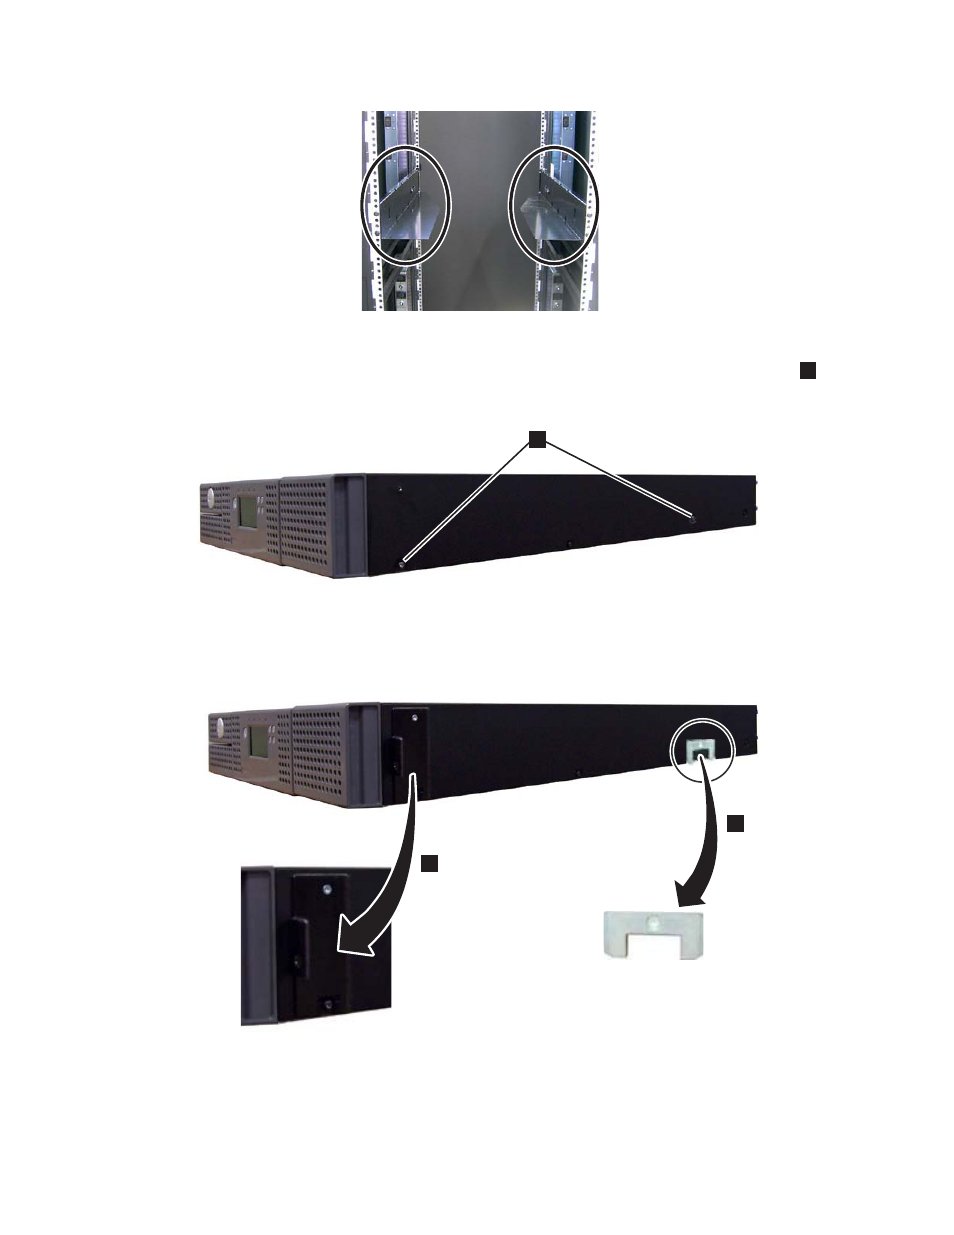
4.
Using
the
Torx
wrench
included
in
your
shipment,
remove
the
screws
(
1
)
as
shown
in
Screw
locations
on
the
4U
library
are
similar.
5.
Install
the
library
rack
anchors
( 2 )
as
shown
in
on
each
side
of
your
library
using
the
longer
counter-sunk
screws
included
in
the
rack
kit.
6.
Install
the
library
mounting
brackets
( 1 )
as
shown
on
the
2U
library
on
each
side
of
the
library
using
the
screw
that
was
removed
from
your
library
and
an
a77ug196
Figure
4-9.
Front
view
of
a
rack
showing
the
rails
installed
a77ug189
1
Figure
4-10.
2U
library
side
screws
to
remove
a77ug188
1
2
Figure
4-11.
2U
library
rack
anchors
and
mounting
brackets
Chapter
4.
Installation
and
Configuration
4-9
See also other documents in the category Dell Computer Accessories:
- POWEREDGE 2950 (182 pages)
- POWEREDGE 2950 (112 pages)
- POWEREDGE 2950 (186 pages)
- POWEREDGE 2950 (10 pages)
- POWEREDGE 2950 (15 pages)
- Console Switch (58 pages)
- PowerConnect 2024 (46 pages)
- 2161DS-2 (56 pages)
- 5316M (15 pages)
- PowerConnect M6348 (737 pages)
- PRECISION 530 (8 pages)
- PRECISION 530 (126 pages)
- PRECISION 530 (300 pages)
- INFINISCALE III M2401G (27 pages)
- POWEREDGE RADI H700 (29 pages)
- ? PowerEdge 6800 (31 pages)
- POWEREDGE M1000E (34 pages)
- POWEREDGE M1000E (41 pages)
- POWEREDGE M1000E (2 pages)
- POWEREDGE M1000E (72 pages)
- POWEREDGE M1000E (1168 pages)
- POWEREDGE M1000E (382 pages)
- POWEREDGE M1000E (1080 pages)
- POWEREDGE M1000E (370 pages)
- POWEREDGE M1000E (14 pages)
- POWEREDGE M1000E (268 pages)
- POWEREDGE M1000E (116 pages)
- POWEREDGE M1000E (86 pages)
- POWEREDGE M1000E (2 pages)
- POWEREDGE M1000E (94 pages)
- POWEREDGE M1000E (260 pages)
- POWEREDGE M1000E (138 pages)
- POWEREDGE M1000E (8 pages)
- POWEREDGE M1000E (96 pages)
- POWEREDGE M1000E (1682 pages)
- POWEREDGE M1000E (108 pages)
- POWEREDGE M1000E (58 pages)
- POWEREDGE M1000E (1316 pages)
- POWEREDGE M1000E (7 pages)
- POWEREDGE M1000E (146 pages)
- POWEREDGE M1000E (23 pages)
- POWEREDGE M1000E (144 pages)
- POWEREDGE M1000E (27 pages)
- POWEREDGE M1000E (22 pages)
- POWEREDGE M1000E (168 pages)