4 bridge port roles – ZyXEL Communications ZyWALL 2 Plus User Manual
Page 149
Chapter 7 Bridge Screens
ZyWALL 2 Plus User’s Guide
149
7.4 Bridge Port Roles
Use the Port Roles screen to set ports as part of the LAN, DMZ and/or WLAN interface.
Ports 1~4 on the ZyWALL can be part of the LAN, DMZ or WLAN interface.
To change your ZyWALL’s port role settings, click NETWORK > BRIDGE > Port Roles.
The screen appears as shown.
The radio buttons correspond to Ethernet ports on the front panel of the ZyWALL. On the
ZyWALL, ports 1 to 4 are all LAN ports by default.
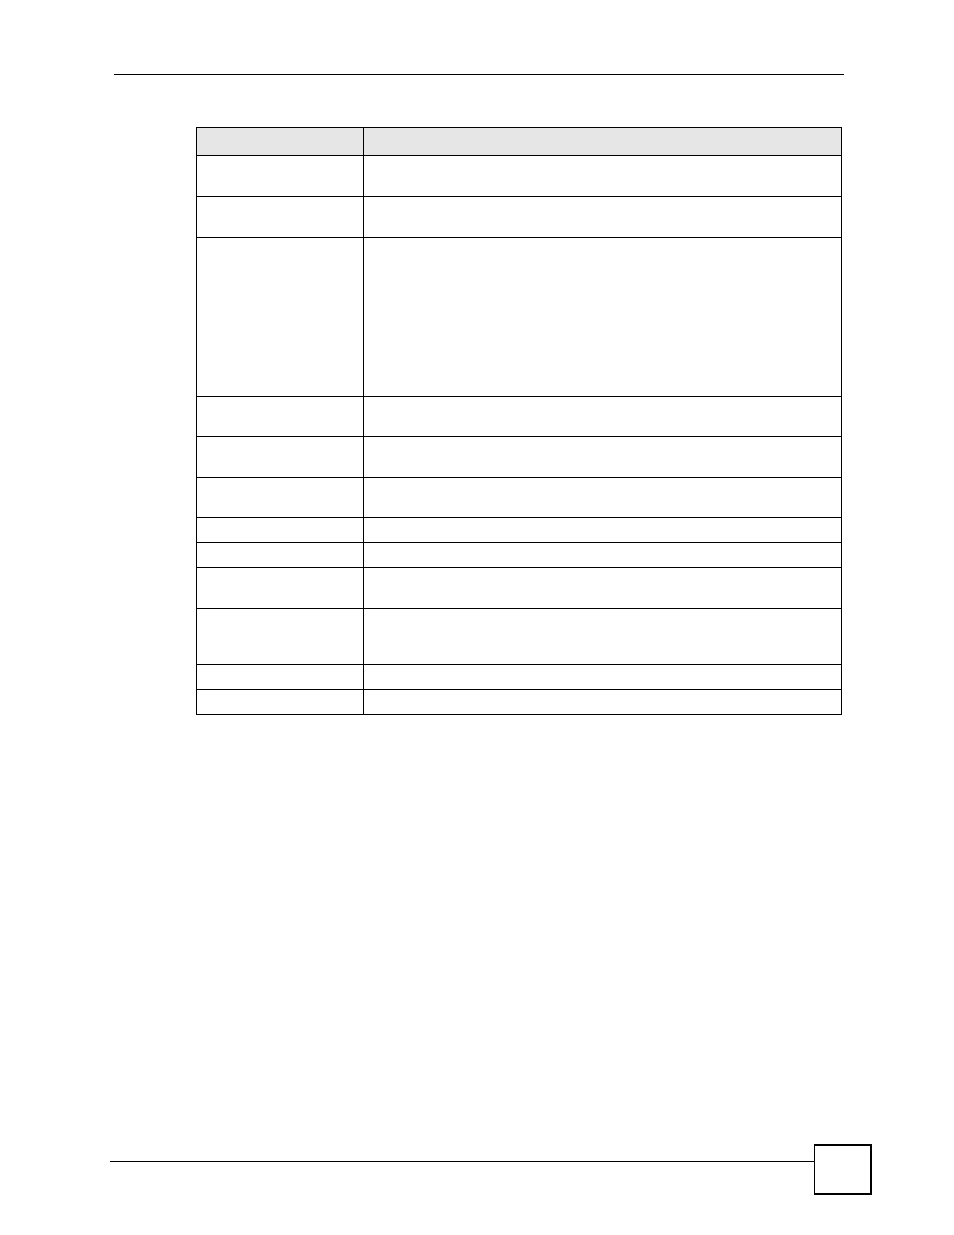
Rapid Spanning Tree
Protocol Setup
Enable Rapid Spanning
Tree Protocol
Select the check box to activate RSTP on the ZyWALL.
Bridge Priority
Enter a number between 0 and 61440 as bridge priority of the ZyWALL.
Bridge priority is used in determining the root switch, root port and
designated port. The switch with the highest priority (lowest numeric value)
becomes the root. If multiple devices have the lowest priority, the device
with the lowest MAC address becomes the root.
The lower the numeric value you assign, the higher the priority for this
bridge.
Bridge Priority determines the root bridge, which in turn determines Hello
Time, Max Age and Forward Delay.
Bridge Hello Time
Enter an
interval (between 1 and 10) in seconds that the root bridge
waits before sending a hello packet.
Bridge Max Age
Enter an interval
(between 6 and 40) in seconds
that a bridge waits to
get a Hello BPDU from the root bridge.
Forward Delay
Enter the length of time
(between 4 and 30) in seconds
that a bridge
remains in the listening and learning port states. The default is 15 seconds.
Bridge Port
This is the bridge port type.
RSTP Active
Select the check box to enable RSTP on the corresponding port.
RSTP Priority
0(Highest)~240(Lowest)
Enter a number between 0 and 240 as RSTP priority for the corresponding
port. 0 is the highest.
RSTP Path Cost
1(Lowest)~65535(Highe
st)
Enter a number between 1 and 65535 as RSTP path cost for the
corresponding port. 65535 is the highest.
Apply
Click Apply to save your changes back to the ZyWALL.
Reset
Click Reset to begin configuring this screen afresh.
Table 28 NETWORK > Bridge (continued)
LABEL
DESCRIPTION