Wiring the rs-232c cable, Chapter 3 connection and installation – KEYENCE BL-600 Series User Manual
Page 31
Chapter 3 Connection and Installation
21
3
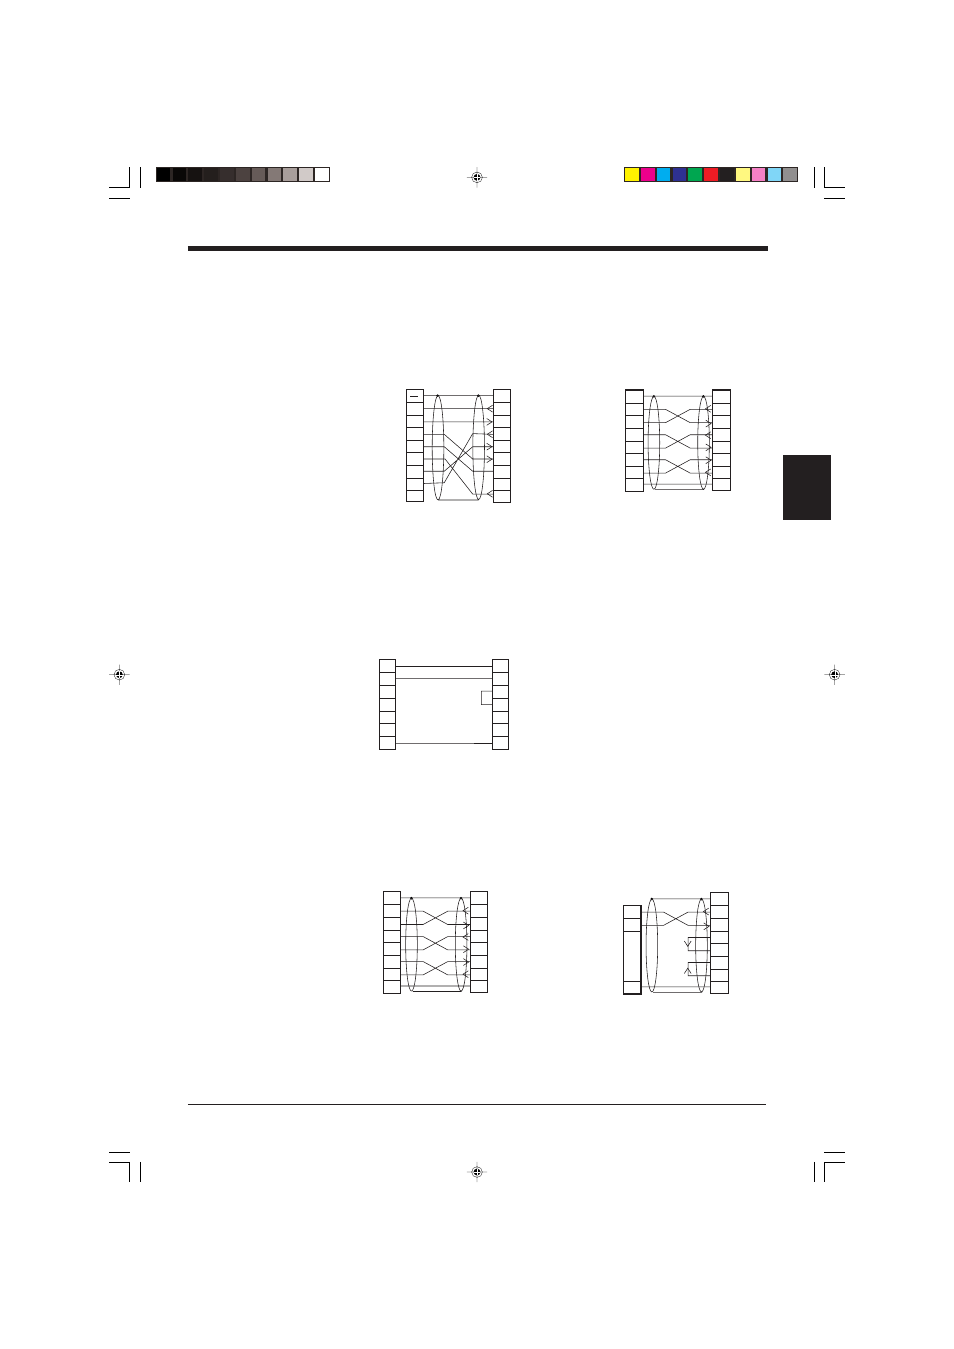
Wiring the RS-232C cable
Connect the BL-U1 to a personal computer or other devices with the following
wiring.
■ Connecting a PC
9-pin serial port
25-pin serial port
■ Connecting NEW KV Series/Communication port
KV-10/16/24/40
■ Connecting KV-L2*
Port 1
Port 2
2
PC
SD
CD
RD
RS
CS
DR
SG
ER
3
4
5
6
2
1
BL-U1
SD
FG
RD
SG
RS
CS
DR
ER
3
4
5
6
7
8
7
8
20
1
D-sub 25-pin (male)
M2.6 screw
Connector case
D-sub 9-pin (female)
#4-40 screw
2
PC
SD
RD
RS
CS
DR
ER
SG
3
4
5
6
2
1
1
BL-U1
SD
FG
FG
RD
RS
CS
DR
ER
SG
3
4
5
6
20
7
20
7
D-sub 25-pin (male)
M2.6 screw
D-sub 25-pin (male)
M2.6 screw
* KEYENCE option OP-22149 (1.5 m)
or commercially available cross cable
can be used.
* KEYENCE option OP-22149 (1.5 m)
and OP-25057 (conversion connec-
tor) can be used.
5
3
4
3
2
4
5
6
20
7
BL-U1
Communication port
D-sub 25-pin (male)
M2.6 screw
RJ11
RD
SD
SG
RD
RS
SD
CS
DR
ER
SG
* KEYENCE option OP-96368 (2.5 m)
and OP-96369 (conversion connec-
tor) can be used.
2
KV-L2
SD
RD
RS
CS
DR
ER
SG
3
4
5
6
2
1
1
BL-U1*
SD
FG
FG
RD
RS
CS
DR
ER
SG
3
4
5
6
20
7
20
7
D-sub 25-pin (male)
M2.6 screw
D-sub 25-pin (male)
M2.6 screw
3
KV-L2
SD
RD
SG
5
2
1
BL-U1*
SD
FG
RD
RS
CS
DR
ER
SG
3
4
5
6
20
7
1
D-sub 25-pin (male)
M2.6 screw
Terminal block
* KEYENCE option OP-22149 (1.5 m) or
commercially available cross cable can be
used.