Lenovo ThinkPad R400 User Manual
Page 193
program,
and
install
themselves
in
the
physical
service
partition.
If
you
install
the
ThinkVantage
Rescue
and
Recovery
product
as
part
of
a
Smart
Image,
do
not
use
the
Delete
all
setting
in
the
Image
Cleanup
tab
of
your
base
map.
3.
The
ThinkVantage
Rescue
and
Recovery
product
can
not
be
preinstalled
on
the
donor
system
before
creating
a
portable
Sysprep
image.
It
must
be
installed
as
a
separate
application
module.
4.
If
the
base
map
uses
the
service
partition
in
the
back:
v
Rescue
and
Recovery
for
Windows
XP
will
use
the
service
partition.
v
Rescue
and
Recovery
for
Windows
Vista
will
use
the
virtual
partition.
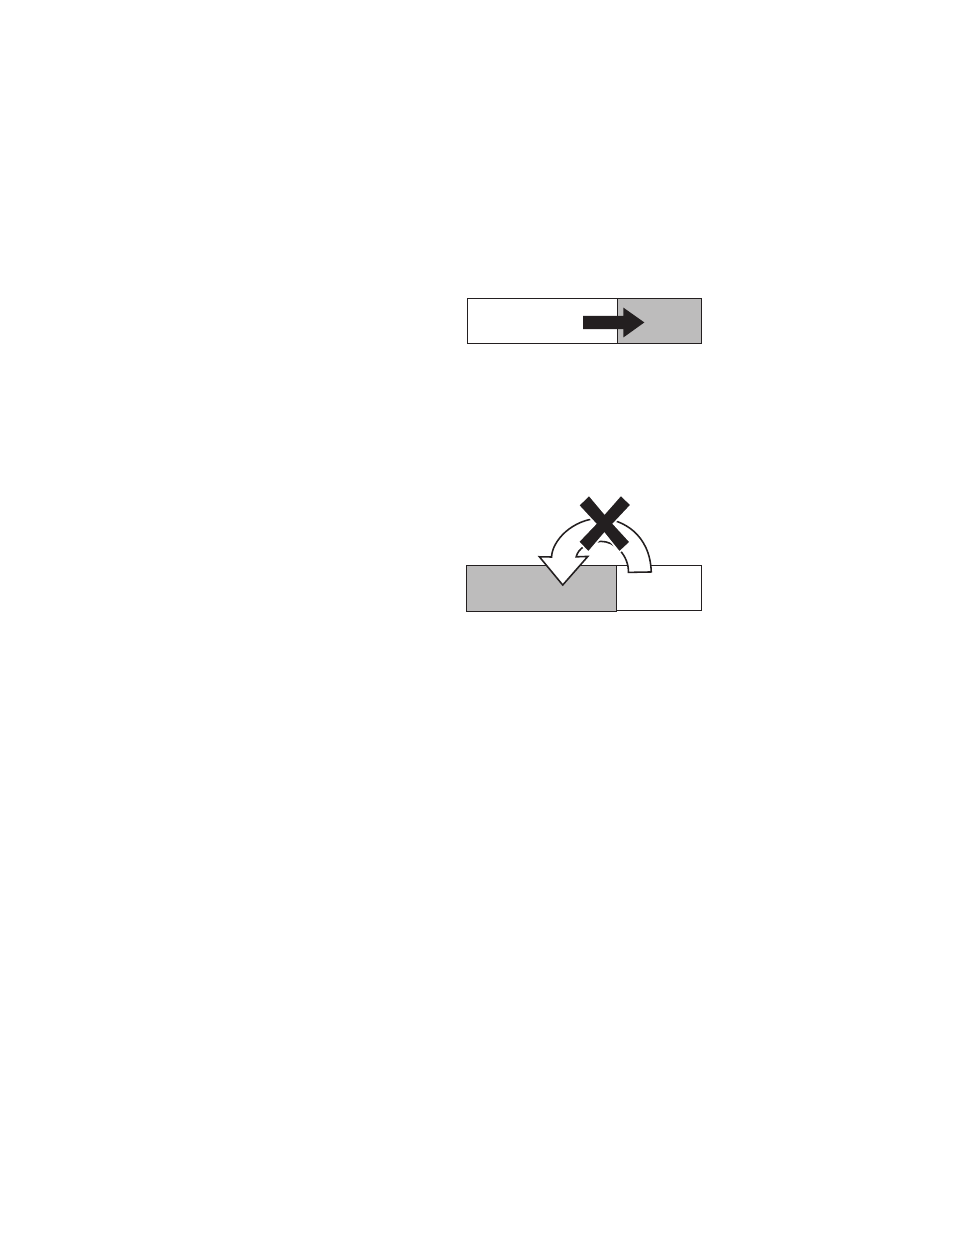
Virtual
Partition
Service
Partition
Note:
F11
goes
to
the
virtual
partition.
The
virtual
partition
has
a
link
that
goes
to
the
service
partition
(Restore
to
Factory
Contents).
5.
If
the
base
map
uses
the
service
partition
in
the
front:
v
Rescue
and
Recovery
for
Windows
Vista
will
use
the
service
partition.
v
Rescue
and
Recovery
for
Windows
XP
will
use
the
virtual
partition.
Service
Partition
Virtual
Partition
Note:
F11
goes
to
the
virtual
partition.
There
is
no
link
that
goes
to
the
service
partition.
Restore
to
Factory
Contents
link
is
present
but
it
does
not
recognize
a
service
partition
in
the
front
of
the
hard
disk
drive.
This
scenario
is
not
recommended
as
it
will
prevent
you
from
ever
using
the
service
partition
again.
Installing
images
on
a
target
computer
after
deployment:
In
a
standard
network
installation
(network-deployment
with
local
installation)
or
an
installation
from
ImageUltra
Distribution
Media,
the
first
boot
cycle
following
the
end
of
deployment
starts
the
installation
process.
The
following
sequence
of
events
takes
place
during
the
installation
process:
1.
An
installation
menu
is
displayed
on
the
screen
of
the
target
computer.
The
content
and
behavior
of
this
menu
is
controlled
by
the
base
map.
The
person
performing
the
installation
makes
selections
from
the
menu.
The
installation
program
collects
modules
associated
with
the
selected
menu
items
until
all
required
modules
are
accumulated.
2.
The
accumulated
operating-system
modules
and
application
modules
are
decompressed
and
copied
to
the
C
partition.
3.
The
device-driver
modules
defined
in
the
driver
map
are
decompressed
and
copied
to
the
appropriate
folder
in
the
C
partition.
4.
Depending
on
the
type
of
image
you
are
installing,
either
a
complete
Windows
setup
or
a
continuance
of
the
configuration
passes
begins.
If
you
are
installing
an
Ultra-Portable
Image,
a
full
Windows
setup
operation
begins.
If
you
are
installing
a
Portable-Sysprep
Image,
a
continuation
of
the
configuration
passes
begins.
Chapter
10.
Using
ImageUltra
Builder
and
Windows
Vista
179
- THINKPAD X60 ThinkPad T43 ThinkPad R61e THINKPAD T61 ThinkPad X301 ThinkPad R50e ThinkPad R50p ThinkPad X40 ThinkPad SL300 ThinkPad SL400 ThinkPad X200 ThinkPad T500 ThinkPad R51 ThinkPad T41 ThinkPad T60 ThinkPad X61 Tablet ThinkPad X41 Tablet ThinkPad X61s THINKPAD X61 ThinkPad R61 ThinkPad X200 Tablet ThinkPad Z61e ThinkPad T400 ThinkPad R61i ThinkPad R52 ThinkPad R50 ThinkPad W700 ThinkPad R500 ThinkPad SL500 ThinkPad X200s THINKPAD Z60M ThinkPad W500 ThinkPad T61p ThinkCentre A30 ThinkPad T42 THINKPAD T40 ThinkPad X300 ThinkCentre M55e