Assigning utilities to base maps, Assigning, Utilities – Lenovo ThinkPad R400 User Manual
Page 101: Base, Maps
4.
Create
links
under
each
utility
menu
item.
Each
link
provides
a
path
after
the
utility
runs
that
would
not
otherwise
exist.
This
link
usually
returns
the
user
to
custom
utility
menu.
5.
For
each
utility
menu
item,
click
View
then
Properties
to
open
the
Menu
Item
Properties
window,
click
the
Submenu
tab,
and
place
a
check
mark
in
the
Automatically
select
single
item
check
box.
6.
Create
a
subordinate
menu
item
(usually
something
like
“Return
to
the
previous
menu”
or
“Exit
the
utility
menu”)
that
enables
the
person
performing
the
installation
to
return
to
the
previous
menu;
then,
create
a
link
under
it
to
the
previous
menu.
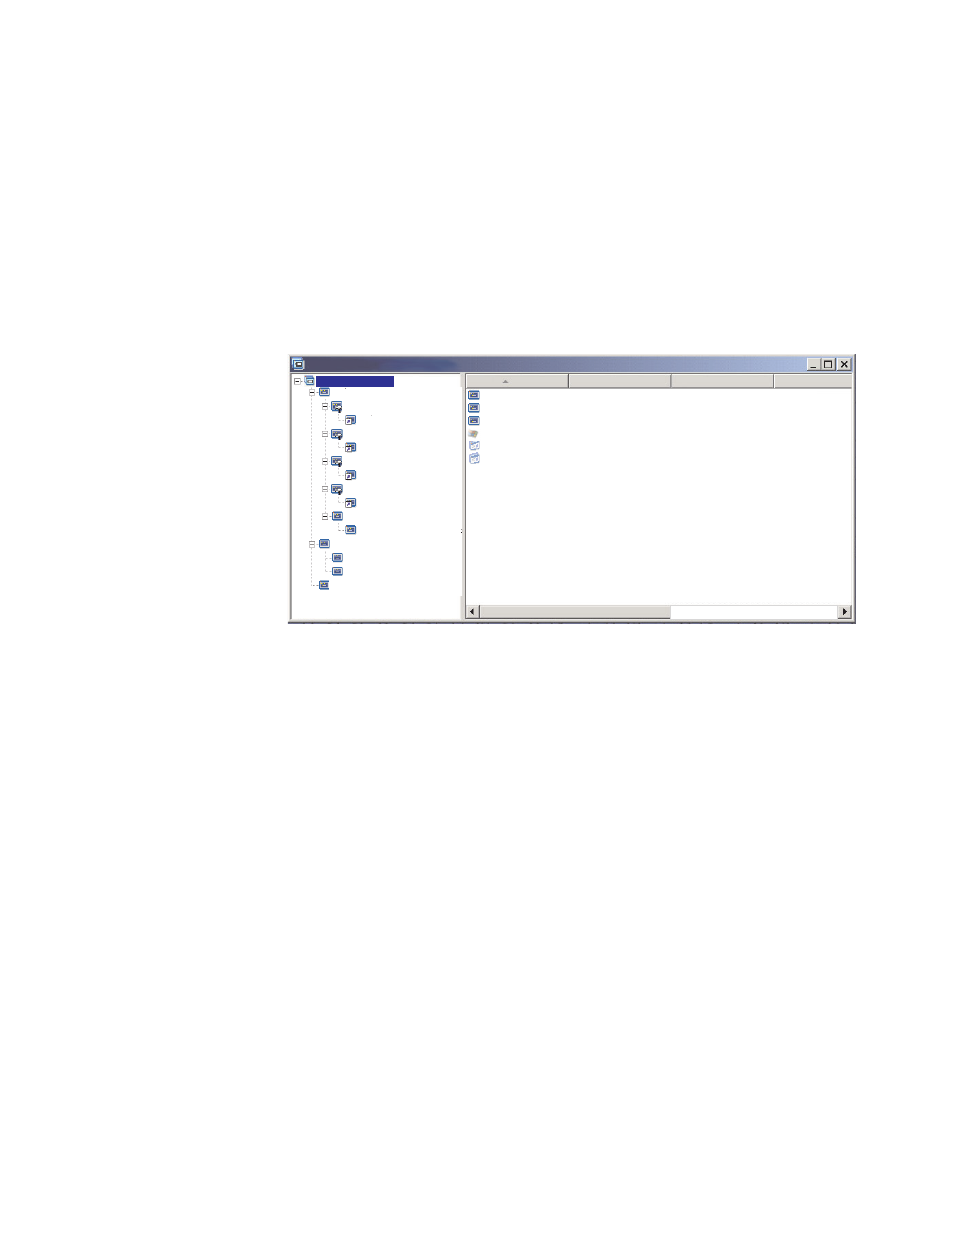
The
following
illustration
shows
the
structure
associated
with
implementing
a
custom
utility
menu.
Sample base map : Base Map *
Name
Version
Type
State
Global_Application_1
Global_Application_2
Windows 2000
Windows XP Prof...
Utilities Menu
Application
Application
Menu Item
Menu Item
Menu Item
In Test
In Test
Sample base map
Utilities Menu
Utilities Menu
Utilities Menu
Utilities Menu
Utilities Menu
Utility 1
Utility 2
Utility 3
Utility 4
Windows XP Professional
French
English
Windows 2000
Return to previous menu
Link to Sample Base Map
Delete all user partitions
Operating System
Assigning
utilities
to
base
maps
You
assign
utilities
at
a
map
level
through
the
Map
Settings
window
of
the
base
map.
The
Before/After
Menu
Options
tab
enables
you
to
define
all
of
the
utilities
you
want
to
run
before
the
first
installation
menu
is
displayed
or
immediately
after
the
final
selection
is
made
from
the
final
installation
menu,
but
before
any
modules
get
installed.
Unlike
utilities
that
get
assigned
to
menu
items,
utilities
that
get
assigned
at
a
map
level
have
no
dependencies
on
specific
menu
items
being
selected.
To
assign
one
or
more
utilities
at
a
map
level,
do
the
following:
1.
In
the
left
pane
of
the
Base
map
window,
highlight
the
root
entry
or
any
menu
item.
2.
In
the
Main
window
menu
bar,
click
Tools
,
and
then
click
Settings...
.
The
Map
Settings
window
opens.
3.
Click
the
Before/After
Menu
Options
tab.
4.
Click
either
the
Before
user
menus
or
After
user
menus
radio
button,
depending
on
when
you
want
the
utilities
to
run.
5.
Click
the
Insert
Utility
icon.
The
Add
Utility
window
opens.
6.
In
the
Name
field,
use
the
drop-down
menu
to
select
the
utility
you
want
to
add.
7.
If
your
repository
contains
folders,
use
the
left
pane
of
the
Add
Utility
window
to
navigate
to
the
folder
that
contains
the
utility
you
want
to
add;
then,
click
OK
.
The
Add
Utility
window
closes
and
the
utility
is
added
to
the
Before/After
Menu
Options
tab.
Chapter
6.
Map
construction
overview
87
- THINKPAD X60 ThinkPad T43 ThinkPad R61e THINKPAD T61 ThinkPad X301 ThinkPad R50e ThinkPad R50p ThinkPad X40 ThinkPad SL300 ThinkPad SL400 ThinkPad X200 ThinkPad T500 ThinkPad R51 ThinkPad T41 ThinkPad T60 ThinkPad X61 Tablet ThinkPad X41 Tablet ThinkPad X61s THINKPAD X61 ThinkPad R61 ThinkPad X200 Tablet ThinkPad Z61e ThinkPad T400 ThinkPad R61i ThinkPad R52 ThinkPad R50 ThinkPad W700 ThinkPad R500 ThinkPad SL500 ThinkPad X200s THINKPAD Z60M ThinkPad W500 ThinkPad T61p ThinkCentre A30 ThinkPad T42 THINKPAD T40 ThinkPad X300 ThinkCentre M55e