Reznor ZQYRA Unit Installation Manual User Manual
Page 63
Form I-ZQYRA P/N 260414R5, Page 63
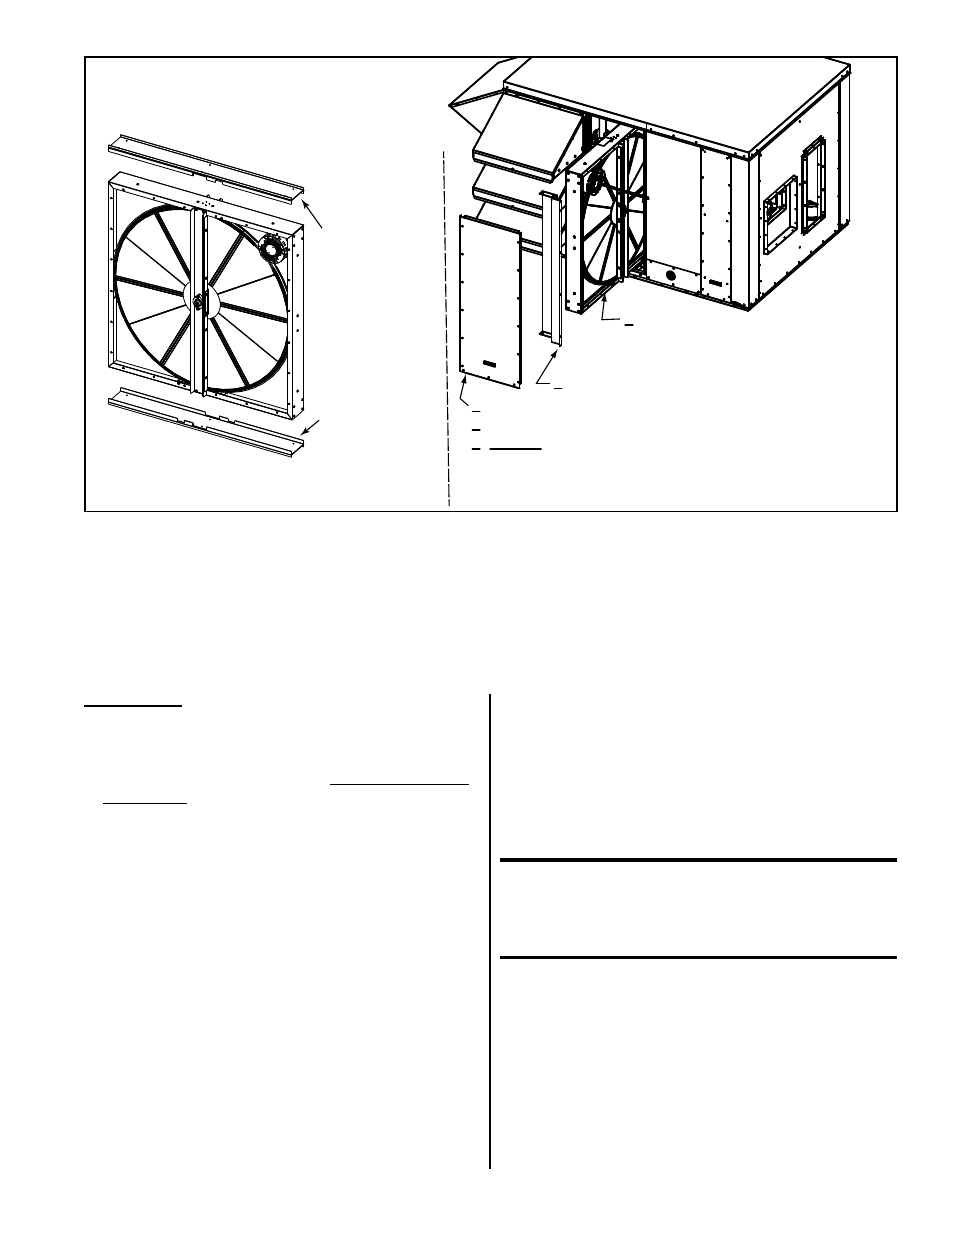
Top and bottom
wheel supports
will slide out
with the wheel.
When returning
the wheel to the
cabinet, match
the notches with
the bearing
supports.
1) Turn the power off to the unit.
2) Remove the wheel access panel.
3) Size 12 - On the post to the right of the wheel, remove
the screws holding the outside air sensor. Move the
sensor so that it does not interfere with wheel removal.
wheel removal.
4) Remove blockoff panel.
5) Disconnect the plug in the
wheel motor wiring and slide the
entire cassette out of the cabinet.
FIGURE 33 - Removing Energy Recovery
Wheel Cassette
According to the manufacturer, a wheel operating in a “clean” environment may not require annual cleaning, but a wheel
in a “contaminated” environment may require multiple cleanings a year to maintain airflow and recovery. The segmented
design of the wheel not only provides for easier cleaning but also allows for replacement of individual dirty segments.
Replacement part numbers are available from your distributor or at www.RezSpec.com.
Removing, Cleaning,
and Replacing Wheel
Segments
The segments are the “heat exchangers” of the energy recovery wheel. Segments
must be handled with care and should never be dropped. Segments may require
“slight” persuasion during installation and removal but NEVER be forced or banged
with a hammer or similar tool.
Instructions:
1. T
urn off power to the unit and follow steps in
FIGURE 33 to slide the wheel cassette out of the
cabinet.
2. Remove the Wheel Segments (from the pulley side
of the wheel)
a) Rotate the wheel to position the first segment to be
removed at the top. On both sides of the segment,
unlock and open the two retaining straps.
b) Using hand pressure only and supporting the
segment, from the motor side push the wheel
segment. On the pulley side, lift the segment out of
the spokes. Lay, do not drop, the segment on a flat
surface
c) Rotate the wheel so that the segment on the
opposite side is on the top. Repeat the procedure
and remove the segment. Continue the procedure
of keeping the balanced open and filled segments
opposite each other and remove all of the
segments.
3. Clean the Wheel Segments
a) Gently brush off any loose dirt and dust.
b) To wash the segments, use a non-acid based
(evaporator) coil cleaner or alkaline detergent
solution. Non-acid based coil cleaner concentrate
in a 5% solution is recommended by the
manufacturer. DO NOT use acid based cleaners,
aromatic solvents, temperatures in excess of 170°F,
or steam as these may cause damage to the wheel.
DO NOT use a pressure washer.
Soak the segments in the cleaning solution until
grease and tar deposits are loosened. An overnight
soak may be required to adequately loosen heavy
deposits of oil based contaminants.
CAUTION: DO NOT use acid based cleaner,
aromatic solvent, steam, temperatures in
excess of 170°F, or a pressure washer, as
damage to the wheel may occur.
c) Rinse the dirty solution from each segment until
the water runs clear.
NOTE: Some staining of
the desiccant may remain and is not harmful to
performance. Allow excess water to drain from the
segments before reinstalling them in the wheel.
(
NOTE: A small amount of water will dry out in the
airflow.)
4. Replace or Re-install Clean Wheel Segments (from
pulley side of wheel)
a) Remove any dirt or dust from the wheel and
cassette and the slide-in area of the cabinet.