Figure 13d - attach top hood – Reznor ZQYRA Unit Installation Manual User Manual
Page 11
Form I-ZQYRA P/N 260414R5, Page 11
A
B
A
B
Size 8 - 7-1/2” (191mm)
Size 12 - 10” (254mm)
Measure up from
the cabinet bottom.
Left
Side
Right
Side
Top
Bottom
FIGURE 13A - Attach
Gasket Strips
FIGURE 12 - View
of installed hoods
showing that the
assembled inlet air
hoods attach to the
outside of the cabinet
corner post.
Refer to
FIGURE 10,
page 9, and FIGURE 12
below for appearance of
installed hoods.
- Size 12 - 10” (254mm)
At that point starting at the corner,
mark a straight horizontal line.
Position one of the 23” (584mm)
gasket strips with the bottom edge on
the line. Adhere the gasket.
2nd - SIDE Gasket Strips (B) -
Left Side - Starting even with the
bottom of the horizontal gasket strip,
position the side strip on the edge of
the corner post (around the corner
from the opening). Clean the surface.
Starting at the bottom, adhere the
gasket strip.
Right Side - On the post or damper
frame on the right of the opening, starting at the bottom, adhere the gasket
strip vertically up the side of the opening.
3rd - TOP Gasket Strip (A) - Position the top strip horizontally across the top
connecting the two side strips. Clean the surface and adhere the gasket.
3. Assemble and Install the Bottom Hood Using Screws from the Hardware Bag
a) Assemble the hood as illustrated in
FIGURE 13B, except for installing the filter
(M) and the filter access panel (K).
D
Top for Bottom
& Middle Hood
E
Right Side
Panel
F
G
H
J
K
M
N
Front Cross
Bracket - 21-15/16”
(557mm) long
Filter
Front Filler Plate
(Size 8 only)
Filter Access
Rear Cross
Bracket -
22-13/16”
(579mm) long
Left Side
Panel
Side Filter
Bracket (2)
FIGURE 13B - Assemble Bottom Hood
M
Filter
K
Filter Access
Top was
already attached
to the hood sides
in Step 3a.
NOTE: Size 12 is illustrated. Size 12 does not have a
filler plate (N). Procedure is the same for both sizes.
FIGURE 13C -
Attach Bottom
Hood
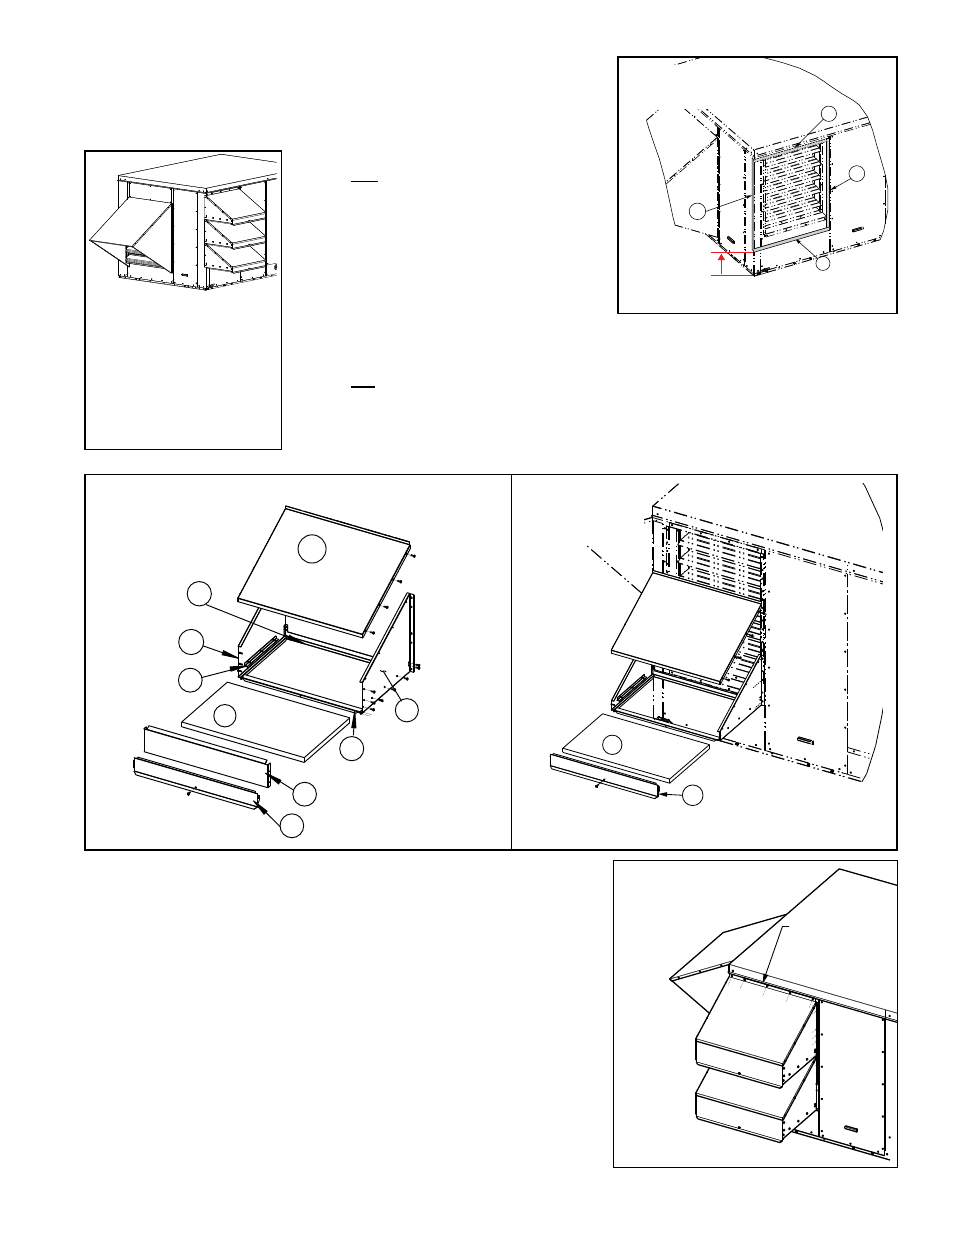
FIGURE 13D -
Attach Top
Hood
When attaching
the top hood, slide
the hood flange
under the edge of
the cabinet top.
NOTE: Size 8
is illustrated.
Procedure is
the same
for Size 12.
b) Attach the assembled hood; refer to
FIGURE 13C. Position the hood so
that the rear cross bracket is on the bottom gasket strip, the left side is
on the gasket strip on the corner post, and the right side on the other
gasket strip. On the right side, match the holes under the gasket strip
with the holes in the hood side panel. Adjust hood location slightly as
needed and attach with screws. Being sure the holes match, attach
the left side of the hood to the corner post.
c) Slide the filter (M) in place and attach the filter access panel (K).
4. Size 12 only - Repeat the procedure in Step 3a (FIGURE 13B) to
assemble the middle hood. Position it above the bottom hood. Line up
the holes on the right side and attach the hood. Attach the left side to
the corner post.
Slide the filter in place and attach the filter access panel.
5. Using the hood top with the longer flange, repeat the procedure in Step
3a (
FIGURE 13B) to assemble the last hood.
When positioning the hood on the cabinet (
FIGURE 13D), slide the