Occupancy config menu – Reznor ZQYRA Unit Installation Manual User Manual
Page 45
Form I-ZQYRA P/N 260414R5, Page 45
6H. TAB MENU
To access a certain menu, use up or down arrow button. At the selected Menu, press the enter button. Use the up or down arrow
button to change the value, then press the enter button. Use the Esc button to get back to the Service Menu.
Control Display
Description
Range
Factory Default
--TAB MENU--
Page 1:
To Start the TAB Process, set the mode to "TAB". This will allow 3 hrs of override
Mode: Tab Mode Command
Off/TAB
Off
↓ Next
Next menu
Page 2: (Only shown when Mode sets to TAB)
--TAB MENU--
TAB Mode: Current TAB Mode
Fan Relay: Supply Air and Exhaust Air Fan Command
On/Off
Off
SaFanSpdSetpt: Supply Air Fan Speed Command
0-100%
18%
ExFanSpdSetpt: Exhaust Air Fan Speed Command
0-100%
29%
Write Fan TAB Speeds to
Speed Setpts:
This takes the temporary TAB setpoints and writes them to the permanent
speed setpoints and also creates a backup copy of the TAB setpoints.
Yes/No
No
↓ Next
Next menu
Page 3: (Only shown when unit is in the manual test mode)
↑ Previous
Previous menu
ER Wheel: Energy Recovery Wheel Command
On/Off
Off
Comp Mode: Heat Pump Mode Command
Off/Heat/Cool
Off
Comp Enable: Heat Pump Command (HP Mode should be set first)
On/Off
Off
Comp Output: Heat Pump Modulation Output Percentage
0-100%
0%
ER Wheel Temp Energy Recovery Wheel Discharge Temperature
Unit DA Temp: Unit Discharge Air Temperature
↓ Menu Top
Returns to the top of the menu
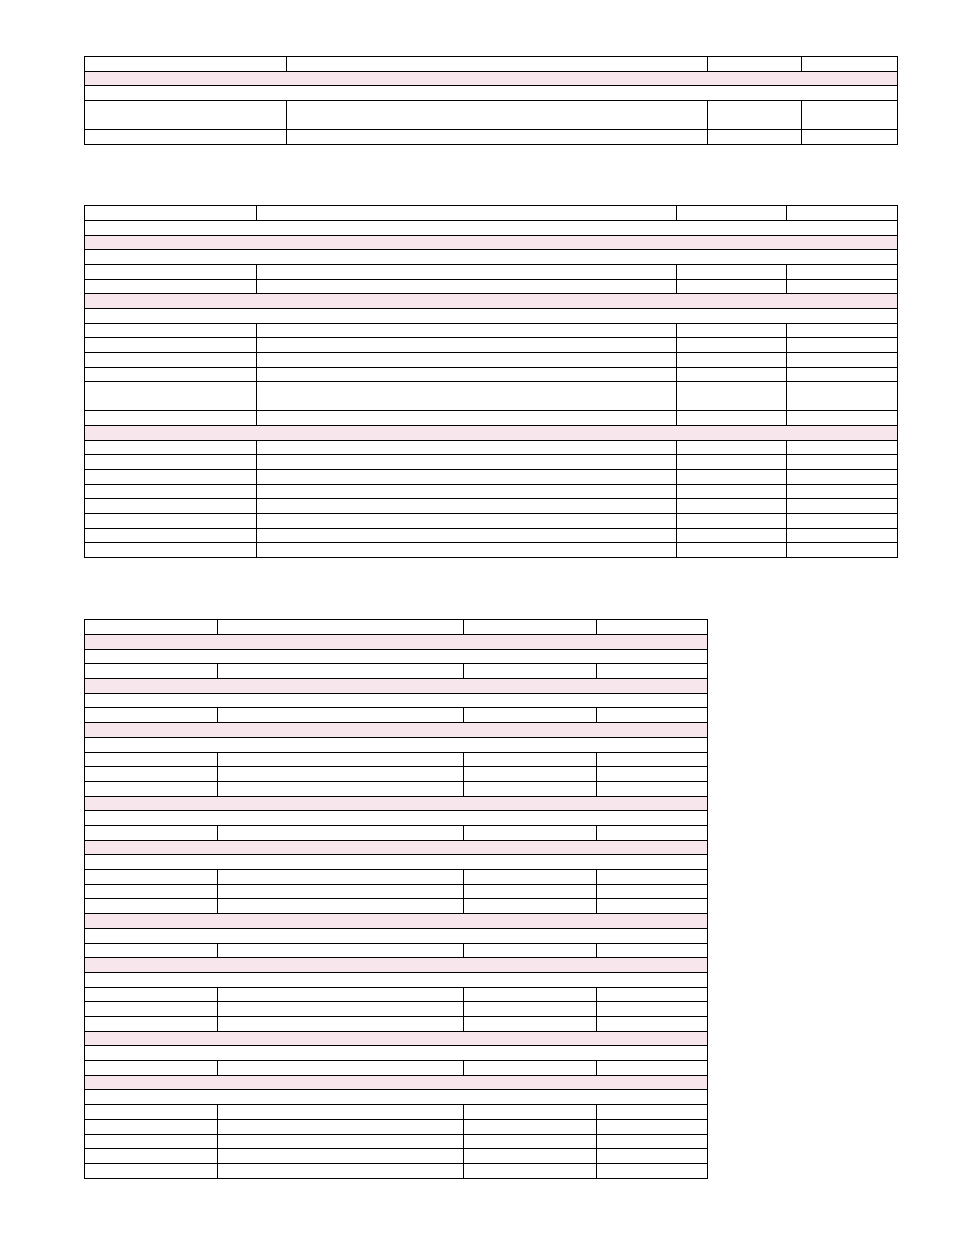
7. OCCUPANCY CONFIG MENU
To access a certain menu, use up or down arrow button. At the selected Menu, press the enter button. Use the up or down arrow
button to change the value, then press the enter button. Use the Esc button to get back to the Main Menu.
Control Display
Description
Range
Factory Default
Page 1:
--Occupancy Setup--
Occ Type: Current Command of Wheel.
1 - 8
1
Page 2: (Only shown when Occ Type is 1)
I want to control the unit using a Manual On/Off Switch.
↓ Configure
Configure menu
Page 3: (Only shown when Occ Type is 1)
--Occupancy Type 1--
Occ Type: Current Occupancy Type
1
CN Option: Current CN Option
CN5
↓
Returns to Page 1
Page 2: (Only shown when Occ Type is 2)
I want to control the unit using an Occ Sensor.
↓ Configure
Configure menu
Page 3: (Only shown when Occ Type is 2)
--Occupancy Type 2--
Occ Type: Current Occupancy Type
2
CN Option: Current CN Option
CN7D
↓
Returns to Page 1
Page 2: (Only shown when Occ Type is 3)
I want to control the unit using an external time clock.
↓ Configure
Configure menu
Page 3: (Only shown when Occ Type is 3)
--Occupancy Type 3--
Occ Type: Current Occupancy Type
3
CN Option: Current CN Option
CN7A
↓
Returns to Page 1
Page 2: (Only shown when Occ Type is 4)
I want to control the unit using internal or BAS Schedule.
↓ Configure
Configure menu
Page 3: (Only shown when Occ Type is 4)
--Occupancy Type 4--
Occ Type: Current Occupancy Type
4
CN Option: Current CN Option
CN5
Schedule: Sets the Schedule
None / Local / BAS
Local
DI Override: Sets the DI Override
Off / On
Off
Schedule Cmd: Current BAS Schedule Command Status
↓ Next
Next menu
Page 3:
DEFAULT INSTALLATION
Restore all settings to
“as-shipped” factory values:
This allows the user to restore all setpoints back to their original factory
settings
No / Yes
No
↓ Menu Top
Returns to the top of the menu