Watlow EZ-ZONE RMH User Manual
Page 116
Watlow EZ-ZONE
®
RMH Module
•
113
•
Chapter 6 Features
lighted (address 6) to bring greater clarity to the con-
trol in focus. Any EZ-ZONE device on the network
will appear in this window and would be available
for the purpose of configuration or monitoring. After
clicking on the control of choice simply click the next
button once again. After clicking on Setup and then
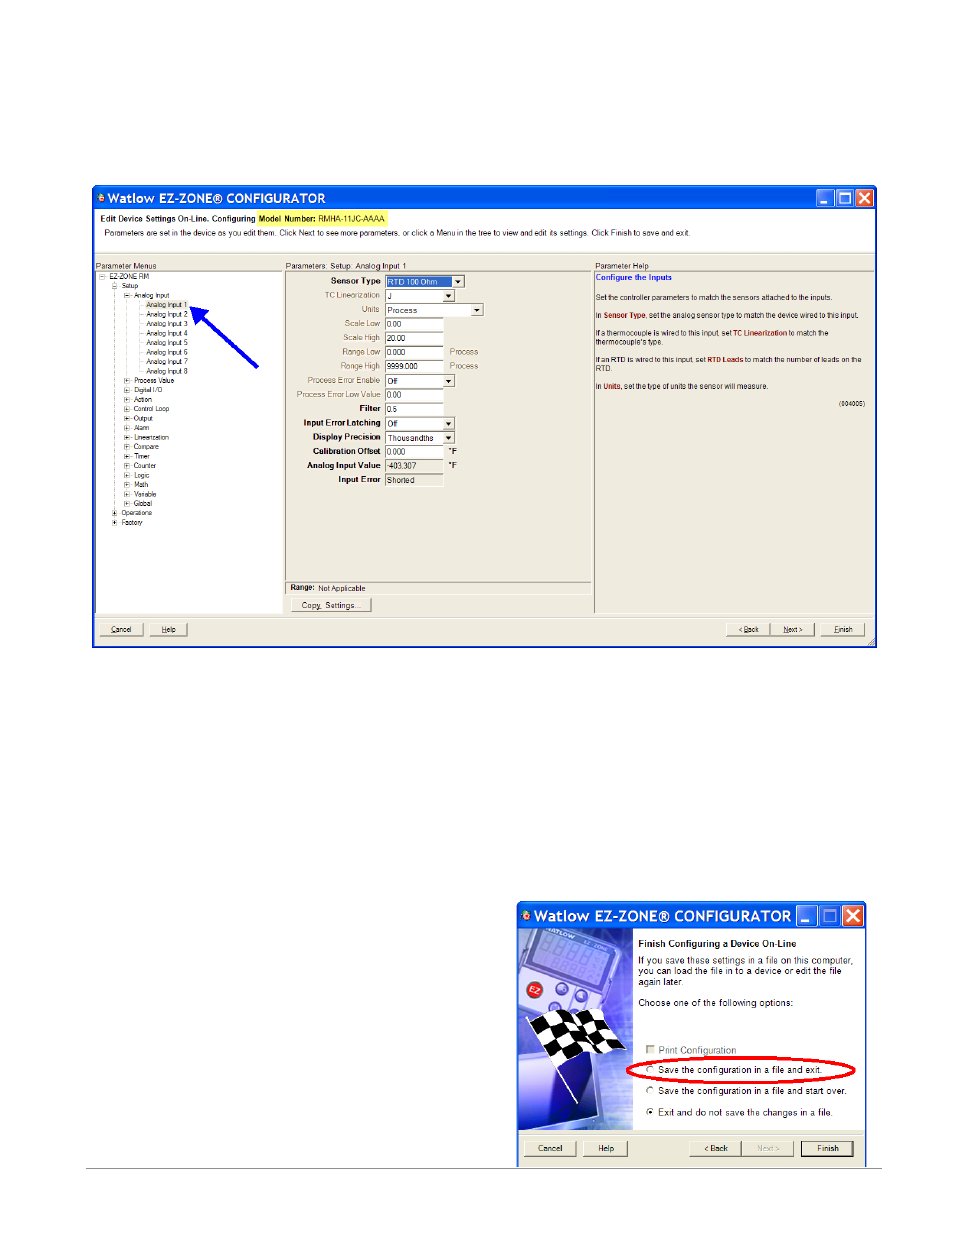
Analog Input 1 the next screen appears below.
In the screen shot above notice that the device part
number is clearly displayed at the top of the page
(yellow highlight added for emphasis). When multiple
EZ-ZONE devices are on the network it is important
that the part number be noted prior to configuring so
as to avoid making unwanted configuration changes
to another control.
Looking closely at the left hand column (Parameter
Menus) notice that when first entering this screen it
displays all of the available Pages (Setup, Operations
and Factory) at a high level. After clicking on any
of the available pages the sub menus and associated
parameters for each will appear as shown above. The
Page structure as laid out within this software fol-
lows:
- Setup
- Operations
- Factory
Navigating from one Page to the next is easy and
clearly visible. Simply clicking on the plus symbol
next to Setup will expand the Setup Page where
all of the sub-menus will appear next. If a vertical
scroll bar appears click on the up or down arrow to
view all of the available menus on the selected page.
Once the focus is brought to an individual parameter
(single click of mouse) as is the case for Analog In-
put 1 in the left column, all that can be setup related
to that parameter will appear in the center column.
The grayed out fields in the center column simply
mean that this parameter does not apply for the type
of sensor selected. As an example, notice that when
RTD is selected,TC Linearization does not apply and
is therefore grayed out.
To speed up the process of configuration notice that
at the bottom of the center column there is an oper-
ation to copy settings. If Analog Input 1 and 2 are
the same type of sensor click on "Copy Settings"
where a copy from to copy to dialog box will appear
allowing for quick duplication of all settings.
Notice too, that by clicking on any of those items in
the center column that context sensitive help will ap-
pear for that particular item in the right hand col-
umn.
Lastly, when the configuration is complete click the
"Finish" button at the bottom right of the previous
screen shot. The screen that follows this action can
be seen below.