Adjusting the picture zoom, Adjusting the picture zoom, Operation and setup, cont’d – Extron Electronics ISM 824 User Manual
Page 58
Operation and Setup, cont’d
ISM 824 Integration Scaling Multiswitcher • Operation and Setup
3-26
Figure 3-37 — Steps 1 and 2 for adjusting picture size
3
.
Use the left front panel encoder (
[
) to adjust the image horizontal size.
Adjustments move only the right side of the image; outwards to make the
image wider, or inwards to make the image narrower.
N
A setting increment widens the picture out to the right, and a setting decrement
narrows the picture in from the right. The vertical dimension does not change,
and the image remains anchored at the active pixel horizontal and vertical start
point, at the top left of the display.
Use the right front panel encoder (
{
) to adjust the image vertical size.
N
A setting increment makes the picture taller, and a setting decrement shrinks the
picture. The horizontal dimension does not change.
With ISM RGB boards, the image remains anchored at the active pixel
horizontal and vertical start point. The vertical size adjustment moves only the
bottom of the image, moving it down to make the image taller or up to make the
image shorter
.
4
.
Press the Esc button to clear all buttons and reset the LCD.
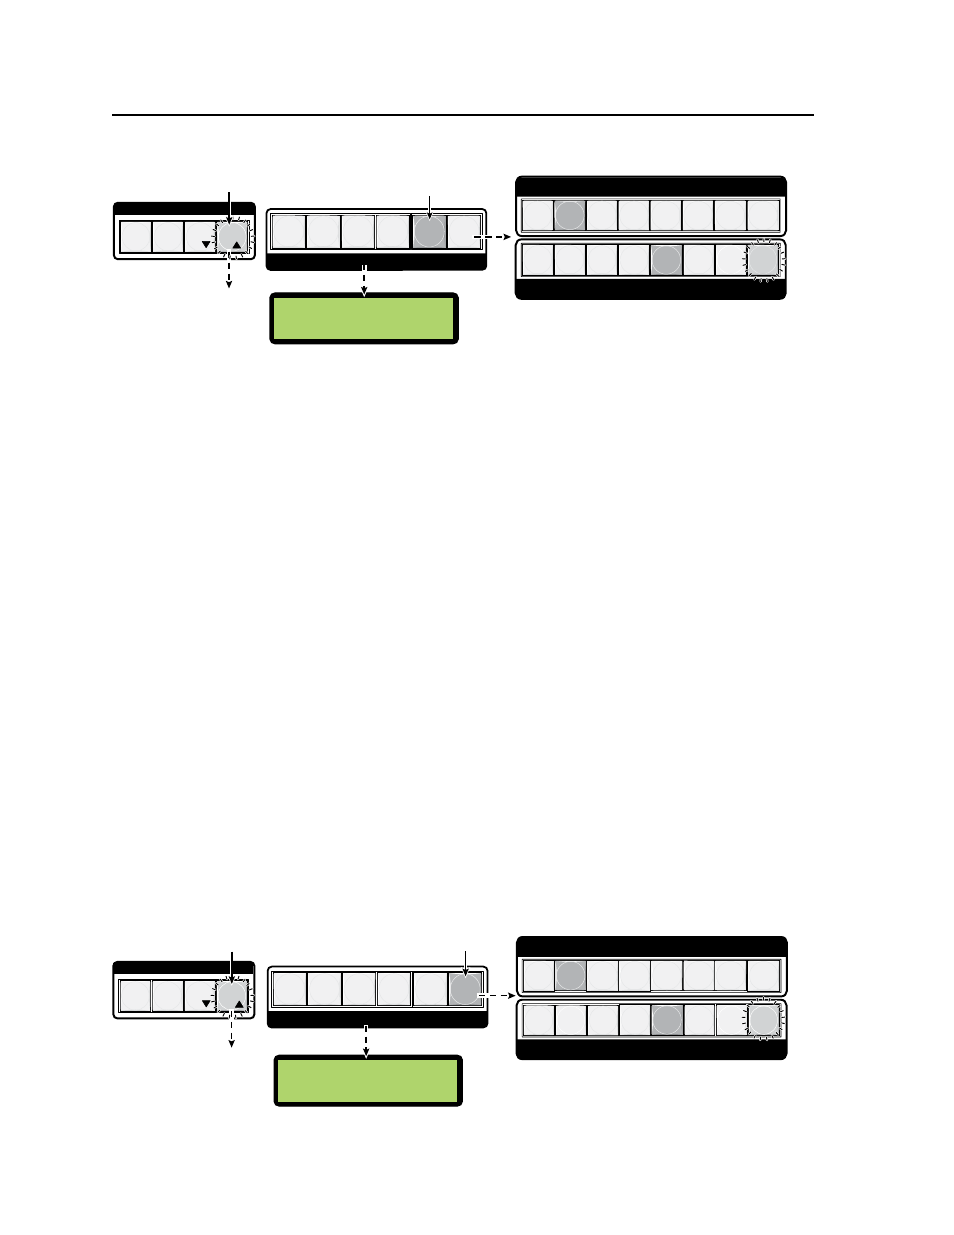
Adjusting the picture zoom
To adjust the picture zoom do the following:
1
.
Press the Esc button to clear all pending changes and reset the LCD.
2
.
Press and release the Zoom adjustment button. The output buttons for scaler
/scan converter boards (outputs 3 through 8) and any associated (tied) input
buttons light solid green. Untied outputs flash green. The LCD panel shows
the current zoom setting (see figure 3-38) for that lit output.
N
All applicable outputs light or flash green. To change to a different output, press
the desired output button. The selected button will light green.
Figure 3-38 — Steps 1 and 2 for adjusting picture zoom
H=1024 V=0768
Out #5 Si
ze
1 2
4
3
6 7 8
OUTPUTS
INPUTS
Step 2.
Press the Size button. The button lights
green.
Step 1.
Press the Esc button to
clear all selections.
The Esc button flashes
green once.
C O N T R O L
PRESET
ENTER
ESC
VIEW
The last selected scaler output card button (#5) and associated
input (#2) light
green. Applicable available outputs flash green.
PICTURE ADJUSTMENTS
ZOOM
COLOR/
TINT
1
5
8
7
6
5
4
3
2
N
The LCD shows the current size setting.
BRIGHT/
CONT
DETAIL POSITION
SIZE
H=1024 V=0768
Out #5 Z
oom
Step 2.
Press the Zoom button. The button lights
green.
Step 1.
Press the Esc button to
clear all selections.
The Esc button flashes
green once.
C O N T R O L
PRESET
ENTER
ESC
VIEW
The last selected scaler output card button (#5) and associated
input (#2) lights
green. Applicable available outputs flash green.
PICTURE ADJUSTMENTS
COLOR/
TINT
N
The LCD shows the current zoom setting.
BRIGHT/
CONT
DETAIL POSITION
SIZE
ZOOM
1 2
4
3
6 7 8
OUTPUTS
INPUTS
1
5
8
7
6
5
4
3
2