2 advanced autotuning by reference procedure, 1) operating procedure – Yaskawa Sigma-5 User Manual: Design and Maintenance - Rotary Motors User Manual
Page 163
5 Adjustments
5.4.2 Advanced Autotuning by Reference Procedure
5-26
5.4.2 Advanced Autotuning by Reference Procedure
The following procedure is used for advanced autotuning by reference.
Advanced autotuning by reference is performed from the Digital Operator (option) or SigmaWin+.
The operating procedure from the Digital Operator is described here.
For basic operations of the Digital Operator, refer to the
Σ
-V series User’s Manual, Operation of Digital Oper-
ator (SIEP S800000 55).
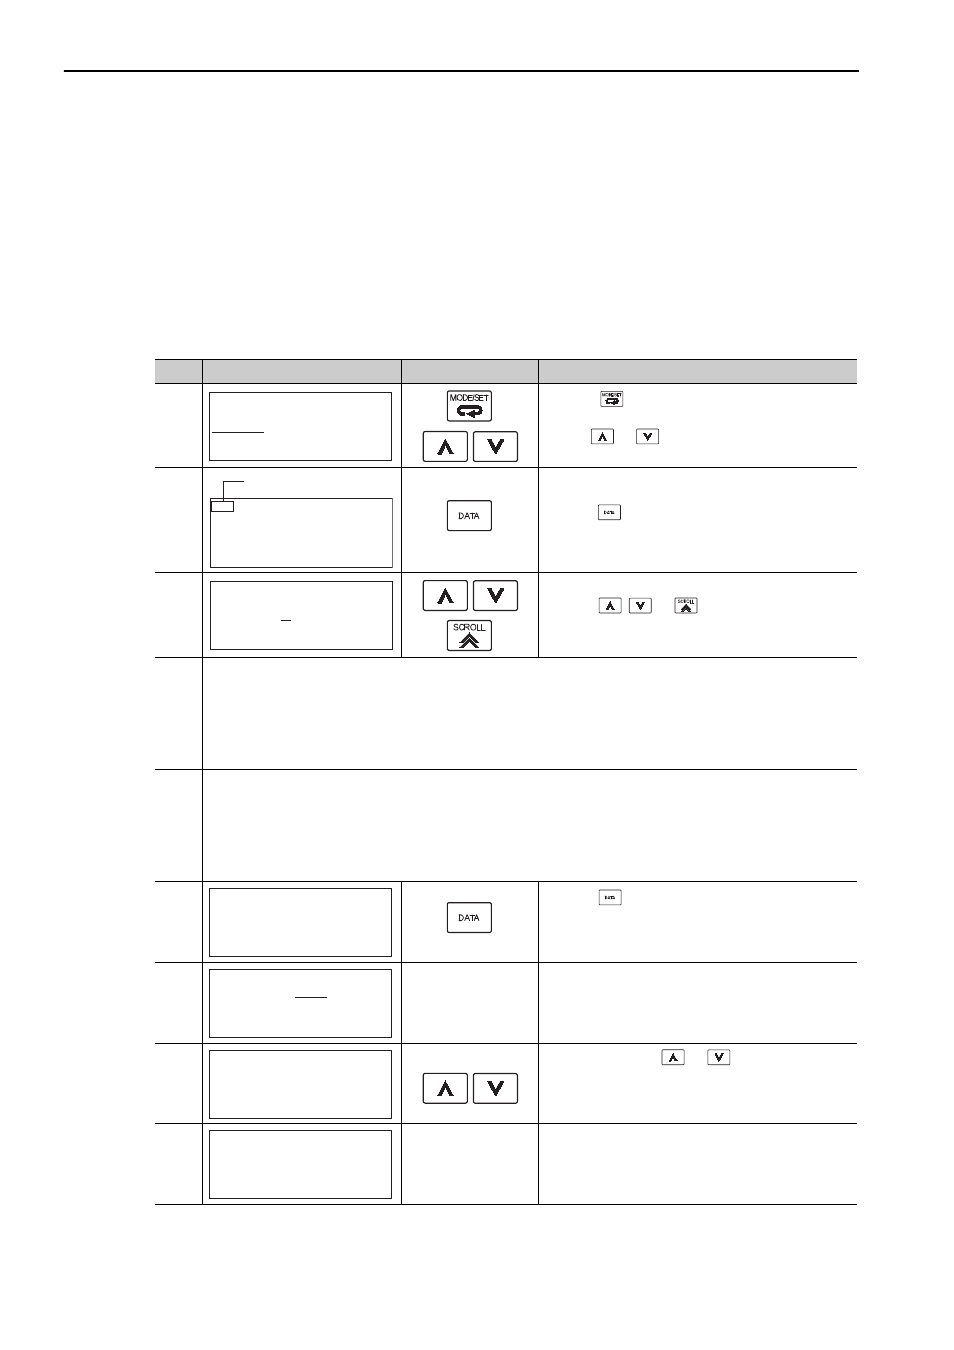
(1) Operating Procedure
Step
Display after Operation
Keys
Operation
1
Press the
Key to view the main menu for the
utility function mode.
Use the
or
Key to move through the list,
select Fn202.
2
Press the
Key to display the initial setting screen
for advanced autotuning by reference.
3
Press the
or
Key and set the items in
steps 3-1 and 3-2.
3-1
Mode Selection
Select the mode.
Mode = 1: Makes adjustments considering responsiveness and stability. (Standard level)
Mode = 2: Makes adjustments for positioning. [Factory setting]
Mode = 3: Makes adjustments for positioning, giving priority to overshooting suppression.
Note: The mode is always set to 1 if a 13-bit encoder is used (applicable servomotor: SGMJV-
A
).
3-2
Type Selection
Select the type according to the machine element to be driven.
If there is noise or the gain does not increase, better results may be obtained by changing the rigid type.
Type = 1: For belt drive mechanisms.
Type = 2: For ball screw drive mechanisms [Factory setting].
Type = 3: For rigid systems, such as a gear.
4
Press the
Key. The advanced autotuning execu-
tion screen will be displayed.
Note: If the mode is set to 2 or 3, the “Pn102” display
will change to the “Pn141”.
5
Input a servo ON command.
6
Start to adjust using
or
Key. “ADJ” will
blink on the status display.
Note: Adjustment cannot be performed during “BB”
is shown on the status display.
7
When the adjustment has been completed normally,
“END” will blink for approx. 2 seconds and “ADJ”
will be displayed on the status display.
㧮㧮 ޓ̆㧲㨁㧺㧯㨀㧵㧻㧺̆
㧲㨚㧞㧜㧝㧦㧭㧭㨀
㧲㨚㧞㧜㧞㧦㧾㨑㨒㧭㧭㨀
㧲㨚㧞㧜㧟㧦㧻㨚㨑㧼㨞㨙㨀㨡㨚
㧲㨚㧞㧜㧠㧦㧭㨂㨕㨎ޓ㧿㨡㨜
㧮㧮 㧭㨐㨢㨍㨚㨏㨑㨐 㧭㨀
ޓ㧹 㨛 㨐 㨑㧩㧟ޓ㨀㨥㨜㨑㧩㧞
Status Display
㧮㧮 㧭㨐㨢㨍㨚㨏㨑㨐 㧭㨀
ޓ㧹 㨛 㨐 㨑㧩㧟ޓ㨀㨥㨜㨑㧩㧞
㧮㧮 㧭㨐㨢㨍㨚㨏㨑㨐 㧭㨀
㧼㨚㧝㧜㧟㧩㧜㧜㧜㧜㧜
㧼㨚㧝㧜㧜㧩㧜㧜㧠㧜㧜
㧼㨚㧝㧜㧝㧩㧜㧜㧞㧜㧜㧜
㧼㨚㧝㧠㧝㧩㧜㧜㧡㧜㧜
㧾㨁㧺 㧭㨐㨢㨍㨚㨏㨑㨐 㧭㨀
㧼㨚㧝㧜㧟㧩㧜㧜㧟㧜㧜
㧼㨚㧝㧜㧜㧩㧜㧜㧠㧜㧜
㧼㨚㧝㧜㧝㧩㧜㧜㧞㧜㧜㧜
㧼㨚㧝㧠㧝㧩㧜㧜㧡㧜㧜
㧭㧰㧶 㧭㨐㨢㨍㨚㨏㨑㨐 㧭㨀
㧼㨚㧝㧜㧟㧩㧜㧜㧟㧜㧜
㧼㨚㧝㧜㧜㧩㧜㧝㧜㧜㧜
㧼㨚㧝㧜㧝㧩㧜㧜㧜㧢㧟㧢
㧼㨚㧝㧠㧝㧩㧜㧝㧡㧜㧜
㧭㧰㧶 㧭㨐㨢㨍㨚㨏㨑㨐 㧭㨀
㧼㨚㧝㧜㧟㧩㧜㧜㧟㧜㧜
㧼㨚㧝㧜㧜㧩㧜㧝㧜㧜㧜
㧼㨚㧝㧜㧝㧩㧜㧜㧜㧢㧟㧢
㧼㨚㧝㧠㧝㧩㧜㧝㧡㧜㧜