Yokogawa Data Logging Software GA10 User Manual
Page 46
3-22
IM 04L65B01-01EN
Recording Interval
Select the interval from the drop-down list.
Options: 100 ms, 200 ms, 500 ms, 1 s, 2 s, 5 s, 10 s, 20 s,
30 s, 1 min, 2 min, 5 min, 10 min
The intervals that are displayed in the list are integer
multiples of the collection period specified on the Monitor
Page. If Data time is set to Device time, you cannot
specify the record interval.
Record File Type
Specify the data output format.
You can save the recorded file in binary format (.dld
extension) or Excel format (.xlsx extension).
Start Condition
You can specify the following for the start condition.
Start Condition
Description
Immediate
Starts recording when the Start Recording button
is clicked.
Specified Time
Starts recording when the specified time arrives.
Specified Period Records at the specified period.
Alarm
Starts recording using the alarm status as a
trigger.
Level
Starts recording using a collected data value as
a trigger.
Stop Condition
You can specify the following for the stop condition.
Stop Condition
Description
Continuous
Stops recording when the Stop Recording button
is clicked.
Specified Time
Stops recording at the specified time. If the start
condition is set to Alarm or Level, GA10 enters a
recording standby state.
Specified
Duration
Stops recording when the specified time elapses
after recording starts. If the start condition is set to
Alarm or Level, GA10 enters a recording standby
state.
Data Number
Stops recording at the specified number of data
points. If the start condition is set to Alarm or
Level, GA10 enters a recording standby state.
Specified Period Stops recording at the specified period and enters
recording standby state.
Alarm
Stops recording using the alarm status as a
trigger and enters recording standby state.
Level
Stops recording using a collected data value as a
trigger and enters recording standby state.
Note
• If you set the start condition to Specified Period, the
stop condition is fixed to Specified Period.
• If the start condition is set to Specified Period and
the recording start time is set to the same time as the
record stop time, the recorded data file is not divided
at every interval.
• If the start condition is set to Specified Period and the
period is set to the 31st of every month, for months
that do not have 31 days, the date is automatically set
to the last day of the month.
• If you set the start condition to Specified Time,
you cannot specify a nonexistent time due to DST
(daylight saving time) transition.
• If the specified time overlaps due to the DST
transition, the first time is used to start recording.
Chapter 3 Configuring and Starting Data Collection and Recording
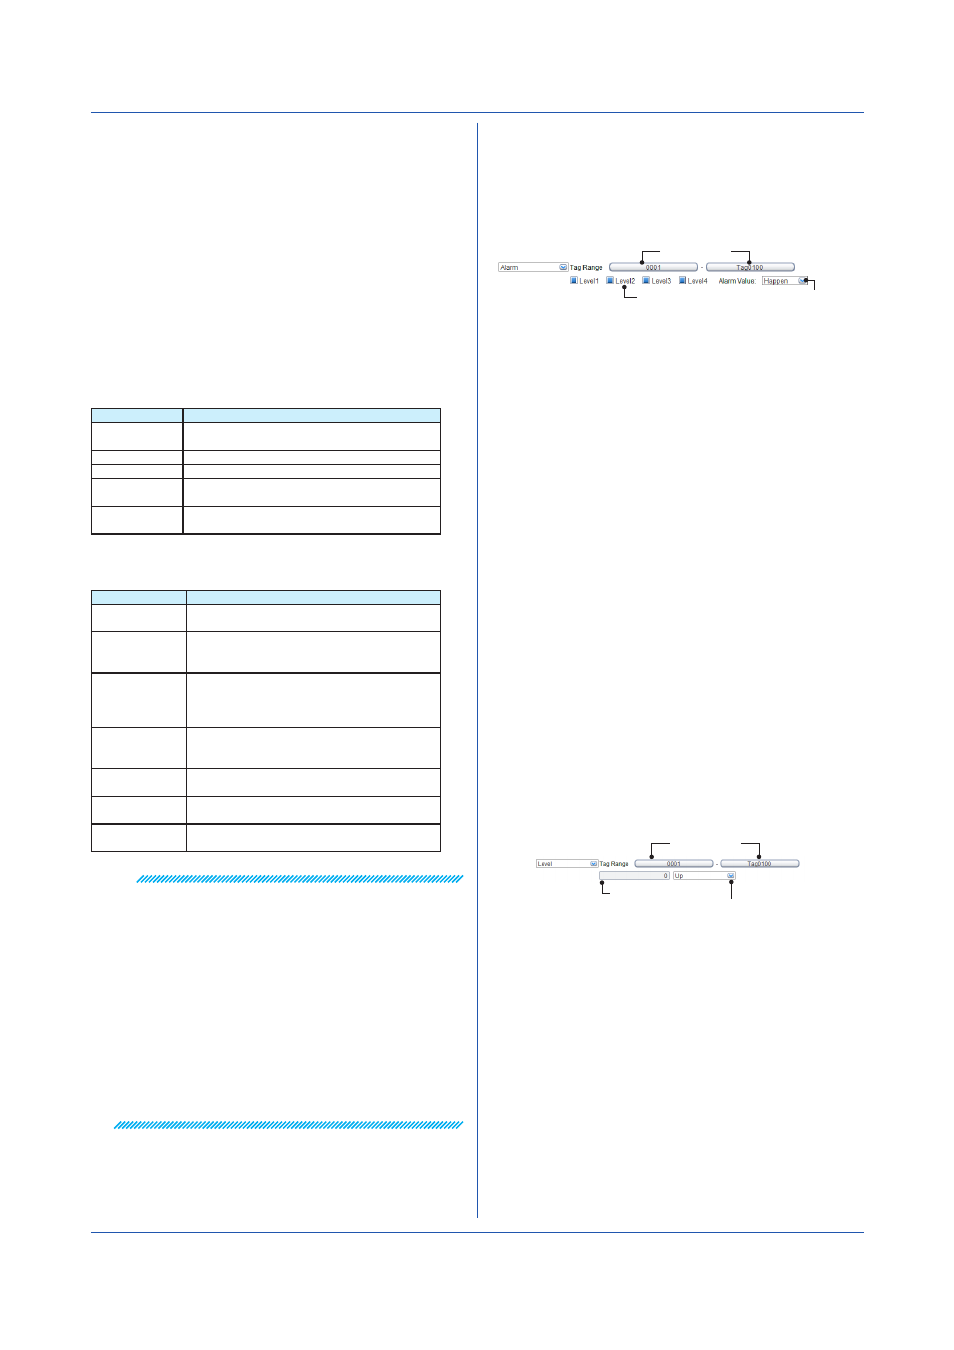
An example of the procedure when the start condition is
set to Alarm is explained below.
1
Set Start Condition to
Alarm.
The tag range, reference alarm, and alarm value are
displayed.
Alarm value
Tag range
Reference alarm
2
Click the first or last tag selection button.
A tag selection dialog box appears.
3
Select the applicable tag range.
The dialog box closes, and the tag selection button
display changes to the selected tag.
4
Select the reference alarm.
5
Set the alarm value to
Happen (alarm activated
state) or
Release (alarm released state).
Click the Start Recording button to enter the record-
ing standby state. When the monitored alarm reach-
es the specified alarm value, recording starts.
• If the stop condition is set to Alarm
The setting procedure is the same as described
above.
GA10 operates in the following manner.
If the start condition is set to Alarm or Level, when the
specified alarm value is reached during recording, GA10
stops recording and enters the recording standby state.
If the start condition is not set to Alarm or Level, when the
specified alarm value is reached during recording, GA10
stops recording.
An example of the procedure when the start condition is
set to Level is explained below.
1
Set Start Condition to
Level.
Tag range, threshold value, and operation direction
appear.
Operation direction
Type the threshold.
Tag range
2
Click the first or last tag selection button.
A tag selection dialog box appears.
3
Select the applicable tag range.
The dialog box closes, and the tag selection button
display changes to the selected tag.
4
Enter the threshold value.
5
Set the operation direction to Up (data value is
greater than or equal to the threshold) or Down
(data value is less than or equal to the threshold).
Click the Start Recording button to enter the record-
ing standby state. When the monitored tag value
reaches the threshold in the specified direction,
recording starts.