Reset button – Extron Electronics HDXP Plus Series User Guide User Manual
Page 15
HDXP Plus Series Switchers • Installation
9
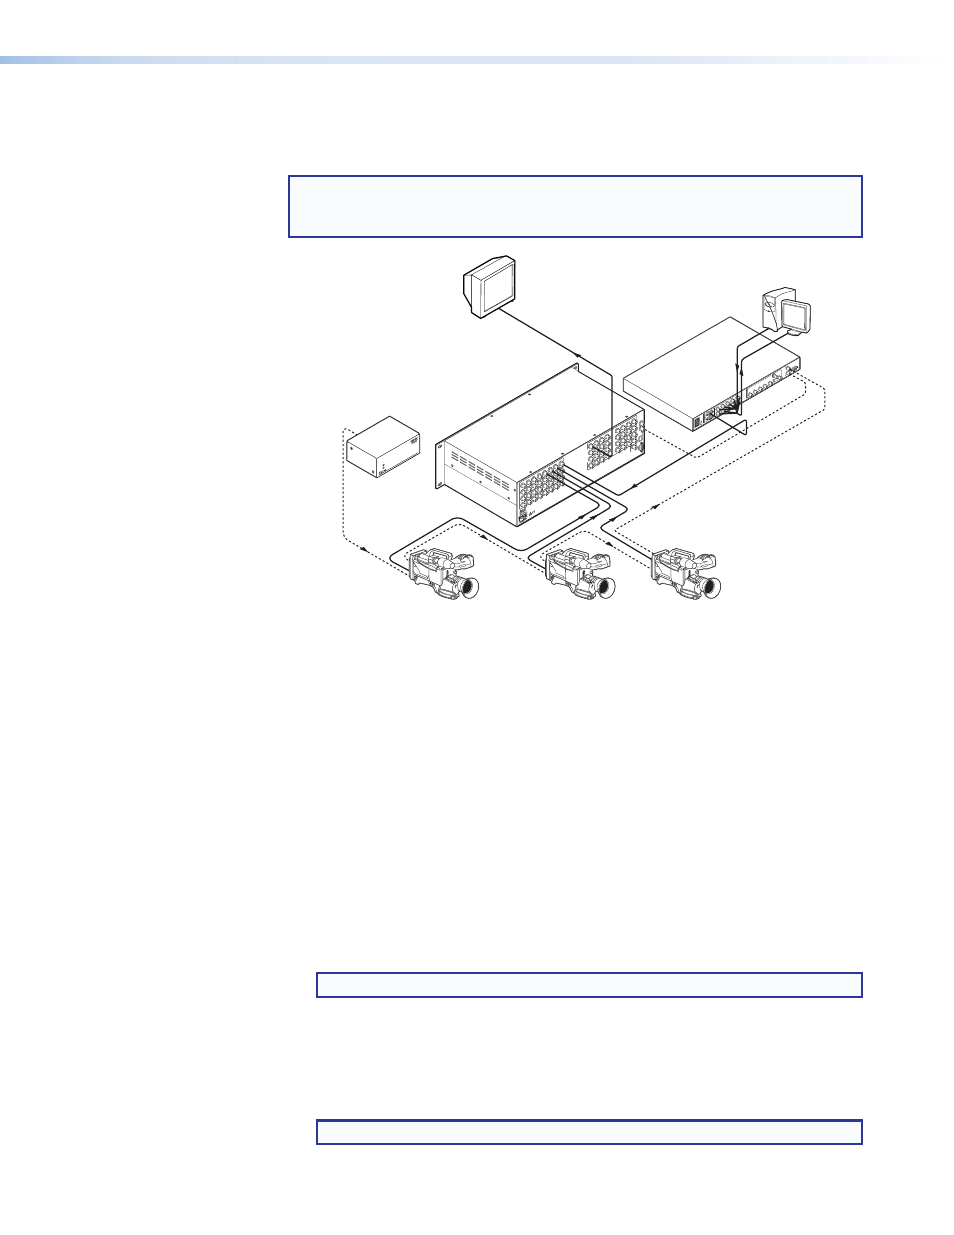
Figure 6 shows a configuration in which the timing source passes through three video
cameras and a video scan converter before connecting to the switcher. This type of
camera can synchronize with the external timing source for video editing applications.
NOTE: I/O grouping is used to set the inputs associated with each reference
input. Input group 1 is associated with the tri-level signal and input group 2 is
associated with the bi-level signal.
Extron
BBG 6 A
Blackburst/Color Bars/
Audio Generator
I
N
P
U
T
S
1
2
3
4
5
6
7
8
9
10
11
12
13
14
15
16
O
U
T
P
U
T
S
1
2
3
4
5
6
7
8
9
10
11
12
13
14
15
16
17
2
3
4
21
6
7
8
25
10
11
12
29
14
15
16
17
18
19
20
21
22
23
24
25
26
27
28
29
30
31
32
LA
N
AC
T
LINK
BI-LEVEL
RESET
TRI-LEVEL
GEN-L
OCK
PREVI
EW
50/
60 H
z
100
-24
0V
0.3
A
R
/R-
Y
R
/R-
Y
I
N
P
U
T
S
O
U
T
P
U
T
S
G
/Y
2
RG
B/R
-Y,
B-Y
, Y
RG
B
1
G-Y
B
/B-
Y
B
/B-
Y
H
/HV
H
/HV
V
V
VID
EO
S-VIDEO
D1
R/R
-Y
G/Y
B/B
-Y
H/H
-Y
RS
-23
2
/42
2
G
E
N
L
O
C
K
V
IN
OU
T
SDI/HD-SDI
Video Camera
SDI/HD-SDI
Monitor
Extron
HDXP Plus 3232
Matrix Switcher
SDI/HD-SDI
Video Camera
SDI/HD-SDI
Video Camera
VGA Input
Extron
VSC 900D
Computer-to-Video
Scan Converter
(SDI only)
DISTRIB
UTIO
N AM
PLIFIER
Figure 6.
Multiple Device Example of an HDXP 3232 External Sync
If no external sync timing source is connected, switching occurs immediately.
Reset Button
e
Reset button — This recessed button initiates three levels of reset on the matrix
switcher. To initiate the different levels of reset, use a pointed object such as a stylus
or a small screwdriver to press and hold the Reset button while the switcher is
running or while you are powering it up (see
•
Events (mode 3) reset — Hold the Reset button until the Reset LED blinks
once (approximately 3 seconds), then release it and press it again momentarily to
toggle events monitoring on and off.
•
IP settings (mode 4) reset — Hold the Reset button until the Reset LED blinks
twice (approximately 6 seconds), then release it and press it again to reset the
switcher IP functions.
NOTE: IP settings reset does not replace any user-installed firmware.
Absolute (mode 5) reset — Hold the Reset button until the Reset LED blinks
three times (approximately 9 seconds), then release it and press it again to restore
the switcher to the default factory settings.
•
Hard reset — Hold the Reset button while powering up the switcher to restore
the switcher to the default factory settings and factory installed firmware version.
NOTE: This type of reset does not clear the current configuration.