Cycle parameters – HEIDENHAIN TNC 620 (34056x-04) Cycle programming User Manual
Page 368

Touch Probe Cycles: Automatic Workpiece Inspection
16.5 MEASURE HOLE (Cycle 421, DIN/ISO: G421, software option 17)
16
368
TNC 620 | User's Manual Cycle Programming | 5/2013
Cycle parameters
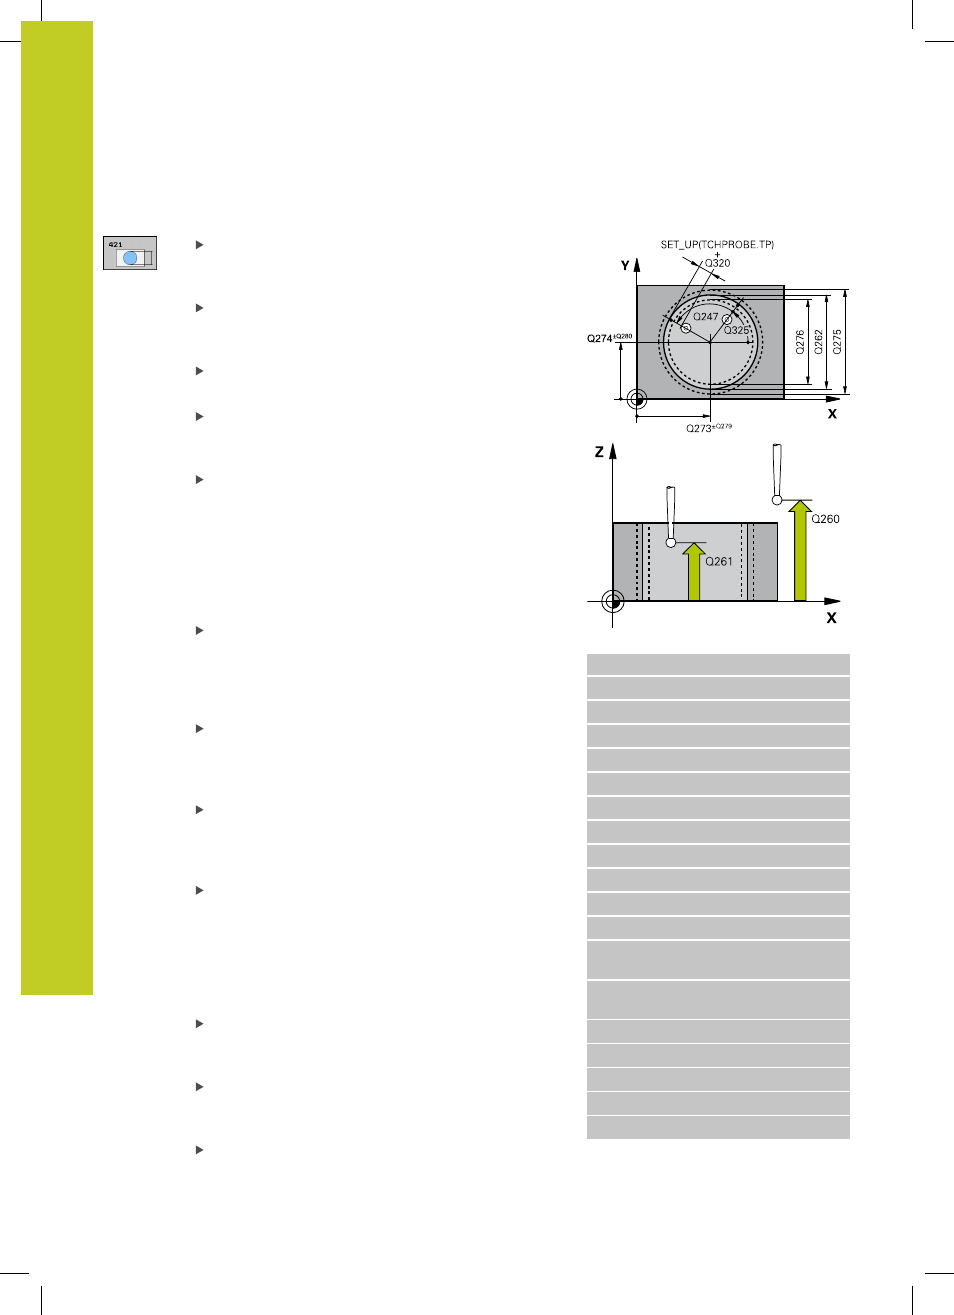
Center in 1st axis Q273 (absolute): Center of the
hole in the reference axis of the working plane.
Input range -99999.9999 to 99999.9999
Center in 2nd axis Q274 (absolute value): Center
of the hole in the minor axis of the working plane.
Input range -99999.9999 to 99999.9999
Nominal diameter Q262: Enter the diameter of the
hole. Input range 0 to 99999.9999
Starting angle Q325 (absolute): Angle between the
reference axis of the working plane and the first
touch point. Input range -360.000 to 360.000
Stepping angle Q247 (incremental): Angle between
two measuring points. The algebraic sign of the
stepping angle determines the direction of rotation
(negative = clockwise) in which the touch probe
moves to the next measuring point. If you wish to
probe a circular arc instead of a complete circle,
then program the stepping angle to be less than
90°. Input range -120.000 to 120.000
Measuring height in the touch probe axis Q261
(absolute): Coordinate of the ball tip center (=
touch point) in the touch probe axis in which
the measurement is to be made. Input range
-99999.9999 to 99999.9999
Set-up clearance Q320 (incremental): Additional
distance between measuring point and ball tip.
Q320 is added to
SET_UP (touch probe table). Input
range 0 to 99999.9999
Clearance height Q260 (absolute): Coordinate in
the touch probe axis at which no collision between
touch probe and workpiece (fixtures) can occur.
Input range -99999.9999 to 99999.9999
Traversing to clearance height Q301: definition
of how the touch probe is to move between the
measuring points:
0
: Move at measuring height between measuring
points
1
: Move at clearance height between measuring
points
Maximum limit of size for hole Q275: Maximum
permissible diameter for the hole (circular pocket).
Input range 0 to 99999.9999
Minimum limit of size for hole Q276: Minimum
permissible diameter for the hole (circular pocket).
Input range 0 to 99999.9999
Tolerance for center 1st axis Q279: Permissible
position deviation in the reference axis of the
working plane. Input range 0 to 99999.9999
NC blocks
5 TCH PROBE 421 MEASURE HOLE
Q273=+50
;CENTER IN 1ST AXIS
Q274=+50
;CENTER IN 2ND AXIS
Q262=75
;NOMINAL DIAMETER
Q325=+0
;STARTING ANGLE
Q247=+60
;STEPPING ANGLE
Q261=-5
;MEASURING HEIGHT
Q320=0
;SET-UP CLEARANCE
Q260=+20
;CLEARANCE HEIGHT
Q301=1
;MOVE TO CLEARANCE
Q275=75.12
;MAXIMUM DIMENSION
Q276=74.95
;MINIMUM DIMENSION
Q279=0.1
;TOLERANCE 1ST
CENTER
Q280=0.1
;TOLERANCE 2ND
CENTER
Q281=1
;MEASURING LOG
Q309=0
;PGM STOP IF ERROR
Q330=0
;TOOL
Q423=4
;NO. OF PROBE POINTS
Q365=1
;TYPE OF TRAVERSE
