Example 1, Status01 display screen, Example 1 — status01 display screen – Carrier 19XL User Manual
Page 252
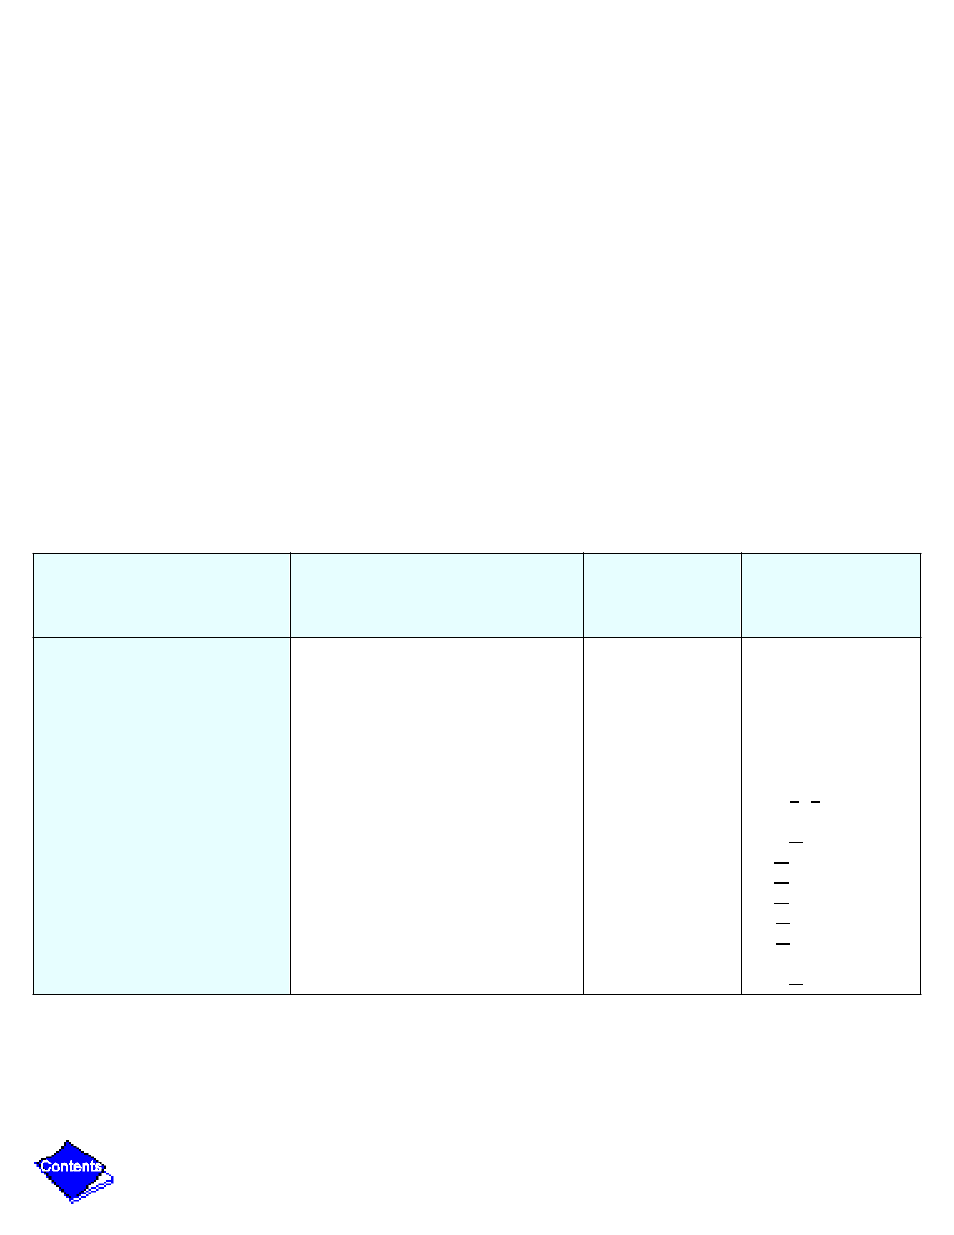
Table 2 — LID Screens
Notes:
1. Only 12 lines of information appear on the LID screen at any given time. Press NEXT or PREVIOUS to
highlight a point or to view points below or above the current screen.
2. The LID may be configured in English or SI units, as required, through the LID configuration screen.
3. Data appearing in the Reference Point Names column is used for CCN operations only.
4. All options associated with ICE BUILD, Lead/Lag, CCN Occupancy Configuration, and Soft Stopping are
only available on PSIO Software Version 9 and higher.
Example 1 — Status01 Display Screen
To access this display from the LID default screen:
1. Press MENU.
2. Press STATUS (STATUS01 will be highlighted).
3. Press SELECT.
Table 2, Example 1 — Status01 Display Screen
Description
Range
Units
Reference Point
Name (Alarm
History)
Control Mode
Run Status
Occupied?
Alarm State
*Chiller Start/Stop
Base Demand Limit
*Active Demand Limit
Compressor Motor Load
Current
Amps
*Target Guide Vane Pos
Actual Guide Vane Pos
Water/Brine: Setpoint
* Control Point
Reset.Off.Local.CCN
Timeout.Recycle.Startup.
Ramping.Running.Demand.
Override.Shutdown.Abnormal.
Pumpdown
No/Yes
Normal/Alarm
Stop/Start
40-100
40-100
0-999
0-999
0-999
0-100
0-100
10-120 (–12.2-48.9)
10-120 (–12.2-48.9)
%
%
%
%
AMPS
%
%
DEG F (DEG C)
DEG F (DEG C)
MODE
STATUS
OCC
ALM
CHIL S S
DLM
DEM LIM
CA L
CA P
CA A
GV TRG
GV ACT
SP
LCW STPT