Checkline TI-CMXDLP User Manual
Page 9
– 9 –
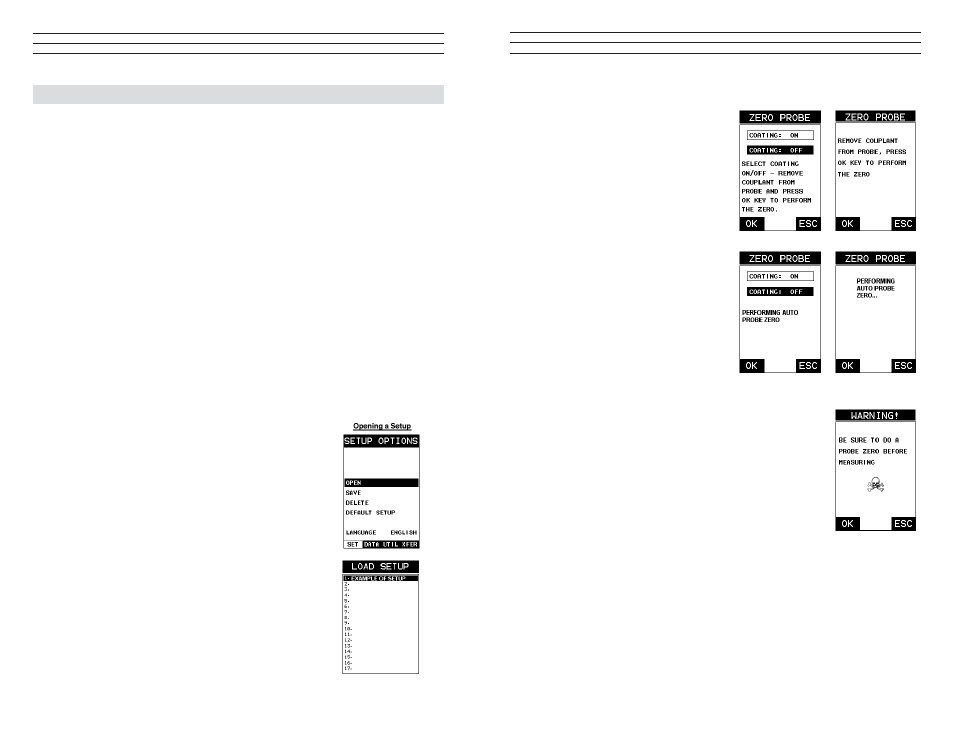
Performing An Auto Zero (Off Block)
1. Be sure all couplant has been removed
from the face of the transducer.
2. Press the OK key to perform the
automatic probe zero, or ESC key
to cancel the zero operation.
3. The screens illustrated will be
briely displayed followed by the
main measurement screen. The
TI-CMXDLP is ready to be calibrated.
Performing a Manual Probe Zero (On Block)
NOTE: When the zero probe option is set to manual, the Probe
Zero Disk (battery cap) located on the top of the gauge, will be
used as a zero standard and the warning screen illustrated above
will be displayed.
1. Press the OK or ESC keys to enter the main measurement
screen and begin the manual zero process.
2. Apply a drop of couplant on the transducer and place the
transducer in steady contact with the Probe Zero Disk, and
obtain a steady reading.
3. Press the MENU key once to activate the menu items tab. Press the MENU key
multiple times to tab right and the ESC key multiple times to tab left until the
PRB menu is highlighted and displaying the submenu items.
4. Press the UP and DOWN arrow keys to scroll through the sub menu items until
ZERO PROBE is highlighted.
–96 –
12.0 SET
UP
S – CREATE, STORE, EDIT, & RE
CAL
L
12.1 Introduction to Setups
Often times, users are faced with a variety of tasks and applications that are sometimes
similar, but often times very different. With a standard thickness gauge,the user would
have to recalibrate for each individual application respectively. With all the features of
the TI-CMXDLP, the number of potential applications also increases based on ability
alone. This is primarily in reference to the addition of those very dificult applications,
where a standard thickness gauge would not be feasible, or capable of accomplishing
the tasks. The increased number of features and parameters also adds to the overall
setup time, or amount of time to set up marginal applications with perfection and
understanding. Because of the additional time involved, the TI-CMXDLP has been
equipped with the ability to save these setups to memory and be recalled at any time.
The TI-CMXDLP can store up to 64 custom setups. These setups can be bidirectionally
transferred to and from a PC. Therefore, the user can save as many setups as necessary
for all their individual applications requirements. This saves a great deal of time and
knowledge for future inspections of the same job or project. This feature also eliminates
error between two or more users during the setup and calibration process.
12.2 Opening a Setup
The TI-CMXDLP is loaded with a number of setups from the factory. These setups
can be opened, edited, and saved to any one of 64 setup locations. If a factory setup
is written over, the user can simply reload the default factory setups at anytime using
the utility software included with the TI-CMXDLP. The
factory setups are general setups Only. However, they
may serve as an excellent starting point, requiring only
minor adjustments to work for custom applications. It
is recommended that user customized setups be saved
to an empty location, and save the factory setups for
the purpose of a general starting point. The following
procedures outline how to open factory and custom
setups:
1. Press the MENU key once to activate the menu
items tab. Press the MENU key multiple times to tab
right and the ESC key multiple times to tab left until
the SETUP menu is highlighted and displaying the
submenu items.
2. Use the UP and DOWN arrow keys to scroll through
the sub menu items until OPEN is highlighted.
3. Press the ENTER key to display the Setup List Box.