Checkline TI-CMXDLP User Manual
Page 15
– 15 –
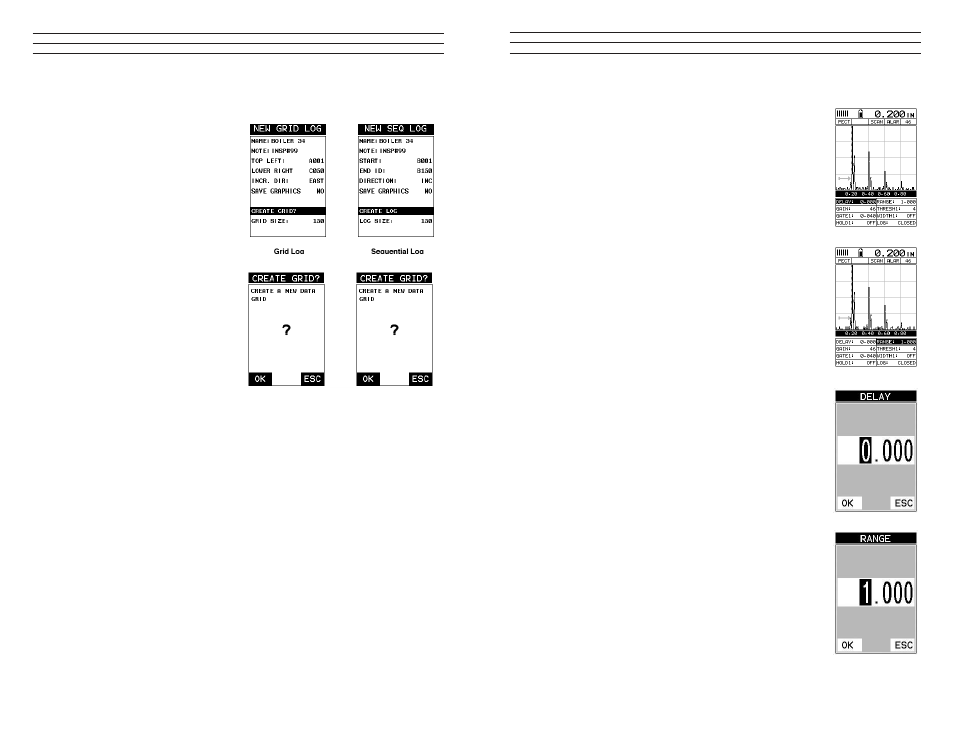
Adjusting Delay (B-START & Range (B-DEPTH)
1. Press the MEAS key once to activate the measure menu
items. Press the MEAS key multiple times to move right
and the ESC key multiple times to move left, until the
either the DELAY (START) or RANGE (DEPTH) cell is
highlighted.
2. Use the UP, DOWN, LEFT, or RIGHT arrow keys
to scroll the DELAY(START) and RANGE (DEPTH)
values.
3. Repeat steps 1 & 2 until the range is correctly being
displayed. Alternatively, the DELAY (START) and
RANGE (DEPTH) values can be changed using the Digit
Edit Box as follows:
4. Press the MEAS key once to activate measure menu
items. Press the MEAS key multiple times to move right
and the ESC key multiple times to move left, until the
either the DELAY (START) or RANGE (DEPTH) cell is
highlighted.
1. Press the ENTER key to display the digits edit box.
2. Press the UP and DOWN arrow keys to scroll the
highlighted value.
3. Press the LEFT and RIGHT arrow keys to scroll the digit
locations.
4. Repeat steps 3 & 4 until the DELAY (START) or
RANGE (DEPTH) value is correctly displayed.
5. Press the OK key to set the DELAY (START) and
WIDTH (DEPTH) value and return to the measure
screen, or ESC to cancel entering the DELAY(START)
or WIDTH (DEPTH) value.
6. Finally, press the MEAS key to return to the
measurement screen and begin taking readings.
NOTE: The DELAY (START) & WIDTH (DEPTH) can
also be adjusted from the tabbed menu item DISP. However,
using the hot menu keys is the easiest method.
– 90 –
3. Continue on to the next section “Saving a Grid or Seq File”.
Saving a Grid
Once all the parameters are set, the user
has the option of saving or canceling
the new grid.
4. Use the UP and DOWN arrow
keys to scroll through the new Grid
or Seq List Items until CREATE
GRID or LOG? is highlighted.
5. Press the ENTER key to accept
the grid or seq log parameters and
activate the conirmation screen
6. Press the OK key to save the New
Grid or Seq Log, or the ESC key
to cancel the New Grid or Seq Log
setup and return to the DATA menu.
7. Press the MEAS key to return to
the measurement screen and begin
storing readings.
11.3 Storing a reading
Now that a grid or sequential log has been created, it’s time to make some measurements
and store the readings. The following procedures outline this process: Storing a Reading
NOTE: Once the gird or sequential log has been created it will automatically be
displayed following the create conirmation screen. It is located at the bottom of the
measurement screen, and can be left open for the duration of the inspection process.
This section assumes the grid or sequential log was just created. Refer to the section on
“opening a grid or seq log” if the ile was created at another time.
Key Feature: When the TI-CMXDLP is displaying a “grid log”, pressing the OK key
will initiate an advance to row number option. Use the Left, Right, UP, and DOWN
arrow keys to enter the row number. Once the row number is correctly displayed, press
the OK key to advance directly to that row number in the grid log.
Key Feature: When the TI-CMXDLP is displaying a “grid log”, pressing the ESC key
multiple times, will toggle through the display options: Digits, RF, RECT,and B-SCAN
views.