Checkline TI-CMXDLP User Manual
Page 5
– 5 –
2.0 QUICK START
UP
GUIDE
Turn the TI-CMXDLP on and off using the switch located on the bottom right corner of
the keypad. When TI-CMXDLP is initially turned on, a lash logo and blinking lights
will be displayed, followed by the identity of the transducer (probe) currently plugged
into the gauge. The TI-CMXDLP is equipped with an “Auto Probe Recognition”
feature that attempts to identify special transducers. If the TI-CMXDLP doesn’t ind a
transducer equipped with this feature, the user will be see a list of transducers and will
need to select a speciic transducer type. The following sections outline each scenario.
NOTE: This section is primarily written as a basic startup guide only.
2.1 TI-CMXDLP Overview
The TI-CMXDLP has great features
and tools that will be a beneit for the
variety of applications you face on
a continual basis. Let’s have a brief
look at the screens you’ll be looking
at most often:
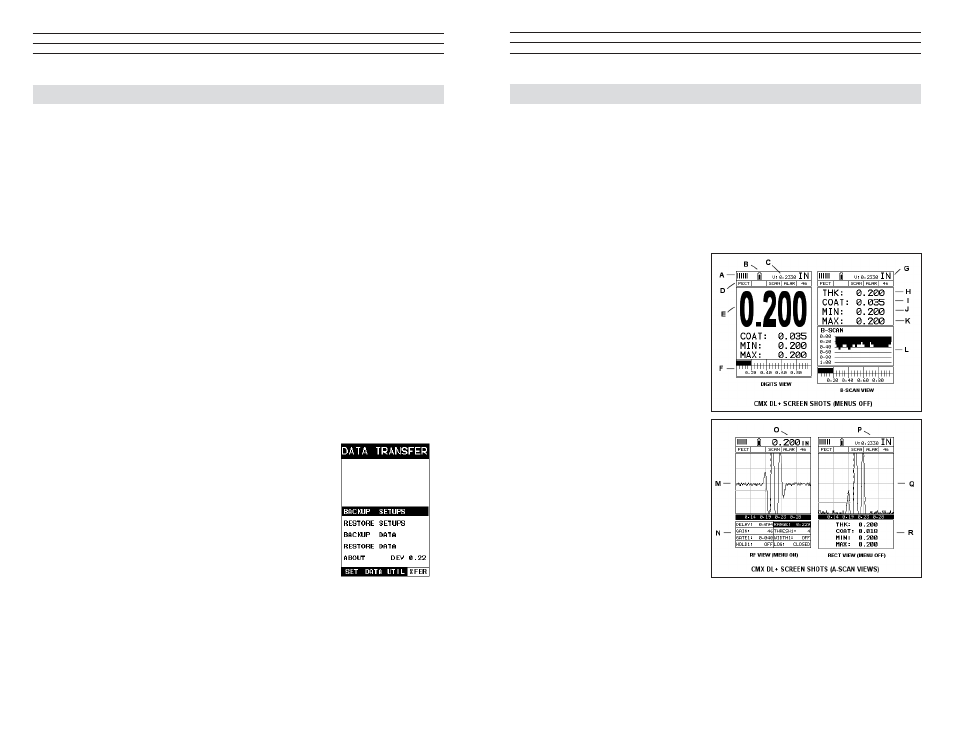
A. Repeatability/Stability
Indicator: This is used in
conjunction with the digital
thickness values displayed.
When all the vertical bars are
fully illuminated and the last digit
on the digital thickness value is
stable, the TI-CMXDLP is
reliably measuring the same
value 3 to 200 times per second,
depending on which
measurement mode and features
are enabled.
B. Battery Icon: Indicates amount
o f battery life remaining.
C. Velocity: The material velocity
value the TI-CMXDLP is
currently using or calibrated for. It can be set to display in English or Metric units.
D. Feature Status Bar: Indicates the features currently enabled and in use
in the following order:
1. Measurement Mode
3. High-Speed Scan Mode
5. Gain Setting
2. Differential Mode
4. Alarm Mode
– 100 –
13.0 USING THE UTILITY SOFTWARE
13.1 Computer System Requirements
Datacomm will run on many different operating systems: Windows 98 (1st or
2nd edition), Windows NT 4.0 with Service Pack 5, Windows ME, Windows XP,
Windows2000 Professional, Windows 2000 Server, or Windows 2000 Advanced Server
operating systems running on Intel or AMD hardware. A Pentium 166MHz or faster
processor with at least 32 megabytes of physical RAM is required. You should have
40 megabytes of free disk space before attempting to install Datacomm. Datacomm
requires an available communications port in order to transfer data to and from the
TI-CMXDLP. Datacomm supports COM1, COM2, COM3, and COM4. USB to Serial
Converter. Some newer laptop computers do not have standard serial ports. In this case
it is possible to use a USB to Serial converter. If a serial to USB cable is needed, contact
Electromatic.
13.2 Installing Datacomm
Datacomm comes on a CD-ROM with an automatic installer program. Place the CD
in your computer’s CD tray and close the door. Open the CD-ROM by double clicking
on the My Computer ICON, then double click on the CD. Finally, double click on the
SETUP icon to begin the installation. Refer to the help section in Datacomm software
for the complete operating manual,setup, and operation.
13.3 Using the XFER menu (TI-CMXDLP)
The XFER menu of the TI-CMXDLP will be used in
conjunction with the Datacomm PC software. The steps
below outline the procedure for accessing the XFER menu
and basic operation as follows:
1. Press the MENU key once to activate the menu items
tab. Press the MENU key multiple times to tab right,
and the ESC key multiple times to tab left,until
the XFER menu is highlighted and displaying the
submenu items.
2. Use the UP and DOWN arrow keys to scroll
through the sub menu items until the desire option is
highlighted.
3. Press the ENTER key to activate the option selected.
4. Once the Backup or Restore function has been
completed, press the MEAS key once to return to the
menu items, or twice to return to the measurement
mode.