Checkline TI-CMXDLP User Manual
Page 17
– 17 –
3.0 Keyboard, Menu & Connector Reference
3.1 Menu Key (Operation * Sub Menus)
The Menu key activates the primary menu structure
containing 8 menu tab groups. These tab groups then
contain sub menu items, or functions. The sub menu
items have been organized in tab groups according
to how closely they are related to the individual tab
group names. Let’s irst get familiar with how to move
around in these tabs before continuing on to the sub
menu functions. This procedure is outlined below:
Activating and Getting Around in the Menus Items
1. Press the MENU key once to activate the menu items
tab. Press the MENU key multiple times to tab right,
and the ESC key multiple times to tab left until the
desired tab group is highlighted and displaying the
submenu items. The tab groups are illustrated above
(A).
2. Use the UP and DOWN arrow keys to scroll
through the sub menu items until the desired
function is highlighted. The sub menu items are
illustrated in the diagram above (B).
3. Depending on which function is highlighted, use
the LEFT, RIGHT, and Enter keys to scroll the
options or activate the Digit Edit and List Box options.
3.2 Probe – Menu
ZERO PROBE: The TI-CMXDLP is zeroed in much the
same way that a mechanical micrometer is zeroed. If the
TI-CMXDLP is not zeroed correctly, all of the measurements
made using the TI-CMXDLP may be in error by some ixed
value. The TI-CMXDLP is equipped with an optional automatic or manual zero feature.
Refer to section 6.2, for an explanation of this important procedure.
ZERO COATING: In order to account for very slight electronic differences in
transducers of the same type, frequency, and diameter, the TI-CMXDLP has been
equipped with a “zero coating” feature. This enables the TI-CMXDLP to obtain
very accurate readings on coatings, eliminating potential errors incurred from slight
differences in the manufacturing processes. Refer to section 6.2.
– 88 –
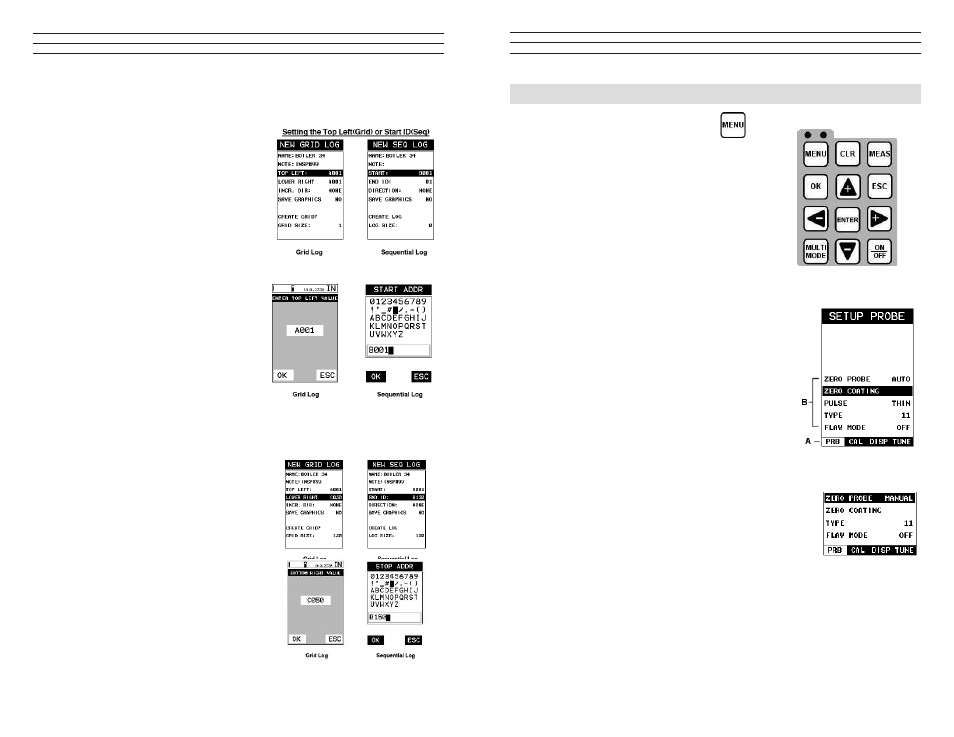
Setting the Top Left(Grid) or Start ID(Seq)
1. Use the UP and DOWN arrow keys to
scroll through the new Grid or Seq List
Items until TOP LEFT or START ID is
highlighted.
2. Press the ENTER key to activate the
Coordinate or Start ID Edit Box.
3. GRID LOG: Use the LEFT, & RIGHT
arrow keys to scroll the Columns, and
the UP, DOWN arrow keys to scroll the
Rows.
SEQ LOG: Use the UP, DOWN, LEFT,
& RIGHT arrow keys to highlight the
appropriate alpha characters. Press the
ENTER key to select a character and
advance to the next character ield, in
conjunction with using the CLR key to
backspace if necessary.
4. Press the OK key to select the coordinate
or start ID and return to the Grid or Seq
List Items screen, or ESC to cancel the
selection and return to the Grid or Seq
List Items menu.
Setting the Bottom Right (Grid) or END ID (Seq)
1. Use the UP and DOWN arrow keys to
scroll through the new Grid or Seq List
Items until LOWER RIGHT or END ID
is highlighted.
2. Press the ENTER key to activate the
Coordinate or End ID Edit Box.Grid Log
Sequential Log
3. GRID LOG: Use the LEFT, & RIGHT
arrow keys to scroll the Columns,and
the UP, DOWN arrow keys to scroll the
Rows. SEQ LOG: Use the UP, DOWN,
LEFT, RIGHT arrow keys to highlight
the appropriate alpha characters. Press
the ENTER key to select a character and
advance to the next character ield, in
conjunction with using the CLR key to backspace if necessary.