Checkline TI-CMXDLP User Manual
Page 11
– 11 –
2.5 Zero Coating
In order to account for very slight electronic differences in transducers of the same type,
frequency, and diameter, the TI-CMXDLP has been equipped with a “zero coating”
feature. This enables the TI-CMXDLP to obtain very accurate readings on coatings,
eliminating potential errors incurred from slight differences in the manufacturing
processes. The procedure is outlined below:
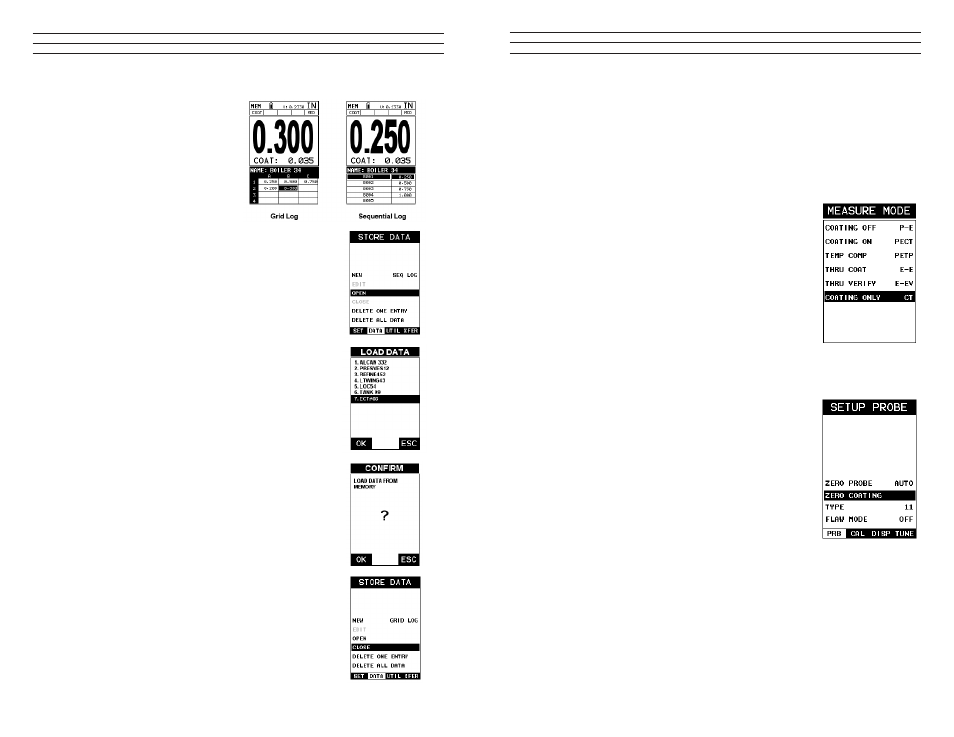
Performing A Coating Zero
1. Press the MULTI MODE key once to activate the
measurement mode options.
2. Use the UP and DOWN arrow keys to scroll through
the sub menu items until Coating Only (CT) mode is
highlighted.
3. Press the ENTER key to select the measurement mode
and return to the measurement screen.
4. Apply a drop of couplant on the transducer and place the
transducer in steady contact with the Probe Zero Disk
(battery cover) and obtain a steady reading.
NOTE: The coating measurement displayed will potentially
be a value greater or less than 0.
5. Press the MENU key once to activate the menu items tab.
Press the MENU key multiple times to tab right and the
ESC key multiple times to tab left until the PRB menu is
highlighted and displaying the submenu items.
6. Use the UP and DOWN arrow keys to scroll through the
sub menu items until ZERO COATING is highlighted.
7. Press the ENTER key to display the conirmation screen.
8. Press the OK key to zero the coating and return to the
PRB menu, or ESC to cancel the coating zero process.
9. Press the MULTI MODE key once to activate the
measurement mode options.
10. Use the UP and DOWN arrow keys to scroll through the
sub menu items until Coating On (PECT) is highlighted
11. Press the ENTER key to select the measurement mode
and return to the measurement screen, and begin taking
readings.
–94 –
11.7 Changing the Active File - Open
The user may have transferred grid/
seq templates from a PC to the
TI-CMXDLP, or setup grids/seq using
the TI-CMXDLP at an earlier time.
The name of the currently active ile is
always displayed at the top of the Grid/
Seq Box in measurement mode (refer to
photo below). It’s not only important to
recognize what ile is currently active,
but also be able to change the active ile
at any time. The following procedures
outline this process:
1. Press the MENU key once to activate the menu
items tab. Press the MENU key multiple times
to tab right and the ESC key multiple times to
tab left until the DATA menu is highlighted and
displaying the submenu items.
2. Use the UP and DOWN arrow keys to scroll through
the sub menu items until OPEN is highlighted.
3. Press the ENTER key to display the Grid/Seq List
Box.
4. Use the UP and DOWN arrow keys to scroll through
the grids until the target grid is highlighted.
5. Press the ENTER key to activate the conirmation
screen.
6. Press the OK key to load the ile from memory.
7. Press the MEAS key to return to the measure screen.
11.8 Closing an active File - Close
A user might not have a current requirement to store
measurements, but a ile is currently open or active and
needs to be closed. The following procedures outline how
to close an open or active ile :
1. Press the MENU key once to activate the menu items
tab. Press the MENU key multiple times to tab right
and the ESC key multiple times to tab left until
the DATA menu is highlighted and displaying the
submenu items.