HID FARGO HDP5000 User Guide User Manual
Page 75
July 2013
Page 75 of 100
© 2012, 2013 HID Global Corporation. All rights reserved.
HDP5000 & HDPii Plus Card Printer Encoder User Guide_L000950, 3.0
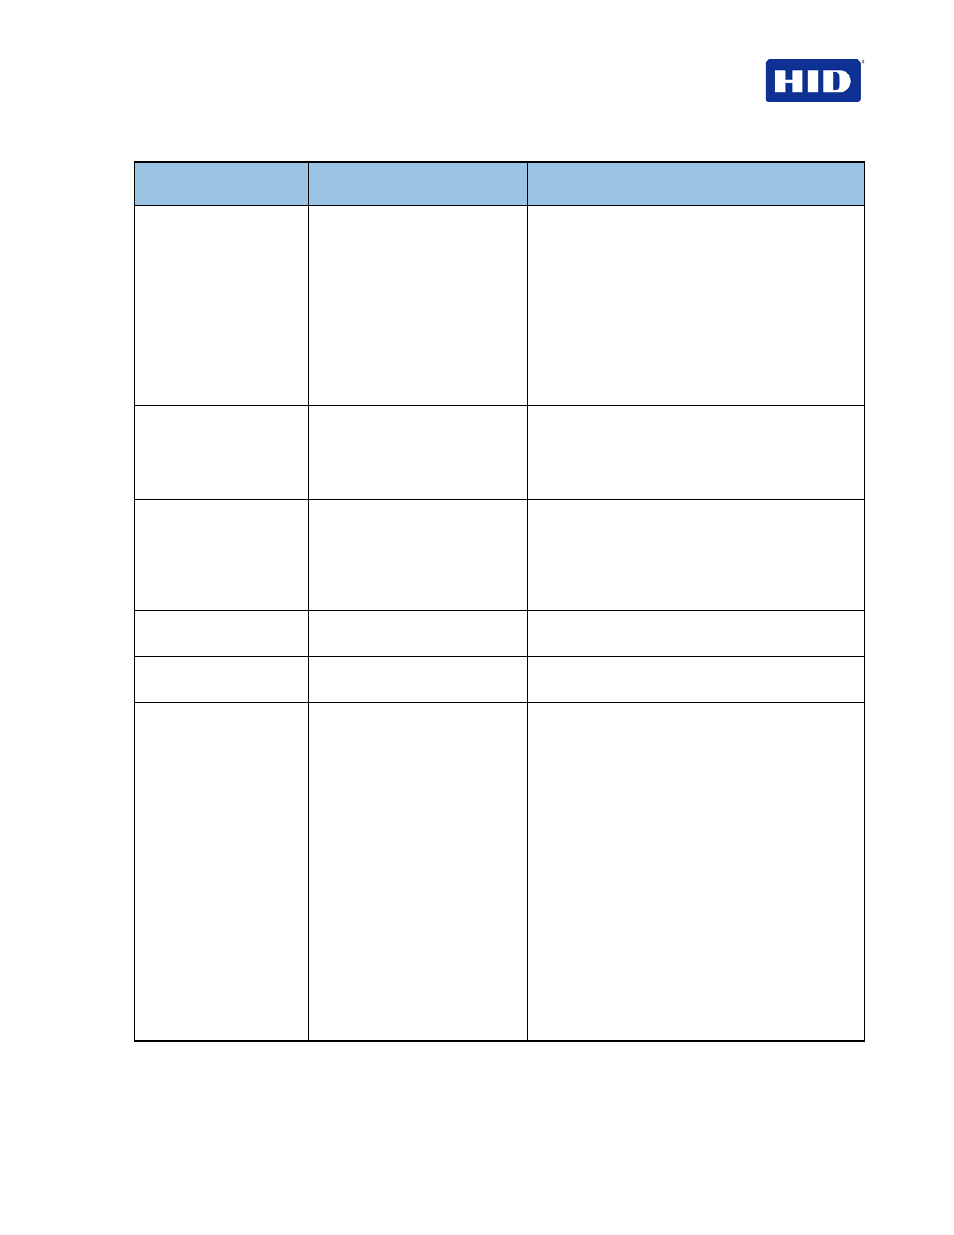
Printer Error
Message
Cause
Solution
No Flipper
The Printer does not have
flipping capabilities.
a. Verify the Printer has flipper capabilities by
way of the LCD Menu.
b. If Flipper capabilities are present, ensure that
the Print Both Sides option in the driver is set
correctly.
c. Press the
Resume button on the Printer’s
Front Cover to continue printing.
d. To cancel the print, press the
Cancel Print
button from the Driver’s display dialog or
press the
Cancel button located on the
Printer's LCD display.
Ribbon RFID Error
The ribbon tag information is
corrupted or incorrect.
Check that the Ribbon is installed properly.
Cancel
is the only option.
Press the
Cancel Print button from the Driver’s
display dialog, or the
Cancel button located on the
Printer's LCD display.
Wrong Ribbon Installed
An incorrect ribbon has been
installed, or a driver setting is
incorrect.
Check that the ribbon is correct for the printer and
job. Press the
Resume button located on the
Printer's LCD display to continue printing.
To cancel the print, press the
Cancel Print button
from the Driver’s display dialog, or the
Cancel
button located on the Printer's LCD display.
No Ribbon Installed
No Print Ribbon is installed in
the Printer.
Install the correct Ribbon and press
Resume on
the LCD display.
Ribbon Out
The Print Ribbon installed in the
printer is empty.
Install a new Ribbon and press
Resume on the
LCD display.
Ribbon Break/Jam
A Ribbon break/jam has been
detected inside the Printer.
The printer has determined that the installed ribbon
has either jammed or broken.
a. Open the Printer Cover and remove the Print
Ribbon. If ribbon is jammed, remove jam and
tighten ribbon.
b. Clear any cards in the printer by using the
Forward and/or Back buttons located on the
Printer's LCD display.
c. Tape the ends of the Ribbon together and
wind any excess onto the Take-up Spool of
the Print Ribbon.
d. Re-install the Print Ribbon, close the Printer
Cover and press the
Resume button located
on the Printer's LCD display to continue
printing.
e. To cancel the print, press the
Cancel Print
button from the Driver's display dialog and
the
Cancel button located on the Printer's
LCD display.