2 second, third & fourth boom section removal, 3 third & fourth boom section removal, Second, third & fourth boom section removal – JLG G12-55A AccuPlace Service Manual User Manual
Page 26: Third & fourth boom section removal
Boom
3.4
G10-55A & G12-55A AccuPlace
3.3.2
Second, Third & Fourth Boom Section
Removal
1. Set the complete boom on level ground and by
repositioning the slings, turn boom over on to the top
side. Set the complete boom on suitable stands to
begin tear down.
Note: With the complete boom setting upside down, the
removal and replacing of each boom section, hoses,
extend and retract chains and hose carrier are made
much easier.
2. Remove the extend/retract cylinder support from the
front of the boom.
3. Support the extend/retract cylinder with a suitable
sling. Remove the lock bolt and pin from both ends
of the cylinder. Remove the cylinder.
4. Unhook the latch on the Boom Length Sensor cable
from the third boom section. Refer to Section
9.11.13, “Boom Length Sensor.”
5. At the boom head, attach a sling through the rod end
of the tilt cylinder. Remove both hoses from the tilt
cylinder. Plug the hose ends and cap the tilt cylinder
fittings to prevent dirt and debris from entering the
hydraulic system. Remove the pin from the barrel
end of the tilt cylinder and remove the cylinder from
the boom head.
6. Loosen and remove the bottom rear wear pads and
rear side bearing pads from the second boom
section. Tag each pad, backing plate, shim and bolts
from each location.
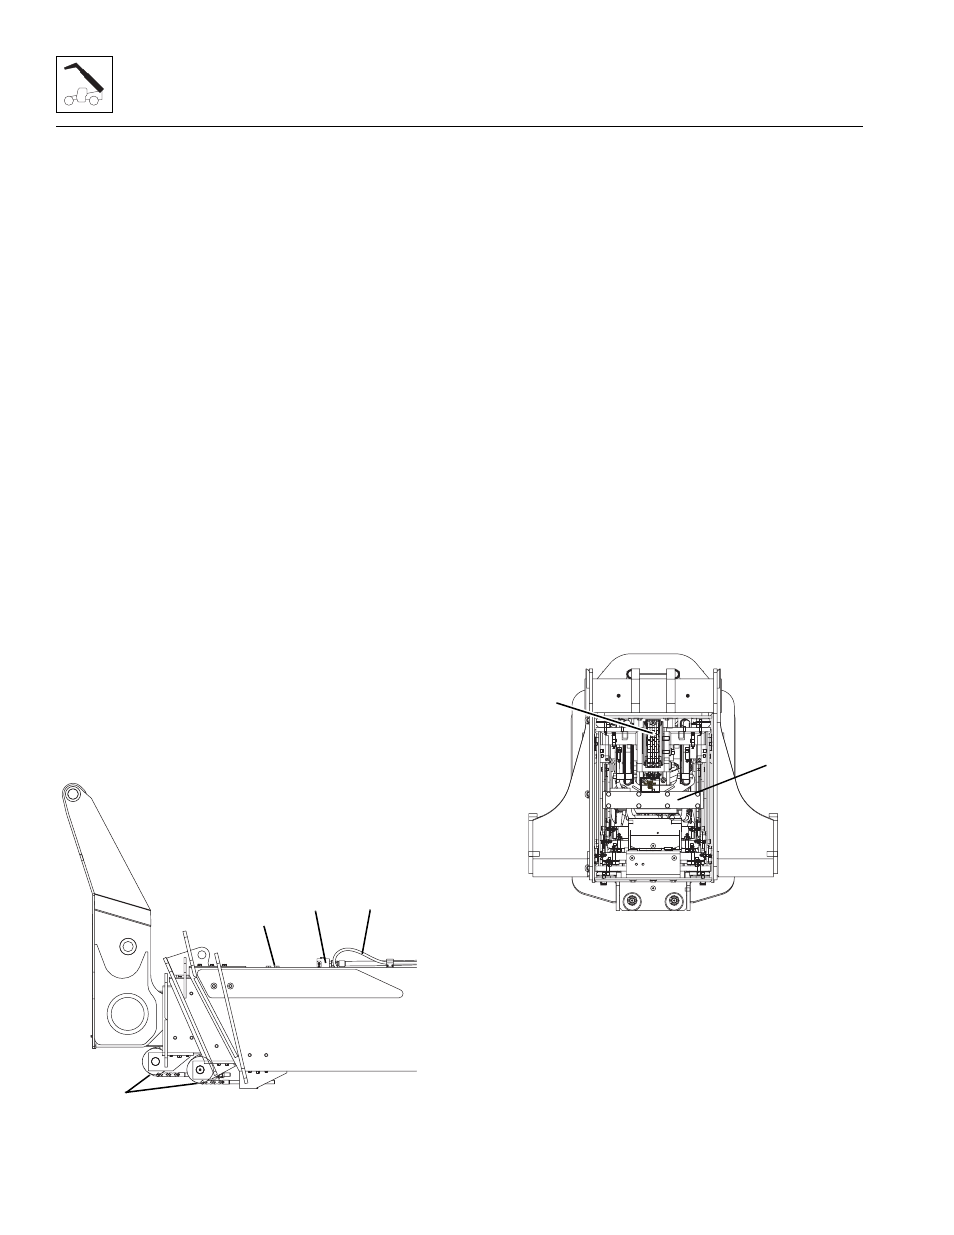
7. Release tension from the hoses on the hose take-up
weldment (1).
8. Loosen the hydraulic hoses (2) and electrical cables
if equipped on the hose take-up weldment. Plug the
hose ends and tube ends to prevent dirt and debris
from entering the hydraulic system.
9. Disconnect the top front chains (3) from the chain
clevis on the first and second boom section.
10. Release the chain tension from the front top chains.
11. Remove the front top chain rollers from the second
and third boom sections.
12. Remove the chain adjustment block (4) from the first
boom section.
13. Remove all wear pads from the front of the first
boom section. Tag each pad, backing plate, shim
and bolts from each location.
14. Carefully pull the second, third and fourth boom
sections together from the first boom section and
place on suitable support for further separation.
3.3.3
Third & Fourth Boom Section Removal
1. Loosen and remove the bottom rear and side wear
pads from the third boom section. Tag each pad,
backing plate, shim and bolts from each location.
2. Remove the standard and optional hose sheaves
from the rear of the second boom section.
3. Remove the chain and chain clevis (5) from the rear
of the second boom section.
4. Remove the hydraulic sub-assembly bracket (6) and
hardware from the rear of the third boom section.
5. Pull the hydraulic sub-assembly partially out through
the rear of the boom to access the hoses.
6. Loosen and remove the hoses from the rear of the
hydraulic sub-assembly.
7. Release the tension on the clevis before proceeding.
8. Loosen and remove the chain adjustment block from
the bottom of the boom.
MAP0660
1
2
3
4
MAP0670
5
6