Merit Medical ProGuide Chronic Dialysis Catheter User Manual
Page 4
4. Make a small incision at the desired exit site of the tunneled catheter on the chest wall. The incision
should be wide enough to accommodate the cuff, approximately 1 cm.
5. Use blunt dissection to create the subcutaneous tunnel opening at the catheter exit site for the white
tissue ingrowth cuff, midway between the skin exit site and the venous entry site, approximately 2-3 cm
(minimum) from the catheter exit site.
WARNING: Do not over-expand the subcutaneous tissue during tunneling. Over-expansion may delay or
prevent cuff in-growth.
6. Make a second incision above and parallel to the first, at the venous insertion site. Enlarge the
cutaneous site with a scalpel and create a small pocket with blunt dissection to accommodate the small
remaining catheter loop (“knuckle”) of the catheter after the peel-away sheath is removed.
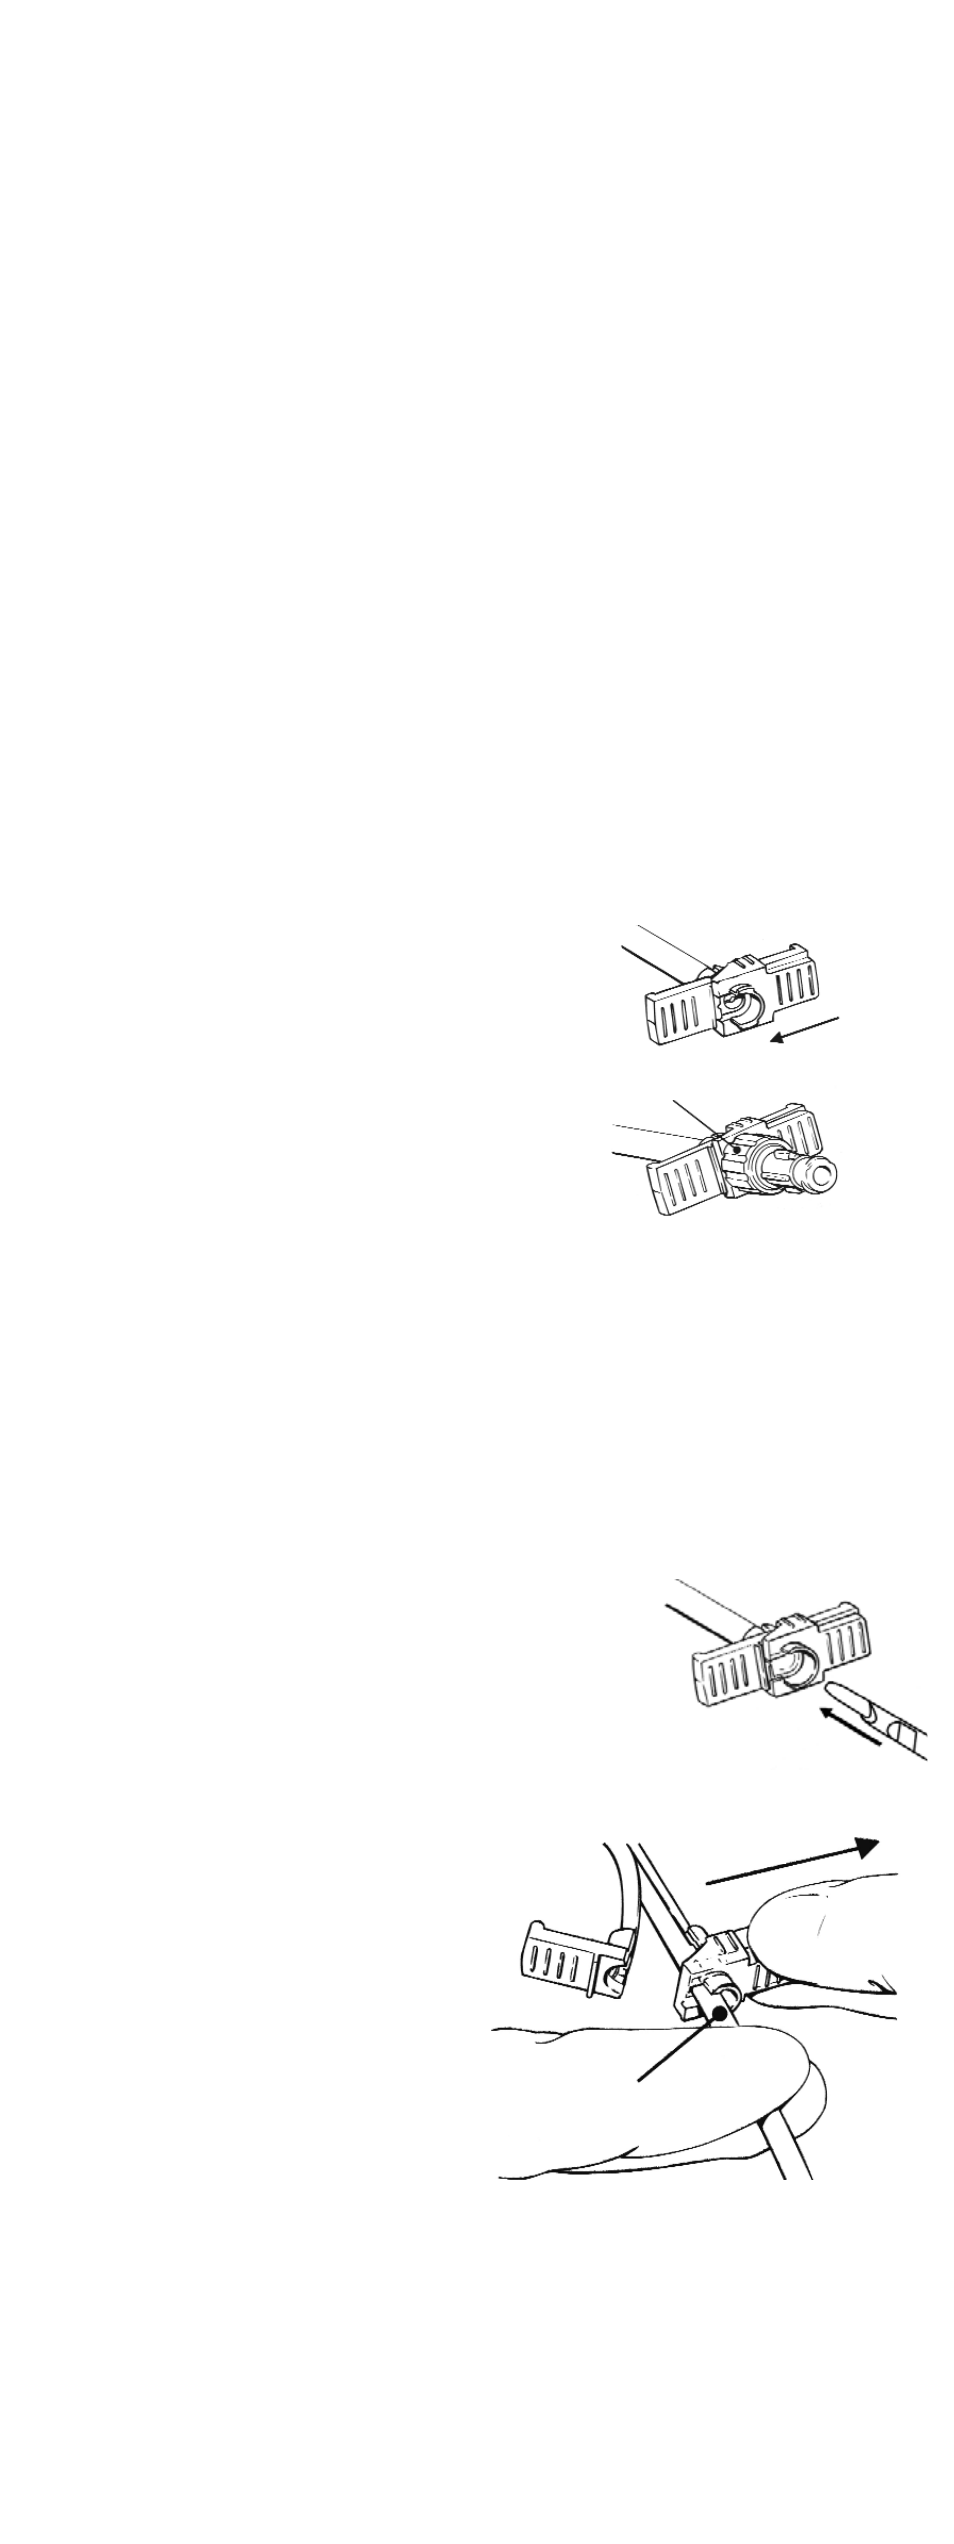
7. Attach the tunneler to the catheter’s venous lumen. Slide the tip of the catheter over the tri-ball
connection until it rests adjacent to the sheath stop.
8. Slide the tunneler sheath over the catheter making certain that the sleeve covers the arterial lumen. This
will reduce the drag in the subcutaneous tunnel as the apparitional bump and arterial port pass
through the tissue.
9. With the blunt tunneler, gently lead the catheter and tunneler connection into the exit site and create a
subcutaneous tunnel from the catheter exit site to emerge at the venous entry site.
CAUTION: The tunnel should be made with care to avoid damage to surrounding vessels. Avoid
tunneling through muscle.
CAUTION: Do not pull or tug the catheter tubing. If resistance is encountered, further blunt
dissection may facilitate insertion. The catheter should not be forced through the tunnel.
10. After tunneling the catheter, the tunneler can be removed by sliding the tunneler sheath away from the
catheter and pulling the tunneler from the distal tip of the catheter.
CAUTION: Avoid damage to the catheter by using a slight twisting motion.
CAUTION: To avoid damage to the catheter tip, keep the tunneler straight and do not pull it out at an angle.
CAUTION: Inspect catheter tip for damage before proceeding with procedure
INTRODUCTION OF THE VALVED PEELAWAY INTRODUCER
CAUTION: The sheath is not intended to create a complete two-way seal nor is it intended for
arterial use.
CAUTION: The sheath is designed to reduce blood loss but it is not a hemostasis valve. The valve may
substantially reduce the rate of blood flow but some blood loss through the valve may occur.
1. Insert the dilator through the valve and lock in place using the
rotating collar.
NOTE - Optional dilation:
• To ease insertion of the peelaway introducer, some physicians
prefer to dilate the vein before inserting the introducer.
• Thread the dilator(s) over the end of the guide wire and
advance into the vein using a rotating motion to assist passage
through the tissue.
CAUTION: As the dilator(s) pass through the tissue and into the
vasculature, ensure that the guide wire does not advance further
into the vein.
2. While maintaining guide wire position in the vein, advance the
locked peelaway introducer and dilator assembly over the
exposed guide wire and into the vein.
WARNING: Never leave the sheath in place as an indwelling catheter. Damage to the vein will occur.
3. Hold the sheath in place and unlock the dilator assembly by turning the rotating collar. Gently
withdraw the dilator and wire from the sheath leaving the valved introducer in place.
NOTE: Leaving the guide wire in place after removing the dilator may cause the valve to leak.
CAUTION: Care should be taken not to advance the split sheath too far into the vessel as a potential
kink would create an impasse to the catheter.
DIALYSIS CATHETER PLACEMENT
1. Advance the distal section of the catheter through the valved sheath introducer and into the vein.
PRECAUTION: To help minimize catheter kinking, it may be necessary to advance in small steps by
grasping the catheter close to the sheath.
2. Advance the catheter tip to the junction of the superior vena cava
and right atrium.
3. With the catheter advanced and positioned, crack the sheath
handle in half and peel partially away from the catheter.
CAUTION: Do not pull apart the portion of the sheath that remains
in the vessel. To avoid vessel damage, pull back the sheath as far as
possible and peel the sheath only a few centimeters at a time.
4. Near the valve, hold the catheter firmly in position
and pull the valve off the catheter.
PRECAUTION: It is normal to experience some
resistance while pulling the catheter through the
slit on the valve.
5. Remove the sheath completely from the patient
and catheter.
6. Press the remaining catheter loop (“knuckle”)
gently into the subcutaneous pocket created at the
venous entry site.
WARNING: Catheters should be implanted carefully
to avoid any sharp or acute angles which could
compromise the flow of blood or occlude the
opening of the catheter lumens.
PRECAUTION: For optimal product performance do
not insert any portion of the cuff into the vein.
7. Attach syringes to both extensions and open the clamps. Confirm correct placement and catheter
function by aspirating blood from both lumens. Flush each lumen with heparinized saline (priming
volume is printed on the extension tubing clamp). Blood should aspirate easily.
PRECAUTION: If either lumen exhibits excessive resistance to blood aspiration, the catheter may need
to be rotated or repositioned to obtain adequate blood flow.
PRECAUTION: It is recommended that the “venous” luer connection be oriented cephalad
(toward the head).
8. Clamp the extensions immediately after flushing.
9. Remove the syringes and replace with injection caps.
Pull valve and
sheath off
Hold catheter
in position
ROTATING COLLAR