Configuring basic bgp, Enabling bgp – H3C Technologies H3C S12500-X Series Switches User Manual
Page 266

252
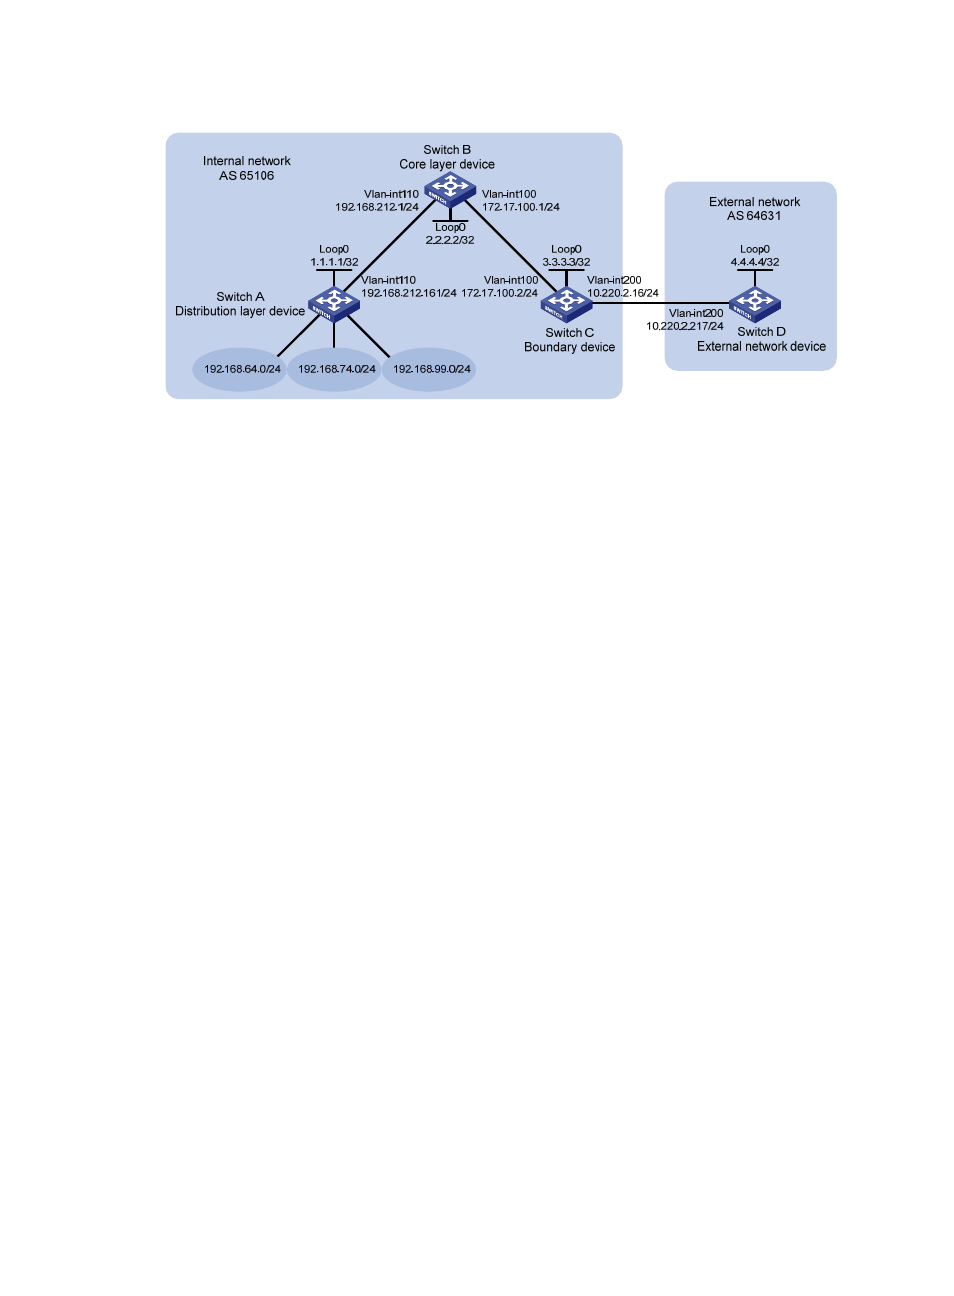
Figure 61 Network diagram
612B
Configuration procedure
1.
Configure IP addresses for interfaces. (Details not shown.)
2.
Configure static routing between Switch A and Switch B:
# Configure a default route with the next hop 192.168.212.1 on Switch A.
[SwitchA] ip route-static 0.0.0.0 0 192.168.212.1
# Configure static routes to 192.168.64.0/24, 192.168.74.0/24, and 192.168.99.0/24 with
the same next hop 192.168.212.161 on Switch B.
[SwitchB] ip route-static 192.168.64.0 24 192.168.212.161
[SwitchB] ip route-static 192.168.74.0 24 192.168.212.161
[SwitchB] ip route-static 192.168.99.0 24 192.168.212.161
3.
Configure OSPF between Switch B and Switch C and configure OSPF on Switch B to redistribute
static routes:
# Configure OSPF to advertise the local network and enable OSPF to redistribute static routes on
Switch B.
[SwitchB] ospf
[SwitchB-ospf-1] area 0
[SwitchB-ospf-1-area-0.0.0.0] network 172.17.100.0 0.0.0.255
[SwitchB-ospf-1-area-0.0.0.0] quit
[SwitchB-ospf-1] import-route static
[SwitchB-ospf-1] quit
# Configure OSPF to advertise the local networks on Switch C.
[SwitchC] ospf
[SwitchC-ospf-1] area 0
[SwitchC-ospf-1-area-0.0.0.0] network 172.17.100.0 0.0.0.255
[SwitchC-ospf-1-area-0.0.0.0] network 10.220.2.0 0.0.0.255
[SwitchC-ospf-1-area-0.0.0.0] quit
[SwitchC-ospf-1] quit
# Display the IP routing table on Switch C.
[SwitchC] display ip routing-table protocol ospf
