Quick start, Quick start -6 – Rockwell Automation 20-COMM-E PowerFlex EtherNet/IP Adapter User Manual
Page 20
1-6
Getting Started
20-COMM-E EtherNet/IP Adapter User Manual
Publication 20COMM-UM010G-EN-P
Quick Start
This section is provided to help experienced users quickly start using the
adapter. If you are unsure how to complete a step, refer to the referenced
chapter.
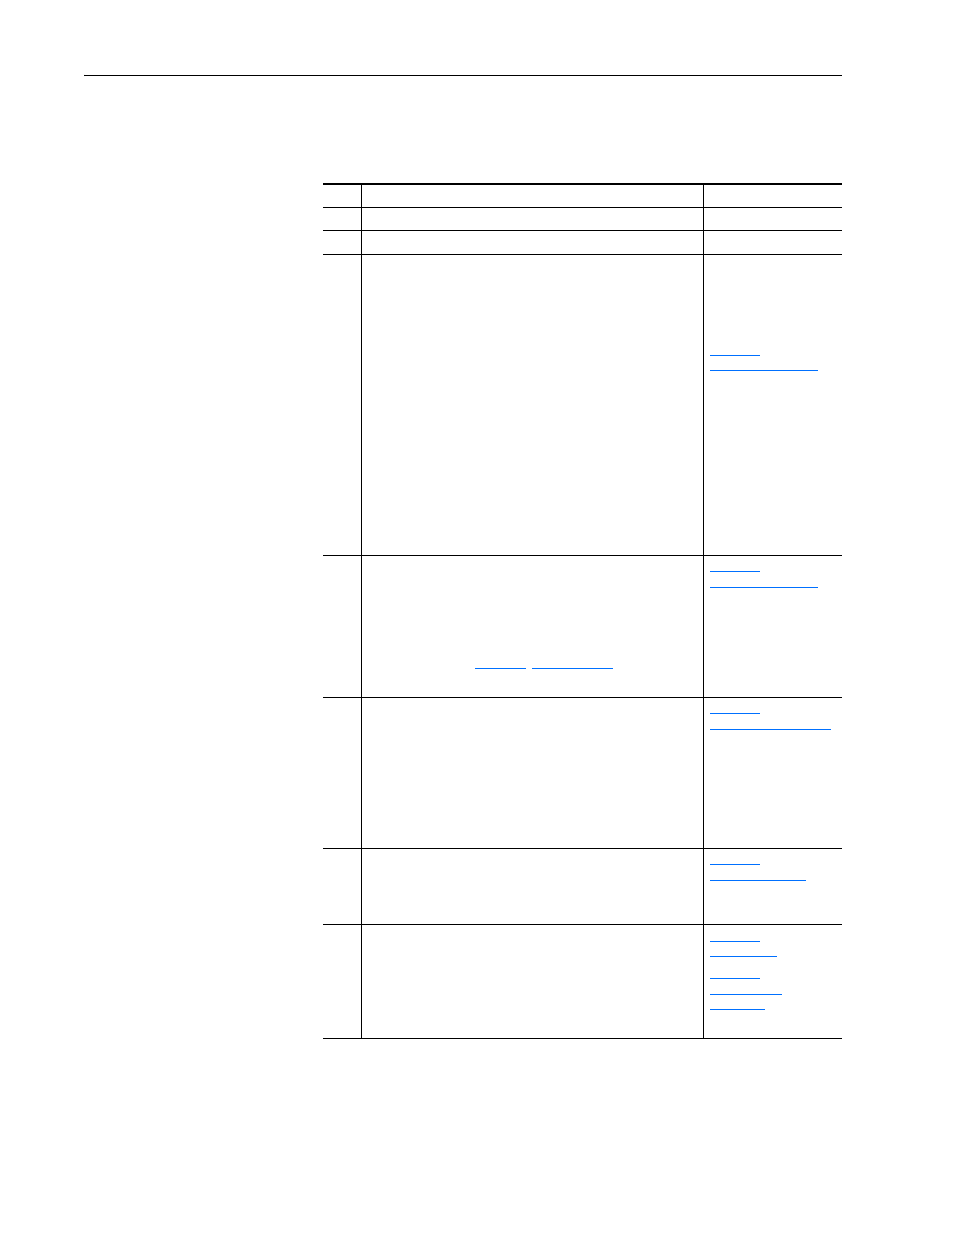
Step Action
See
1
Review the safety precautions for the adapter.
Throughout this manual
2
Verify that the PowerFlex drive is properly installed.
Drive User Manual
3
Install the adapter.
a. Verify that the PowerFlex drive is not powered.
b. Connect the adapter to the drive with the Internal Interface
cable.
c. Use the captive screws to secure and ground the adapter to
the drive.
d. Connect the adapter to the network with an Ethernet cable.
NOTE: When installing the adapter in either of the following
products, see the listed publication for instructions:
• DPI External Comms Kit—see the 20-XCOMM-DC-BASE
Installation Instructions, publication 20COMM-IN001, supplied
with the kit.
• PowerFlex 750-Series drive—see the 20-750-20COMM and
20-750-20COMM-F1 Communication Carrier Cards
Installation Instructions, publication 750COM-IN001, supplied
with the card.
PowerFlex 7-Class DPI
Network Communication
Adapter Installation
Instructions, publication
20COMM-IN004, and
,
4
Apply power to the adapter.
a. Verify that the adapter is installed correctly.
The adapter receives power from the drive.
b. Apply power to the drive.
The status indicators should be green. If they flash red, there
is a problem. See
c. Configure and verify key drive parameters.
,
5
Configure the adapter for your application.
Set adapter parameters for the following functions as required by
your application:
• IP address, subnet mask, and gateway address
• Data rate
• I/O configuration
• Master-Slave or Peer-to-Peer hierarchy
• Fault actions
,
6
Configure the controller to communicate with the adapter.
Use a controller configuration tool, such as RSLogix software, to
configure the master on the network to recognize the adapter and
drive.
,
7
Create a ladder logic program.
Use a controller configuration tool, such as RSLogix software, to
create a ladder logic program that enables you to do the
following:
• Control the connected drive, via the adapter, by using I/O.
• Monitor or configure the drive by using explicit messages.
,
,