Sitrans p measuring instruments for pressure – Siemens SITRANS P User Manual
Page 64

SITRANS P measuring instruments for pressure
Transmitters for gage, absolute and differential pressure, flow and level
DS III, DS III PA and DS III FF series
Technical description
2/64
Siemens FI 01 · 2009
2
Pressure transmitter for gage pressure
• Measured variable: Gage pressure of aggressive and non-ag-
gressive gases, vapors and liquids.
• Span (infinitely adjustable)
for DS III HART: 0.01 ... 400 bar g (0.145 ... 5802 psi g)
• Nominal measuring range
for DS III PA and FF: 1 ... 400 bar g (14.5 ... 5802 psi g)
Pressure transmitters for absolute pressure
• Measured variable: Absolute pressure of aggressive and non-
aggressive gases, vapors and liquids.
• Span (infinitely adjustable)
for DS III HART: 8.3 mbar a ... 100 bar a (0.12 ... 1450 psi a)
• Nominal measuring range
for DS III PA and FF: 250 mbar a ... 100 bar a
(3.63 ... 1450 psi a)
• There are two series:
- Gage pressure series
- Differential pressure series
Pressure transmitters for differential pressure and flow
• Measured variables:
- Differential pressure
- Small positive or negative pressure
- Flow q ~
√Δp (together with a primary differential pressure
device (see Chapter "Flow Meters"))
• Span (infinitely adjustable)
for DS III HART: 1 mbar ... 30 bar (0.0145 ... 435 psi)
• Nominal measuring range
for DS III PA and FF: 20 mbar ... 30 bar (0.29 ... 435 psi)
Pressure transmitters for level
• Measured variable: Level of aggressive and non-aggressive
liquids in open and closed vessels.
• Span (infinitely adjustable)
for DS III HART: 25 mbar ... 5 bar (0.363 ... 72.5 psi)
• Nominal measuring range
for DS III PA and FF: 250 mbar ... 5 bar (3.63 ... 72.5 psi)
• Nominal diameter of the mounting flange
- DN 80 or DN 100
- 3 inch or 4 inch
In the case of level measurements in open containers, the low-
pressure connection of the measuring cell remains open (mea-
surement "compared to atmospheric").
In the case of measurements in closed containers, the lower-
pressure connection has to be connected to the container in or-
der to compensate the static pressure.
The wetted parts are made from a variety of materials, depend-
ing on the degree of corrosion resistance required.
■
Design
Front view
The transmitter consists of various components depending on
the order. The possible versions are listed in the ordering infor-
mation. The components described below are the same for all
transmitters.
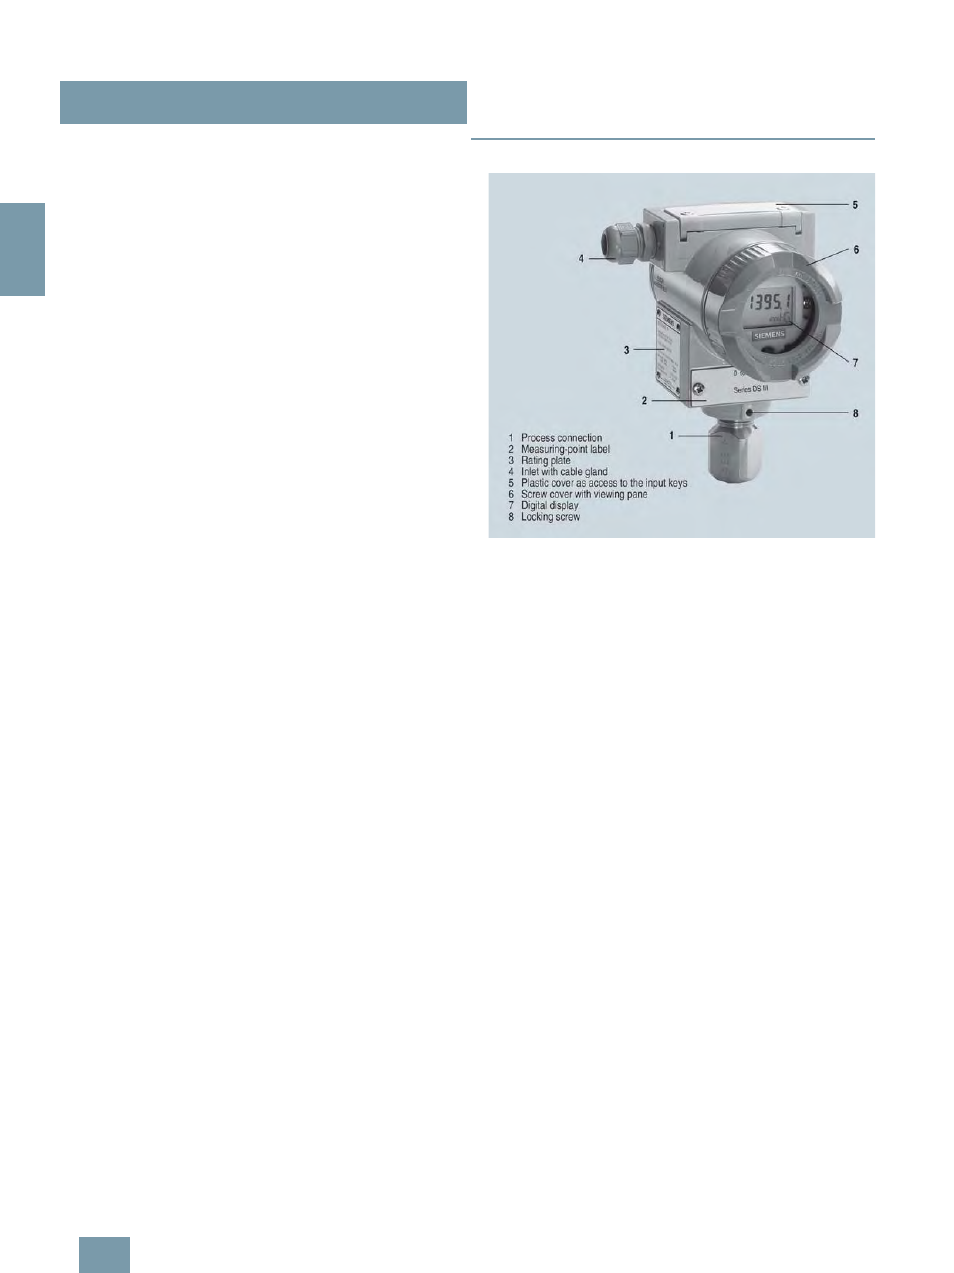
The rating plate (3, Figure "Front view") with the Order No. is lo-
cated on the side of the housing. The specified number together
with the ordering information provide details on the optional de-
sign details and on the possible measuring range (physical
properties of built-in sensor element).
The approval label is located on the opposite side.
The housing is made of die-cast aluminium or stainless steel pre-
cision casting. A round cover is screwed on at the front and rear
of the housing. The front cover (6) can be fitted with a viewing
pane so that the measured values can be read directly on the
digital display. The inlet (4) for the electrical connection is lo-
cated either on the left or right side. The unused opening on the
opposite side is sealed by a blanking plug. The protective earth
connection is located on the rear of the housing.
The electrical connections for the power supply and screen are
accessible by unscrewing the rear cover. The bottom part of the
housing contains the measuring cell with process connection
(1). The measuring cell is prevented from rotating by a locking
screw (8). As the result of this modular design, the measuring
cell and the electronics can be replaced separately from each
other. The set parameter data are retained.
At the top of the housing is a plastic cover (5), which hides the
input keys.
© Siemens AG 2008
