Section 9.8 previz, Section 9.9 comps and mems – NewTek TriCaster 2 Elite (3 RU) User Manual
Page 122
P a g e | 104
Hint: The QuickSelect button (marked with an 'eye' icon to associate it with visibility) is located in between
BKGD and FTB. Clicking it updates the Switcher's T-Bar delegate and transition states so that the next TAKE or
AUTO operation will remove all visible DSK or KEY layers from output. (On supporting control surfaces, press
ALT & BKGD to trigger the QuickSelect feature.)
SECTION 9.8
PREVIZ
The
Look Ahead Preview
viewport above the
Switcher
shows the
outcome
of the currently configured transition before it is
performed.
Previz
takes this capability further, allowing you to
pre-visualize effects in motion, including T-bar operations.
You can preview any
Switcher
and
M/E
effects (including
DSK/KEY
layers) without fear of disrupting
Switcher
(or
M/E
) output. Create
complex compositions in this mode and copy them back to
the
original M/E (or Switcher) or a different one.
You might use
Previz
to test your currently delegated transitions
and sources before applying them. Alternatively, though, you can
experiment to your heart’s content. Freely change layer sources, modify
Positioner
settings, transitions or
effects, layer delegates, test the result of
Take/Auto
, use
T-Bar
or
Zoom
controls with impunity.
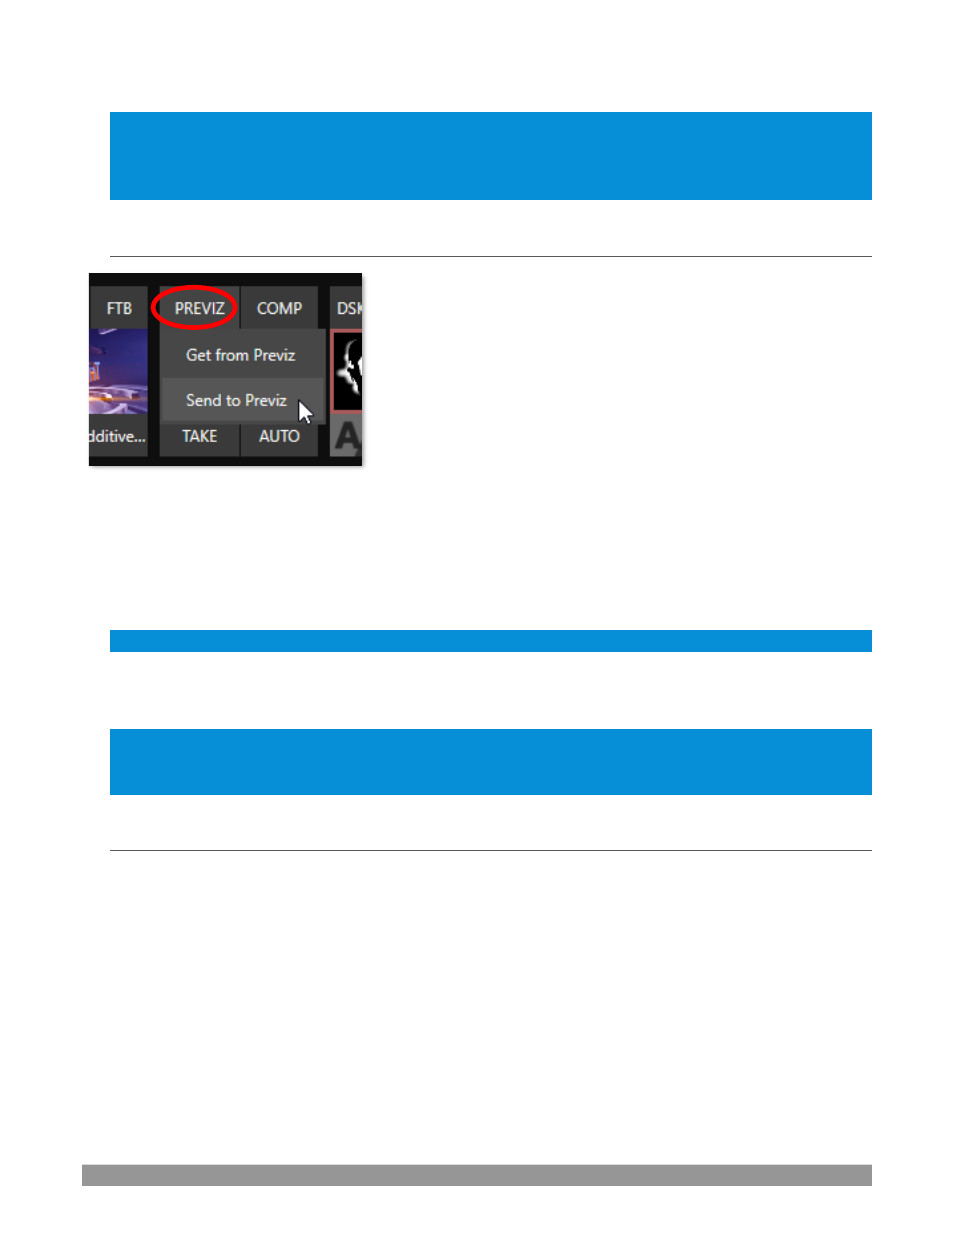
Use the
PREVIZ
menu to
copy the current settings of the source (
Switcher
or
M/E
) into the dedicated
Previz
pane, located with the M/Es, since it can be thought of as a specialized M/E
–
one
never
visible on output.
Hint: Use the “M/E Follow”
Workspace to monitor your experiments in the Previz pane.
When you arrive at a composition you like, simply select the
Paste Previz
menu item in the desired
destination (
Switcher
or
M/E
tab) to send it to the target.
Hint: This allows you to transfer all of the settings very easily for an M/E
–
say, the left camera angle for a
virtual set complete with carefully positioned M/E and KEY layers
–
to one or more additional M/Es. Then you
can simply swap the effect for the new M/Es to add different angles that match the original perfectly.
SECTION 9.9
COMPS AND MEMS
You’ll also notice a button labeled
COMP
immediately above the
T-Bar
. Clicking it opens the
Comp Bin
, which
provides powerful layer and effect control features.
We’re going to discuss the
Comp Bin
in full soon (Section 14.8), but at this point we want to distinguish
Comps
from
Switcher
MEMs. Bumping the cursor at the left edge of the screen adjacent to the
Switcher
or an
M/E
reveals a
MEM bin
with features that are quite similar. The primary difference between
MEMs
and
Comps
is
that the former retain (and apply) all settings in the
Switcher
–
including source selection.
FIGURE 122