4 setup button and menus – Magnum Energy ME-RTR Router User Manual
Page 31
Page 23
©
2014 Magnum Energy, Inc.
Setup
3.3.4
SETUP Button and Menus
Pressing the SETUP button provides access to the menu items and settings that enable you to
confi gure the router display, the inverter/charger, a ME-AGS-N, and a ME-BMK. Review each menu
item to determine if you need to adjust any settings to meet your system requirements.
Info: The fi rst screen that may appear when the SETUP button is pushed is a password
screen. If the PIN has been set under the TECH button’s 05 SETUP PIN menu, the fi rst
screen is the Set SETUP PIN menu. The proper PIN must now be entered in order to
access the SETUP menus. After fi ve minutes from the last button push, the display
automatically returns to the System Home screen and the PIN must be reentered in
order to access the SETUP menus. Refer to the TECH button’s SETUP PIN menu to set
or change the PIN number.
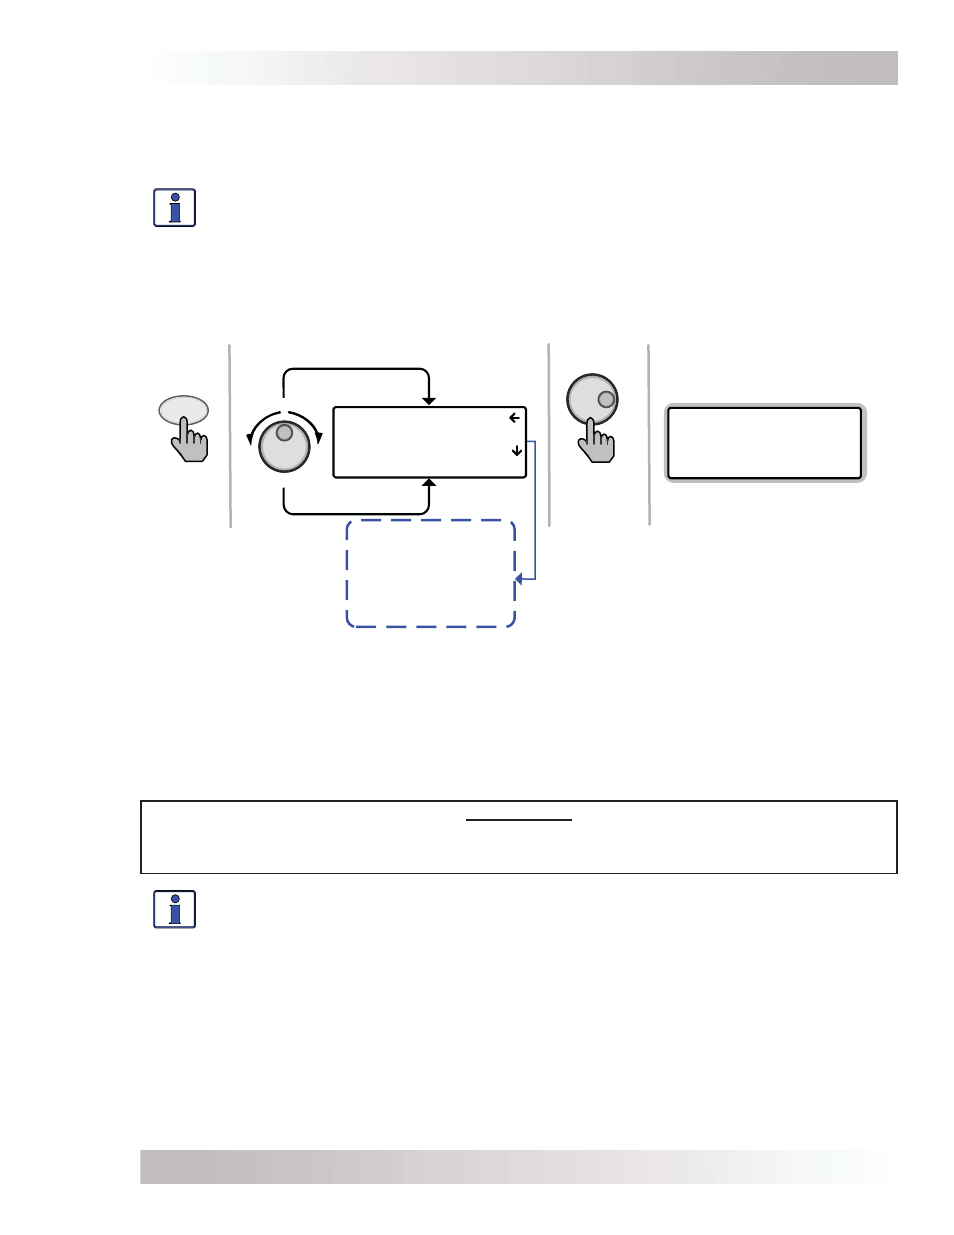
Press
SETUP
Rotate to desired selection:
Press to
select
Top line shows menu
Bottom line shows menu
(Ex: Inverter Setup menu)
01 System Setup
02 Inverter Setup
03 Charger Setup
ALL Select SETUP
02B Low Battery Cut
Out (LBCO) Volts =
20.0 Volts
ALL View INV SETUP
01 System Setup
02 Inverter Setup
03 Charger Setup
04 AGS Setup
05 BMK Setup
06 RC Setup
Figure 3-11, SETUP Button
SETUP: 01 System Setup
The following menus are used to set up the router clock and screen.
• 01A System Clock: The router contains a real time clock that must be set for proper operation
of some features. These features are: the SETUP button’s 02C AC In – Time, 04B Gen Run
Time, 04G Gen Quiet Time, 04H Gen Exercise menus, and the TECH button’s 04 Fault History
menu items.
**IMPORTANT**
It is very important that you set the time clock as it is a critical piece in effectively addressing
fault issues, as well as for the proper start/stop functions of your AGS device, if installed.
Info: The clock obtains power from the inverter and will reset if the router is disconnected
from the inverter.
To Set the Current Time
From the Set System Clock menu:
1. Rotate the SELECT knob to the hour of day, and then press SELECT.
2. Rotate the SELECT knob to the correct minute setting, and then press SELECT.
3. Rotate the SELECT knob to the appropriate AM or PM setting, and then press SELECT.
• 01B
Screen
Setup: This setting adjusts the contrast and brightness of the LCD screen to
accommodate the current lighting conditions and viewing angle.
Default settings: Contrast = 100%, Brightness = 50%
Range: 0-100%