AERCO SmartPlate User Manual
Page 59
SmartPlate Installation, Operation & Maintenance Manual
CHAPTER 8 – CORRECTIVE MAINTENANCE
OMM-0069_0E
AERCO International, Inc.
100 Oritani Dr. Blauvelt, NY 10913
Page 59 of 138
SP-100
Phone: 800-526-0288
PRI: 11/26/2013
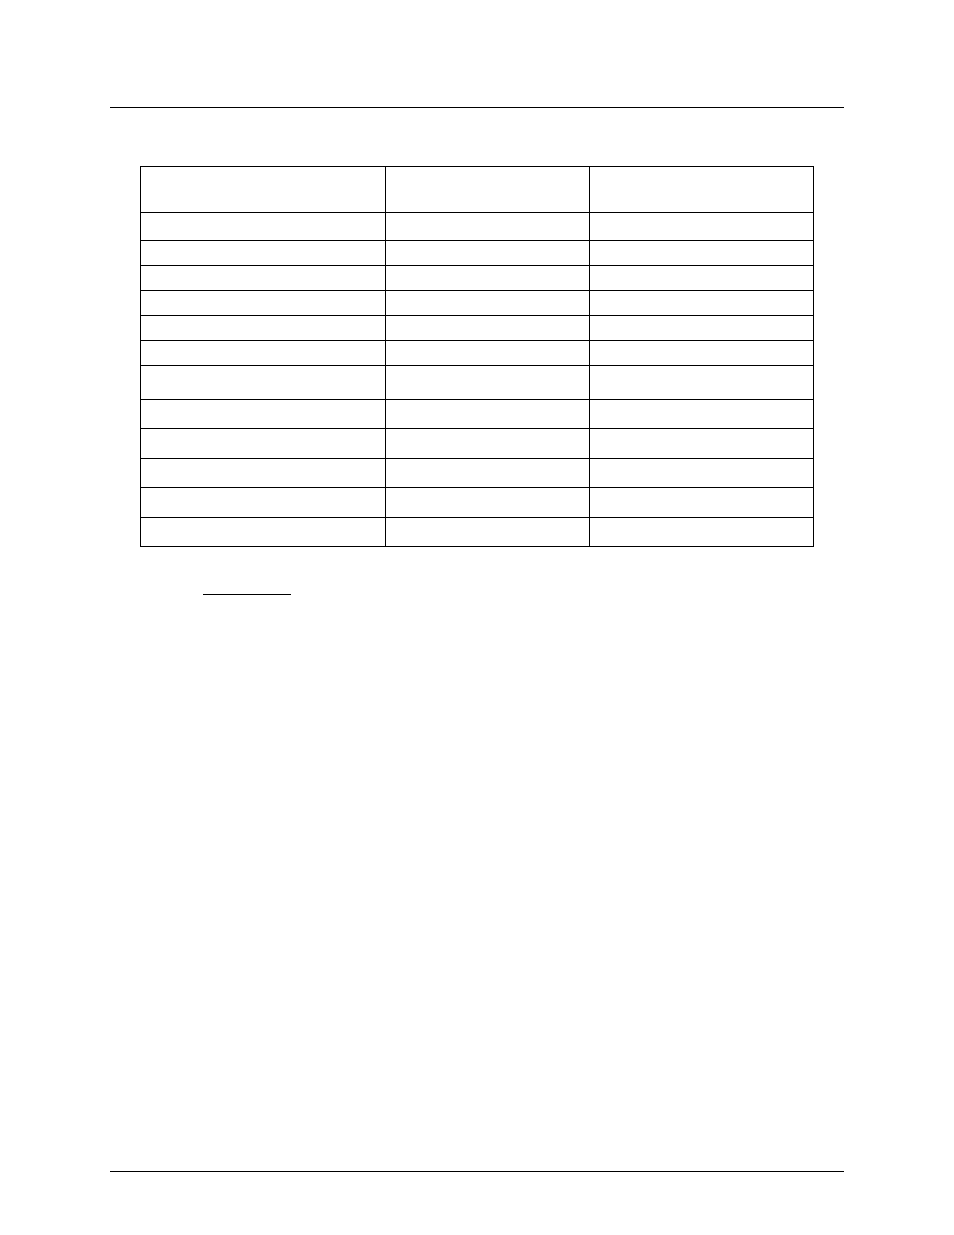
Table 8-1. AERCO HydroSkrub Solution Required For De-Scaling Heat Exchanger
SmartPlate Model
Heat Exchanger
Volume (gallons)
HydroSkrub Required
(Gallons)
Single-Wall Heat Exchangers
SP23 1.70 0.90
SP33 2.40 1.20
SP45 3.40 1.70
SP69 5.20 2.60
SP150 11.30 5.70
Double-Wall Heat Exchangers
SPDW23 2.00 1.00
SPDW32 2.80 1.40
SPDW42 3.70 1.90
SPDW61 5.50 2.80
SPDW113 10.20 5.10
6. Drain at least half of the Heat Exchanger volume shown in the above Table for the
SmartPlate Model being de-scaled.
7. While making sure that the Drain Valve is tightly closed, pour the correct amount of
HydroSkrub into the Air Vent opening in the Manifold.
8. Add water as needed until the Manifold is full.
9. Replace the 1” NPT Air Vent.
10. Set the Control Box POWER Switch to the ON position and ensure that the Recirculation
Pump is operating.
11. Allow the HydroSkrub/Water solution to circulate through the Heat Exchanger and piping
for 1 to 3 hours, depending on the amount of scale deposit that is inside the Heat
Exchanger. Since the amount of scaling will be hard to estimate, it should be based on the
time in service and water hardness.
12. Upon completion of the previous step, turn OFF the POWER Switch on the Control Box to
stop the Recirculation Pump.
13. Remove the 1” NPT Air Vent and open the Heater Drain Valve.
14. Flush with fresh water for at least 3 minutes.
15. Next, close the Drain Valve and fill with fresh water.
16. Apply new thermal sealant (Loctite 565 or equiv. NSF61 approved) to the threads of the 1”
NPT Air Vent and install it in the Manifold.
17. Open the four Isolation Ball Valves on the SmartPlate Water Heater.
18. Turn ON the Control Box POWER Switch to restart the SmartPlate Water Heater and
place it back in service using the start-up instructions in Chapter 5.