2 short overview of the functions, 3 commissioning, Commissioning – Lenze PLC Designer R3-x User Manual
Page 39: Working with the sample projects
Lenze · Commissioning of Lenze drives · 1.3 EN - 06/2014
39
Working with the sample projects
Sample project with "Table positioning" application - TablePositioning
_ _ _ _ _ _ _ _ _ _ _ _ _ _ _ _ _ _ _ _ _ _ _ _ _ _ _ _ _ _ _ _ _ _ _ _ _ _ _ _ _ _ _ _ _ _ _ _ _ _ _ _ _ _ _ _ _ _ _ _ _ _ _ _
7.2.2
Short overview of the functions
7.2.3
Commissioning
1. Wire the power connections
• Use the mounting instructions supplied with the controller to correctly use the power
connections according to the requirements of your device.
2. Wire the control terminals
3. Connect USB diagnostic adapter.
4. Switch on the voltage supply of the controller.
• Connect mains voltage.
When the green LED "DRV-RDY" is blinking and the red LED "DRV-ERR" is off, the controller is ready
to start and you can continue with the commissioning.
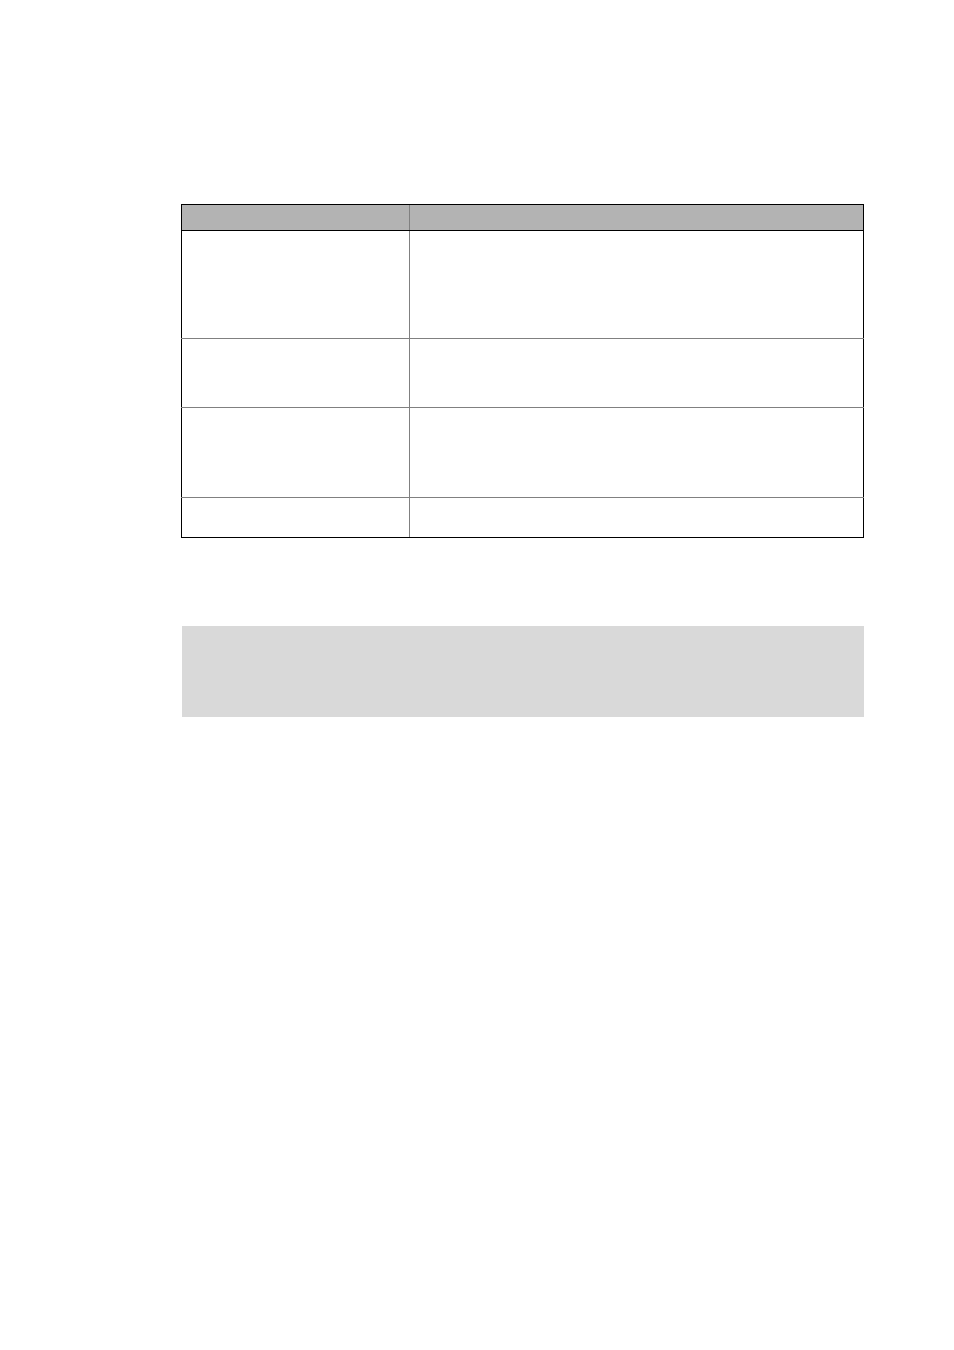
Mode
Description
Automatic
In the automatic mode a sequence runs over an infinite loop.
Selection:
When the drive has been referenced...
1.travel to position 1,
2.travel to position 2,
3.restart at (1.).
Manual
In manual mode, the controller can be manually actuated by setting the
single control bits (xManualPos, xManualNeg, xDriveSetQsp, xResetError).
Like this, the controller can be controlled manually, e.g. for cleaning or
changing the tools.
Service
The service mode serves to adjust the controller.
Selection:
• Travel positive for one second,
• Stop for one second,
• Travel negative for one second.
Homing
In homing mode, the drive is referenced.
• Either the home position is set directly, or a homing is started.
Read the mounting instructions accompanying the controller first before you start
working!
The mounting instructions contain safety instructions that must be observed!