23 english, English – Milwaukee M12 TI User Manual
Page 2
2
3
ENGLISH
You are free to load this software on as many computers as you
like at no charge, as long as you agree to the “End User License
Agreement” at the time of installation.
How to Open the Software Manual on Your Computer
This Software Manual loads onto your computer from the product
CD when you install the Software. When you are using the
Software, you can open this Software Manual through the HELP
Menu or by pressing F1. You can then read the manual, search for
a topic, or print some or all of it.
Alternatively, you can open the folder on your computer’s CD drive
or the hard drive where the Software Manual is located, and copy
or open the Software Manual PDF file from there, even if you are
not running the Software.
INTRODUCTION TO THE SOFTWARE WORKFLOW
The menu bar along the bottom of the computer screen shows the
workflow from left to right. A button activates each major step in the
workflow. Your work gets saved as you proceed, and you can go
back and forth between steps using the < BACK and > NEXT
buttons located on the lower right of the screen.
The following is meant to give you a brief overview of the workflow.
Not every feature of the software is described in this introduction.
The details of using the software follow the introduction.
Introduction to the MANAGE IMAGES Step
1. Load images from the Thermal Imager onto a computer to save
them permanently.
2. Select certain images to put into a report.
Introduction to the ANALYZE IMAGES Step
1. Use the mouse-driven SPOT METER to identify temperatures
throughout each thermal image of interest, and add notations
called Push Pins, which are to call attention to something of
interest in an image.
2. On any saved image, you can change the color palette and the
range after the fact, just as if the image was still in the Thermal
Imager. Making these adjustments does not change the data in
the saved images. It only changes how they are displayed.
These are some of the optional adjustments you can make to
images to optimize them for presentation.
3. Write your own results analysis and recommendations to fix a
problem or potential problem. For example, you might find a
motor shaft overheating, suggesting a bad bearing. Or you might
find one circuit breaker in a panel that is much hotter than the
others, suggesting that it is overloaded or failing internally.
Introduction to the BUILD REPORT Step
1. At this step in the workflow you choose the format and type style
you would like and add your company name, logo, address,
phone and fax numbers and email address.
2. This step is also where you write an optional Cover Page and
Summary.
INTRODUCTION
MILWAUKEE™ Thermal Imager Report Software (hereafter called
the Software) is provided to every purchaser of a MILWAUKEE
M12™ 160x120 Thermal Imager. The Software provides an easy
way to accomplish the following:
■ View thermal images loaded from the Thermal Imager into a
computer as well as the temperatures anywhere within the
thermal images.
■ Adjust the appearance of the thermal images to reveal what is
important in the thermal image. You can also put visual tags on
the thermal images showing temperature readings and
comments.
■ Easily build a professional-looking report. The report contains
the thermal images you selected to show, the visual images to
go with each one, and any comments and recommendations
you want to make. The report is a PDF file that you can print,
save on a computer, or email to a customer.
DISCLAIMER
Milwaukee warrants that the software will work as described in the
user's guide. There is no other warranty expressed or implied.
Milwaukee does not warrant that the software does not contain
errors, or will never stop unexpectedly, or will never lose data.
You agree that MILWAUKEE shall not under any circumstances be
held liable for financial loss or any other kind of damage, loss of
business, loss of information, or personal or business liability
arising directly or indirectly out of usage of the Software.
The limitations mentioned before do not apply in the event of the
death of a consumer or personal injury to the latter.
Statutory rights remain unaffected.
WHEN TO USE THE SOFTWARE
The Software is indispensable in accomplishing the following
tasks:
■ Backing up your saved thermal and visual images to a safe
place. Saving images long-term on the Thermal Imager is not
recommended, since another user can delete them, the SD card
could be lost, filled up, fail, etc.
■ Creating a baseline and then making comparisons of the same
electrical or mechanical equipment or area being evaluated at a
later time. By comparing thermal studies over time, you can
detect whether operating conditions are stable or deteriorating. If
you find something overheating and getting worse over time,
you can recommend corrective action, using compelling
evidence to back you up.
■ Sending a report to a customer or creating a record for your own
company files. The Software generates an attractive,
professional-looking report to conclude a job.
■ Taking many thermal images quickly when you have access to
an area for only a short time. You can take your time when you
are back in your office or workbench to examine your saved
thermal images. You can use a mouse-driven SPOT METER,
identifying temperature readings throughout the image. You can
place SPOT METER tags on thermal images. You can also
enhance images by changing the range and the color palette,
and you can attach IMAGE NOTE tags to point out something
important in an image.
SYSTEM REQUIREMENTS
Computer
Configuration
Minimum
Requirement
Recommended
Free hard disk space 100 MB
1 GB or more
CD-ROM drive
Yes
-
Monitor native
resolution
1024 x 768 pixels
1920 x 1080 pixels
Free USB interface Yes
Same
Operating System
Microsoft® XP®
Microsoft Windows® 7
Operating System
Components
Microsoft .NET®
Framework version
4.0 or newer
Same
Color printer
No
Yes, to print reports
Internet connection No
Yes, to receive
Software updates and
Thermal Imager
operating firmware
updates from
MILWAUKEE.
Computer
microprocessor
32-bit Pentium®
class, 1.2 GHz
64-bit Dual or Quad
Core, ≥2.5 GHz
Graphics interface
hardware and RAM
No
500 MB or greater
dedicated graphics
RAM for faster image
processing
DRAM
1 GB
4 GB or more
Microsoft, Windows, Vista, XP and .NET are registered trademarks
of Microsoft Corporation
Pentium® is a registered trademark of Intel Corporation
OBTAINING TECHNICAL SUPPORT
Visit www.milwaukeetool.com on the web and look for “Technical
Support.” There you can find out how to contact MILWAUKEE by
email, telephone, or postal mail.
The mailing address of the main MILWAUKEE Factory Service
Center is:
MEDINA HOUSE, FIELDHOUSE LANE
BUCKS - SL7 1TB MARLOW
GREAT BRITAIN
INSTALLING THE SOFTWARE
Insert the Thermal Imager product CD into the CD drive. The setup
program should run automatically.
1. If you see a message about the publisher not being verified,
ignore it and click on Install to proceed. Since you are installing
the application from the product CD, there is no need to be
concerned about verifying the publisher.
2. If a Windows update is required, for example to update the
Microsoft .NET Framework to version 4.0 or later, accept the
messages to allow your computer to receive updates through its
internet connection.
3. Language selection is automatic based on the region setting of
your Microsoft Windows operating system. If the language
associated with your operating system is available in the
MILWAUKEE Thermal Imager Report Software, the installer
program selects and installs that language version. If your
language is not available in the Software, the English version is
installed.
NOTE:If your CD drive is configured for Autorun, the installation
starts automatically. If installation does not start automatically, do
the following:
1. Click on the Windows Start icon (lower left icon on Windows
screen), then Computer (or “My Computer”)
2. Click on the CD drive to access the CD.
3. Double-click on the file named Setup.exe in the CD top-level
folder.
Installing the Software on One or Multiple Computers
ENGLISH
Introduction to the PRINT PREVIEW Step
1. Preview your report and go back to BUILD REPORT to make
changes until you are satisfied.
2. Create a PDF file and/or print your report.
3. At this point you can end your session, go back to open an
existing job, or start a new one. Throughout your session, you
can click on SAVE at the lower right of the screen whenever you
want to be sure to save your work. The Software auto-saves
your work every 2 minutes by default. You can change the File
Saving setting in the top-level File menu under Settings.
4. When you close the program, all work is saved, also by default.
STARTING THE SOFTWARE
Double-click on the MILWAUKEE logo:
The Main Menu appears as shown following
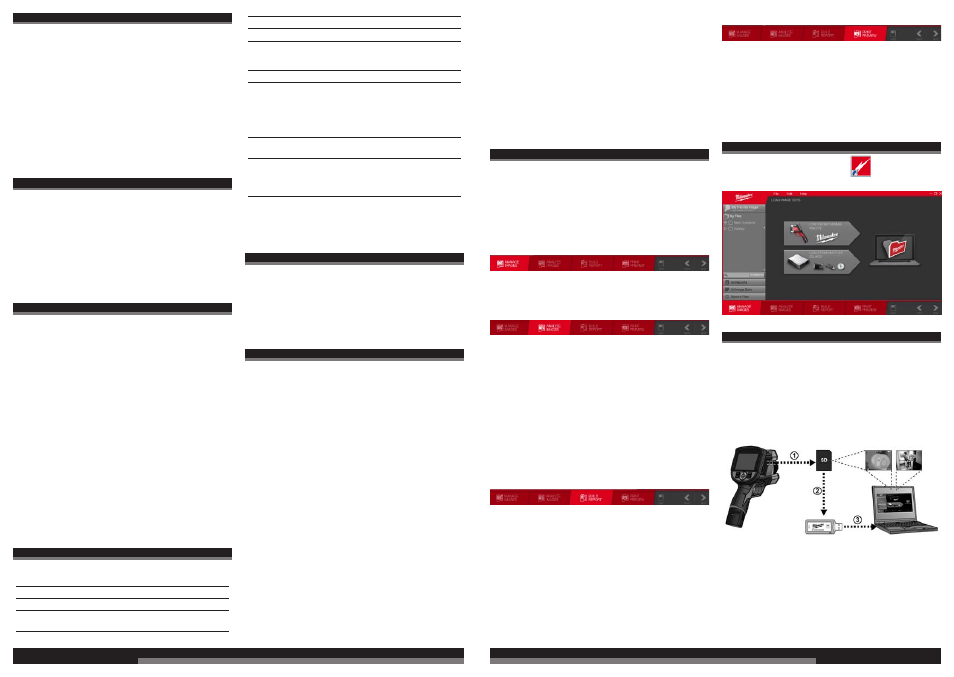
LOADING IMAGES FROM THE THERMAL IMAGER
The first step in using the Software is to load images from the
Thermal Imager into the computer. There are two ways to do it.
Either method works as well as the other. For both methods, use
the LOAD FROM THERMAL IMAGER Software button.
Method 1:
Connect the USB cable from the Thermal Imager to the computer.
The Thermal Imager power must be on. Make sure the battery has
at least a half charge as shown on the battery status symbol in the
upper right corner of the Thermal Imager display.