Scienceworkshop, Analog adapter with a, Sensor set-up – PASCO Xplorer-GLX Users’ Guide User Manual
Page 65: F4 sensors
X p l o r e r G L X U s e r s ’ G u i d e
59
F4 Sensors
The Sensors menu contains the following options for adding, removing, and cali-
brating sensors.
Add
Select this option to set up a sensor without physically connecting it. A
menu containing all PASPORT sensors will open. Use the arrow keys to highlight
the desired sensor and press
.
Remove
Use this option to delete the selected sensor without disconnecting it
from the GLX. All data collected by that sensor will be deleted.
If there are multiple sensors, select the sensor that you want to delete before
selecting the Remove option. See “Working with Multiple Sensors” on
page 55.
It is not necessary to select Remove from the Sensors menu in order to discon-
nect a sensor; you can simply unplug it.
When you physically unplug a sensor (after recording data), the icon for the sen-
sor remains in the upper part of the Sensors screen with
above it. All data
recorded from that sensor, and the sensor’s settings (such as sampling rate) are
preserved in the GLX. If that sensor is ever reconnected, it will be installed in its
old place with the same settings. If you would like to remove the archived data
and settings, select the icon of the unplugged sensor
, then select Remove from
the Sensors menu.
Calibrate
Select Calibrate from the Sensors menu to open the Calibration dialog
box. See page 71 for a description of the dialog box and instructions on calibrat-
ing a sensor.
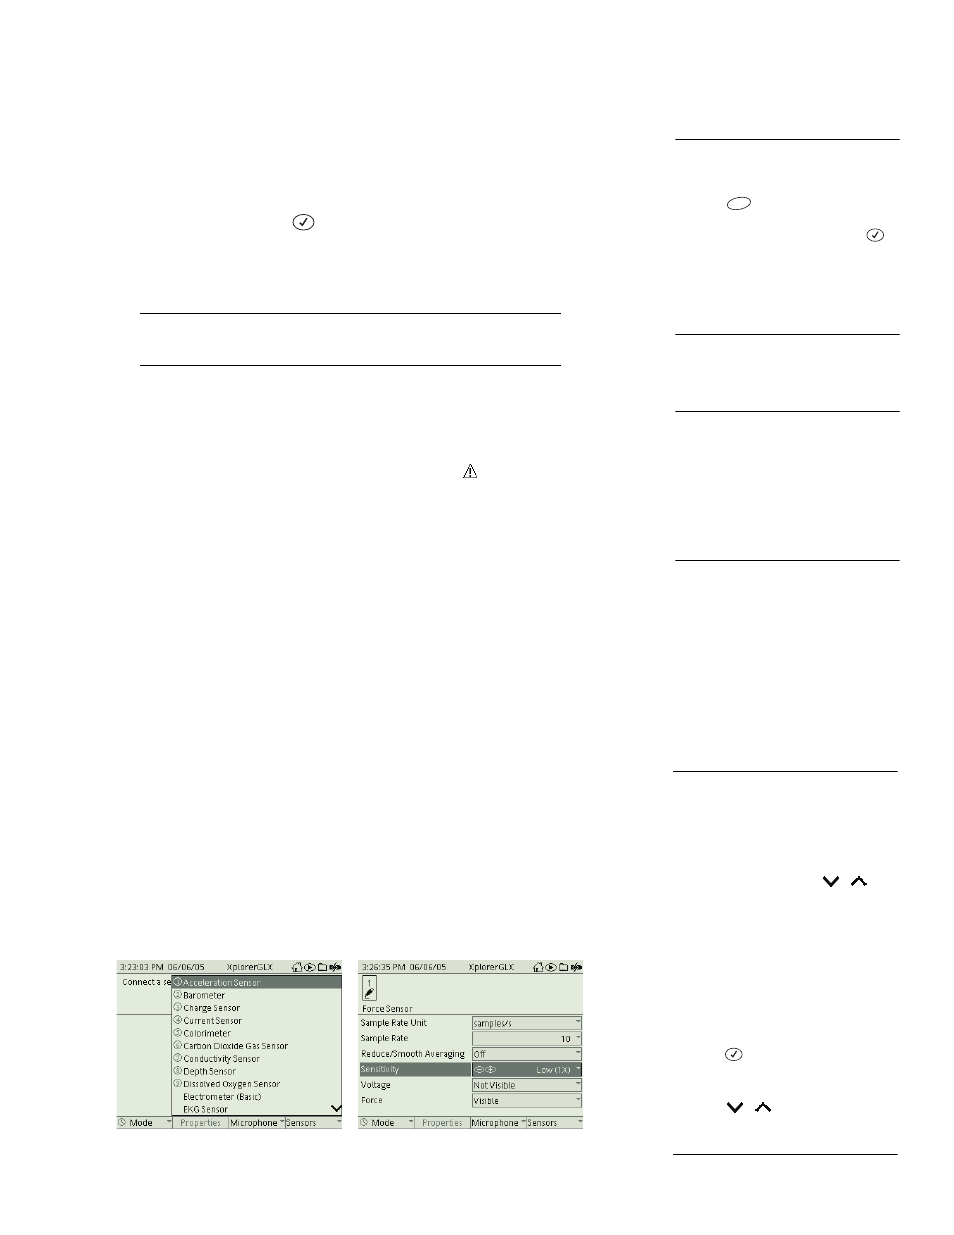
Analog Adapter with a
ScienceWorkshop
Sensor Set-up
You can connect an analog ScienceWorkshop sensor to the GLX via an Analog
Adapter (PS-2158). When you connect the Analog Adapter to the GLX, a special
menu listing all ScienceWorkshop sensors appears. From this menu, select the
sensor that you have connected (or will connect) to the adapter.
After you have
selected it, the sensor appears in the top portion of the Sensors screen, just like a
PASPORT sensor.
In addition to the regular sensor settings (see page 56), a Sensitivity setting
appears in the Sensor screen. This setting controls the gain of the Analog Adapter
and can be set to Low (1X), Medium (10X), or High (100X). The gain is the fac-
tor by which the resolution of the sensor is improved, and by which the range is
decreased.
ScienceWorkshop Sensors menu (left) and
Sensors screen with a
ScienceWorkshop sensor (right)
9
To select an option from the Sensors
menu
Keypad
1. Press
to open the menu.
2. Use the arrow keys to highlight the
desired menu option and press
;
or press the number on the keypad
corresponding to the desired option.
Mouse
1. Click Sensors to open the menu.
2. Click the desired option.
F4
10
To select a sensor icon
Keypad
Press the left or right arrow key to move
the box to the icon in the upper portion of
the Sensors screen.
Mouse
Click the icon in the upper portion of the
Sensors screen.
11
To select a sensor form the
ScienceWorkshop Sensors menu
Keypad
1. Connect an Analog Adapter to the
GLX to launch the menu.
2. Use the arrow keys to highlight the
desired sensor. Arrows (
,
)
appear on the menu to indicate that
some sensors are not visible. Press
the up or down arrow key multiple
times to move the highlight beyond the
visible portion of the menu. The menu
will scroll to bring other sensors into
view. To skip directly to the last sen-
sor on the menu, move the highlight to
the first sensor, then press the up
arrow key.
3. Press .
Mouse
1. Click the up or down arrow on the
menu (
,
) to bring the desired
sensor into view.
2. Click the desired sensor.