Watlow EZ-ZONE PM PID User Manual
Page 92
Watlow EZ-ZONE
®
PM PID Controller
•
89
•
Chapter 9 Features
sible to minimize error. In addition, a precision volt/ohm meter capable of reading values to 4 decimal places
or better is recommended. Prior to calibration, connect this volt/ohm meter to the precision source to verify
accuracy.
Actual input values do NOT have to be exactly the recommended values, but it IS critical that the actual
value of the signal connected to the controller be accurately known to at least four digits.
Calibration of Analog Inputs:
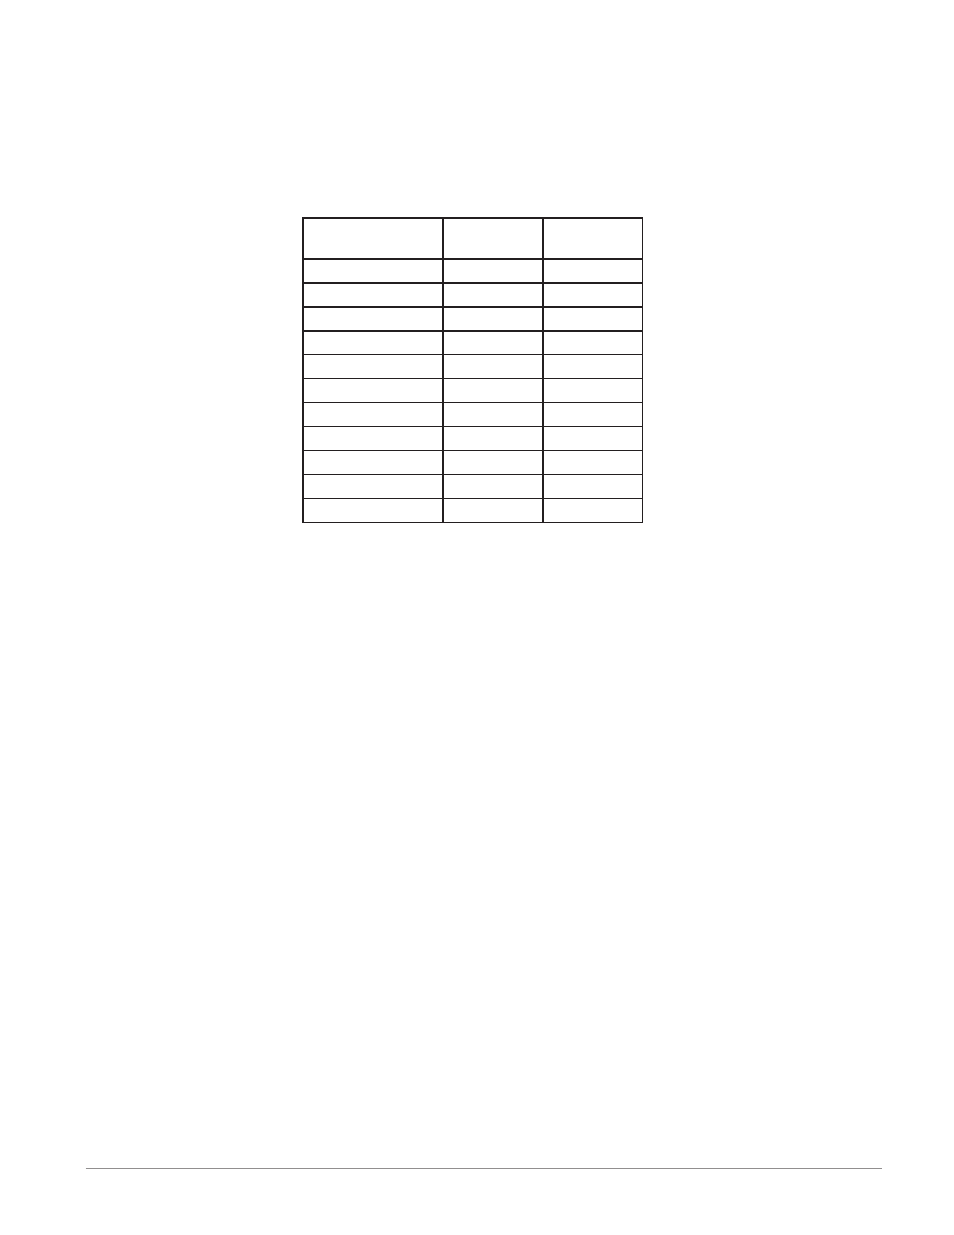
To calibrate an analog input, you will need to provide a source of two electrical signals or resistance values
near the extremes of the range that the application is likely to utilize. See recommended values below:
Sensor Type
Precision
Source Low
Precision
Source High
thermocouple
0.000 mV
50.000 mV
millivolts
0.000 mV
50.000 mV
volts
0.000V
10.000V
milliamps
0.000 mA
20.000 mA
100 Ω RTD
50.00 Ω
350.0 Ω
1,000 Ω RTD
500.0 Ω
3,500 Ω
thermistor 5 kΩ
50.00
5,000
thermistor 10 kΩ 150.0
10,000
thermistor 20 kΩ 1,800
20,000
thermistor 40 kΩ 1,700
40,000
potentiometer
0.000
1,200
Note:
The user may only calibrate one sensor type. If the calibrator interferences with open thermocouple detec-
tion, set Sensor Type [`SEn] in Setup Page [`SEt], Analog Input Menu [``Ai] to millivolt [`Mu] instead
of Thermocouple [``tC] to avoid interference between the calibrator and open thermocouple detect circuit
for the duration of the calibration process. Be sure to set sensor type back to the thermocouple type utilized.
1.
Disconnect the sensor from the controller.
2.
Record the Calibration Offset [`i;CA] parameter value in the Operations Page [oPEr] , Analog Input
Menu [``Ai] then set value to zero.
3.
Wire the precision source to the appropriate controller input terminals to be calibrated. Do not have any
other wires connected to the input terminals. Please refer to the Install and Wiring section of this docu-
ment for the appropriate connections.
4.
Ensure the controller sensor type is programmed to the appropriate Sensor Type [`SEn] to be utilized
in the Setup Page [`SEt] , Analog Input Menu [``Ai].
5.
Enter Factory Page [FCty] , Calibration Menu [`CAL] via RUI or EZ-ZONE Configurator Software.
6.
Select the Calibration [CAL] input instance to be calibrated. This corresponds to the analog input to be
calibrated.
7.
Set Electrical Input Slope [ELi;S] to 1.000 and Electrical Input Offset [ELi;o] to 0.000 (this will cancel
any prior user calibration values)
8.
Input a Precision Source Low value. Read Electrical Measurement value [`Mu] of controller via
EZ-Configurator or RUI. This will be referred to as Electrical Measured Low. Record low value
______________
9.
Input a Precision Source High value.
10. Read Electrical Measurement value [`Mu] of controller via EZ-Configurator or RUI. This will be re-
ferred to as Electrical Measured High. Record high value ______________
11. Calculated Electrical Input Slope = (Precision High – Precision Low) / (Electrical Measured High - Elec-
trical Measured Low). Calculated Slope value ___________
12. Calculated Electrical Input Offset = Precision Low - (Electrical Input Slope * Measured Low). Calculated
Offset value ___________
13. Enter the calculated Electrical Input Slope [ELi;S] and Electrical Input Offset [ELi;o] into the control-
ler.
14. Exit calibration menu.