EXP Computer C4077-90960 User Manual
Page 286
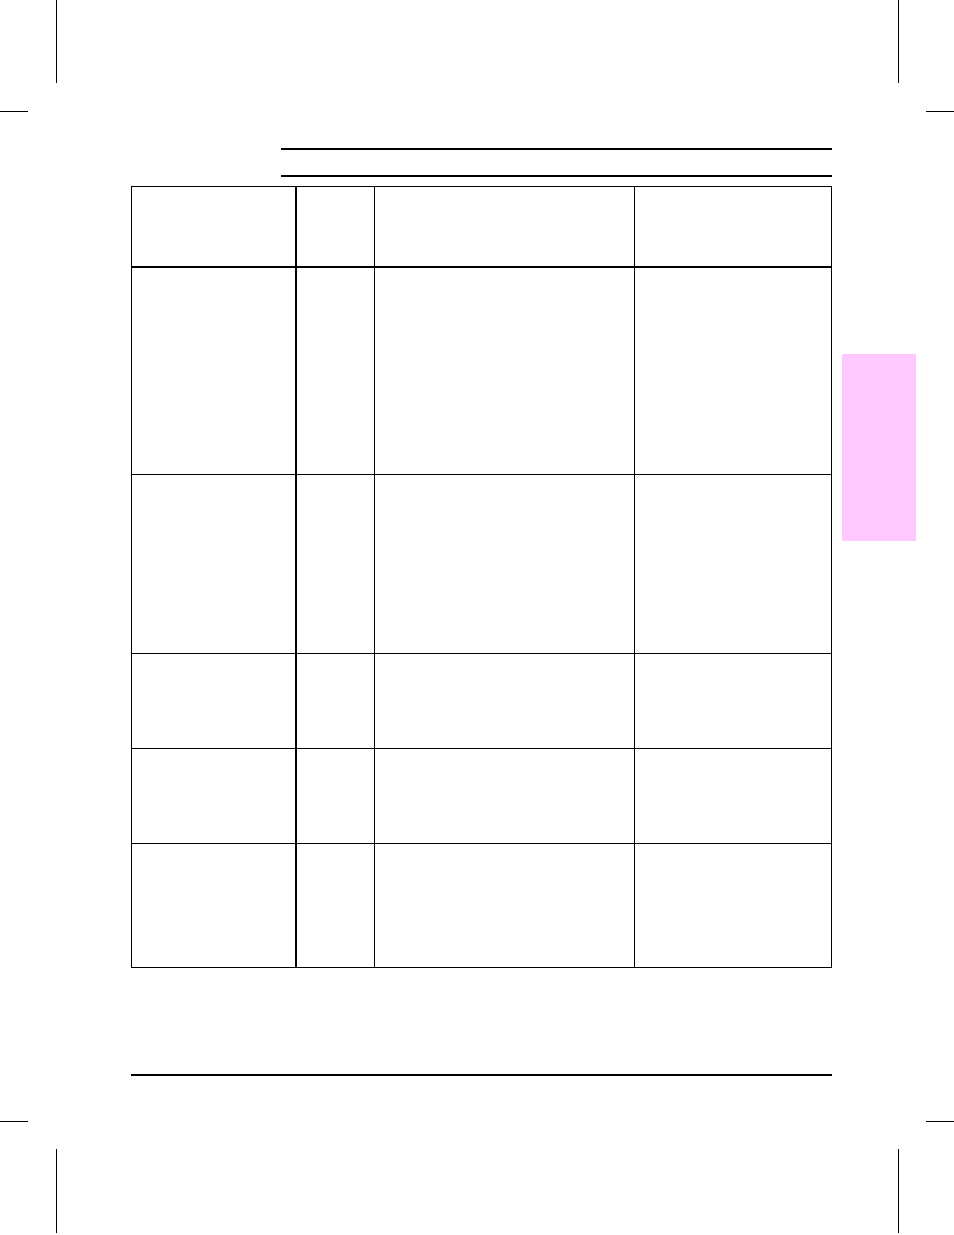
Message
Error
Log
Category/
Message
Description
Recommended
Action
21 PRINT OVERRUN DATA
LOST
Error
Message
The data (dense text, rules, raster or vector
graphics) sent to the printer was too complex.
Press
[Select]
to resume printing.
If AUTO CONTINUE=ON, the
printer will stop printing, display
the error for 10 seconds, then
clear the error, and resume
printing. Some data loss may
occur. Try to simplify the print job.
If you must print the job as is, set
PAGEPROTECT=ON from the
Configuration Menu. Then print
the job. Reset
PAGEPROTECT=AUTO,
otherwise the printer’s
performance will degrade.
22 PARALLEL IO ERROR
CHECK SETUP
Error
Message
22.00.00
An I/O buffer overrun error. For parallel (PAR)
configurations, the computer and printer are
not communicating because of improper
signal protocols.
Press
[Select]
to clear the error
message. Data will be lost. If the
error continues: check for loose
cables and use a high-quality
cable (HP C2951A or equivalent).
NOTE: Some non-HP parallel
cables may be missing pin
connections necessary for
bi-directional communications. If
the printer is using an I/O other
than the HP supplied l/O, refer to
the manual for that device.
22 HP MIO 1 IO ERROR
CHECK SETUP
Error
Message
22.01.00
The upper slot HP MIO buffer has overflowed. Press
[Select]
to continue. Data
will be lost. Pressing
[Select]
will
cancel the current print job at the
upper port. If a non-HP MIO
device is installed, refer to the
manual for that device.
22 HP MIO 2 IO ERROR
CHECK SETUP
22.02.00
The lower slot HP MIO buffer has overflowed. Press
[Select]
to continue. Data
will be lost. Pressing
[Select]
will
cancel the current print job at the
lower port. If a non-HP MIO
device is installed, refer to the
manual for that device.
30.1.1 DISK FAILURE
30.1.2 FAILURE
Error
Message
30.01.1
30.01.2
An optional disk accessory has failed its
self-test. This error is saved in the error log.
Press
[Select]
to continue.
Inspect the cable connector for
the disk drive. Replace the disk
cable assembly. Replace the disk
assembly. Replace the Formatter.
Test the disc by selecting
DISC DIRECTORY
from the test on
the control panel.
Table 7-5
Printer Control Panel Messages (continued)
7
Troubleshooting
Troubleshooting 7-49