7 mounting brackets, Mounting brackets -17, Mounting brackets – KEYENCE GL-RHG Series User Manual
Page 65
3-17
GL-RHG-M-NO3-E
In
sta
llatio
n
to
a Mac
h
in
e
3
3-7
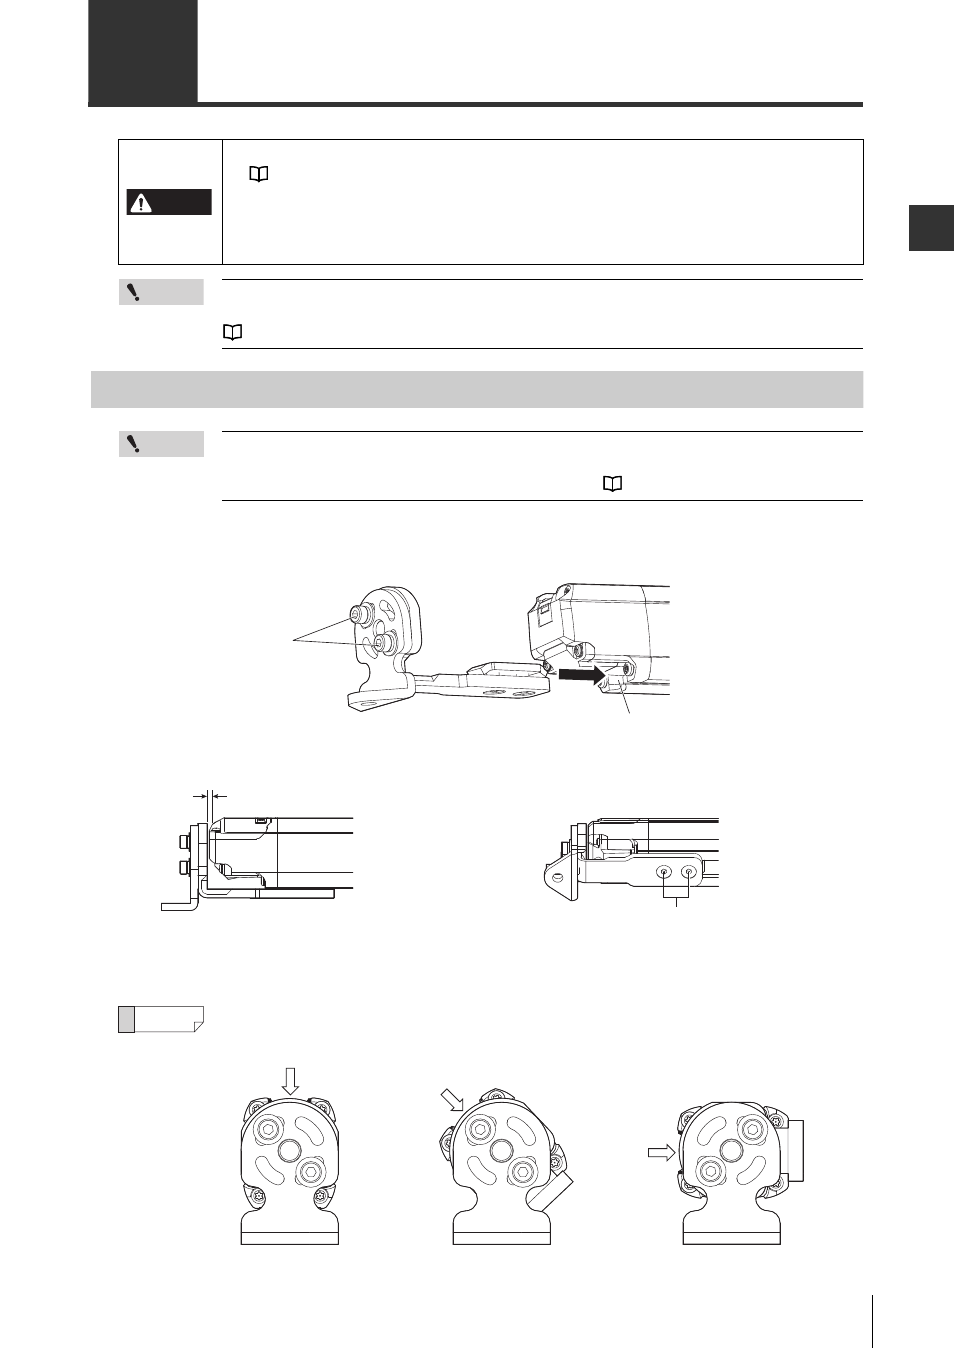
Mounting Brackets
Point
Connect the cables to the GL-RHG before connecting the mounting brackets. If the mounting
brackets are connected before the cables, the cable may be disconnected or poor connection.
"Cable Installation" (page 3-14)
Adjustable angle mounting bracket (GL-RB01/GL-RB02)
Point
If the length for a single GL-RHG unit is 1280 mm or greater, use the antivibration bracket for
the adjustable angle mounting bracket additionally as an intermediate support bracket.
For more information about the mounting position, see
1
Insert the adjustable angle mounting bracket into the GL-RHG along the groove on the back side,
as shown in the following image.
2
Secure standard mounting bracket A to the GL-RHG with hexagon socket bolt 2 on the back side.
3
Adjust the installation angle of the GL-RHG for optical alignment and secure the standard mount-
ing bracket A to the GL-RHG with the hexagon socket bolt 1.
Reference
There are three types of mounting directions according to the positions of hexagon socket bolt 1.
Additionally, the angle can be adjusted precisely in the range of ±25°
DANGER
The proper installation of the device should be verified according to the procedure outlined
in
"Regular (periodical) inspection" (page A-9) in the event that maintenance requires
the removal of the device from its target equipment or the adjustment of its installation
position after its initial installation onto that target equipment. Failure to follow this
installation instruction may result in significant harm to the machine operators, including
serious injury or death.
Hexagon socket bolt 1
(M4, length: 10 mm,
width across flat: 3 mm)
Groove on the back side
The space between bracket and the GL-RHG must be 2 mm or less.
Hexagon socket bolt 2 (M5, Length: 8 mm, width across flat: 3 mm)
A recommended tightening torque of 3 N•m
Detection surface
Back mounting
Detection surface
Detection
surface
45° mounting
90° mounting