Optimum start setup, Sensor setup, Optimum start setup sensor setup – KMC Controls FlexStat Operation Guide User Manual
Page 9: Sensor setup on
FlexStat
9
Operation Guide, Rev. R
reverting from Standby back to Occupied
mode (although it may still take some
time for the room to reach its normal
.
NOTE: DCV is only available in models with the
built-in CO
2
sensor.
Occupancy
Standby*
Cooling
Setpoint
Scheduled
On Time
Space
Temperature
Scheduled
Off Time
Optimum
Start
Unoccupied
Unoccupied
Occupied
Occupancy
Override*
(*Available only on FlexStats with motion sensors)
The State field monitors whether motion has been
detected during the last scan of the motion sensor
input (BI6). Detected motion will show an “occu-
pied” state. This can be used during troubleshooting
to determine if motion is being detected.
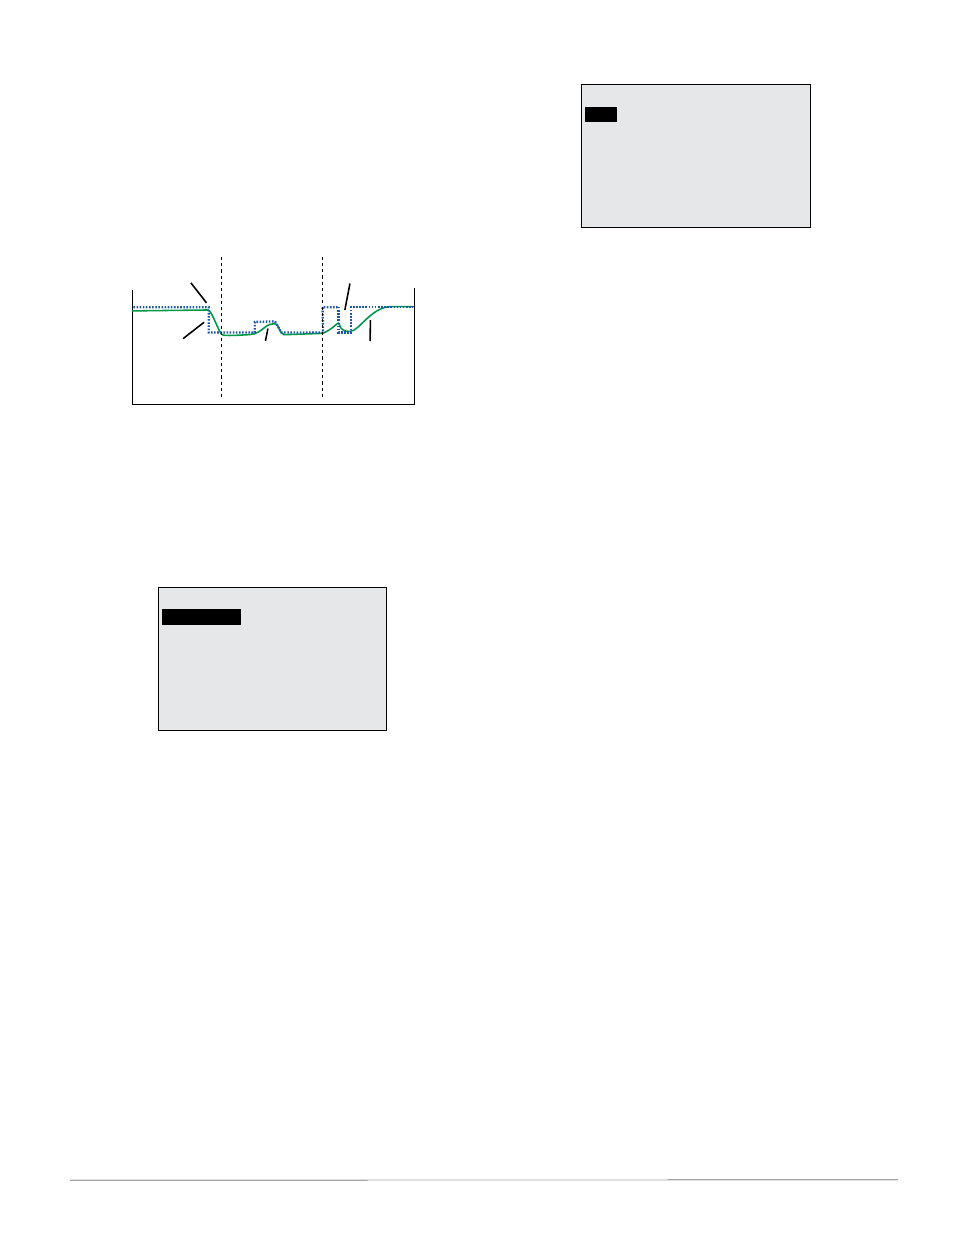
Optimum Start Setup
OPTIMUM START
OPT START:
DISABLE
When Optimum Start is enabled, the FlexStat soon
“learns” the amount of time required to reach
the setpoint from the setback/setup temperature.
It will then adjust the actual start time needed
to reach the desired setpoint at the beginning
of the scheduled On times. (See the chart in the
(Advanced) Motion Sensor section.) It will also make
seasonal temperature adjustments if an outside air
temperature sensor is connected appropriately.
NOTE: For maximum efficiency, if Optimum
Start is enabled, set times in schedules for
when the room temperature should reach
the setpoint, not when heating/cooling
equipment should start (which would be
earlier). See
NOTE: For details of the energy-saving calculations
performed, see the Optimum Start section
in the relevant Sequence of Operation in the
Sensor Setup
SENSOR SETUP
IN 2:
IN 9: CO2
SPACE TEMP: REMOTE
-- IN 1 IS ONBOARD
-- IN 7 IS REMOTE
DISCH AIR TEMP
Input 7 (AI7) can be configured for a remote space
temperature sensor. Then space temperature can be
configured for onboard (internal AI1), remote (AI7),
averaging of the two, the lowest reading, or the high-
est reading. To calibrate and change the thermistor
type, see
Input 2 (AI2) can be configured for discharge air
temperature (DAT and Type III thermistor is the
default), fan status (dry contact), or unused.
• If AI2 is set for discharge air temperature, a
trend log is automatically created and monitors
the discharge air temperature, but it has no effect
on operation. The sensor can be calibrated and
changed from the default Type III thermistor to a
• If AI2 is set for fan status and no closed contact is
detected when there is a call for fan operation, a
Fan Fail Alarm is created. See
.
• If AI2 is set for unused, built-in applications will
not use it, but the input would be available for
custom programming.
In BAC-12xxxx/13xxxx/14xxxx models, Input 9 (AI9)
can be configured for an external KMC SAE-10xx
CO
2
sensor. For more information, see
Control Ventilation) Setup on page 11
See also
.