Preliminar y – Extron Electronics MLC 226 IP Series Installation User Manual
Page 43
3-13
MLC 226 IP Series • Operation
PRELIMINAR
Y
10.
Click Add Schedule. The Scheduled Actions Wizard window reappears.
11.
Type in a name for the schedule that will automatically unlock the MLC’s
panel.
12.
In the Schedule Times area, select the days and hours when the front panel
should be unlocked.
13.
Click Next.
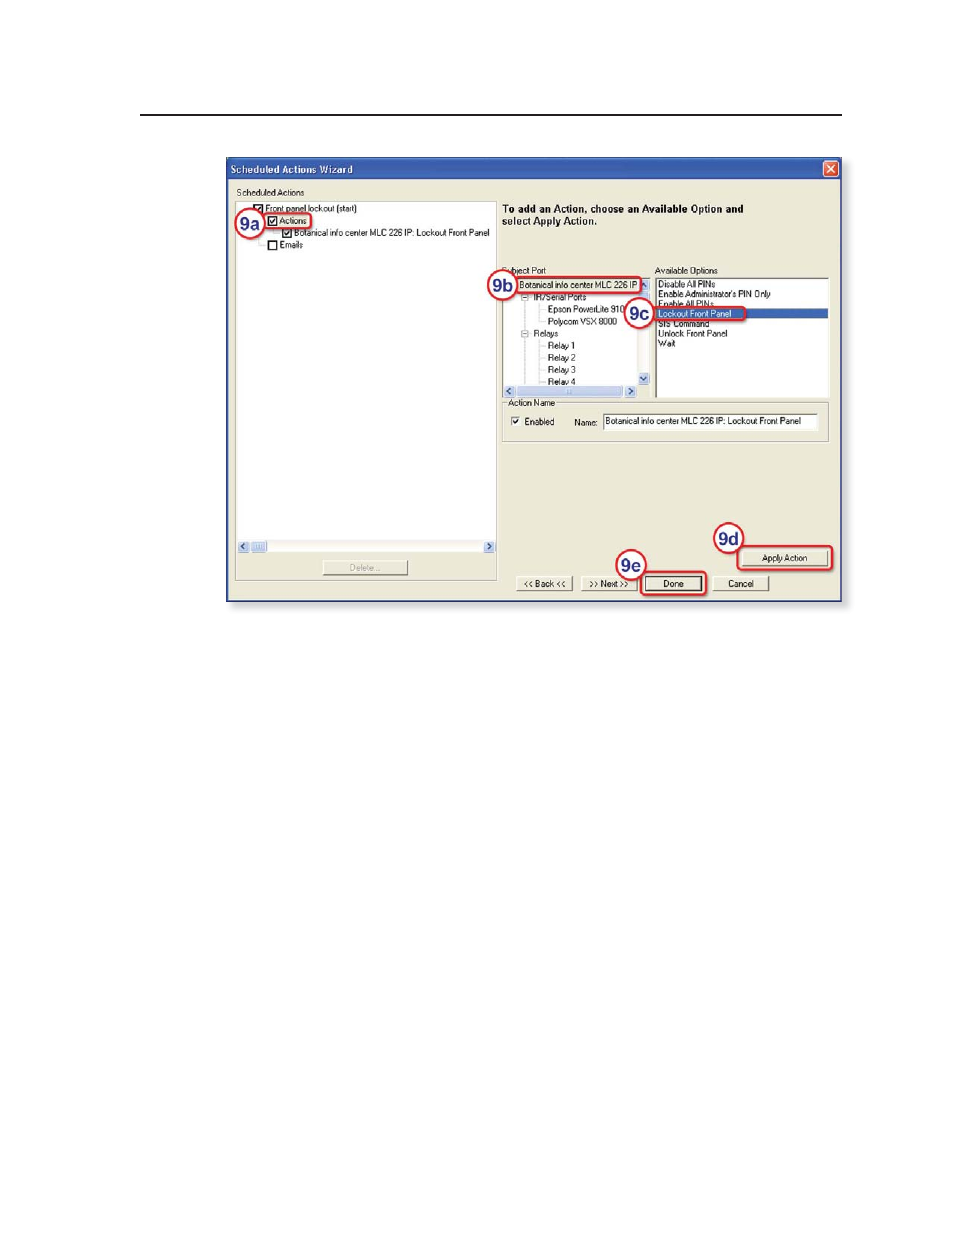
14.
Set up the front panel unlock action for the MLC.
a.
Check the Action check box.
b.
Select the MLC, itself, from the Subject Ports list.
c.
Click on Unlock Front Panel in the Available Options list. If desired, you
can change the name assigned to this action in the Action Name area.
d.
Click Apply Action.
e.
Click Done. The Scheduled Actions Wizard window closes.
15.
Save the project: click File and then Save or click the Save icon.
16.
Upload the project to the MLC.
a.
Click the Build menu and select one of the options (Build Changed
Configurations or Build All Configurations).
b.
Click the Begin button.
c.
When the uploading is fi nished, click Close.
- AVTrac Corner Cut Solution (2 pages)
- AVTrac Demonstration Kit (2 pages)
- AVTRac End Ramp and Cable Pass-Through Kits (1 page)
- AVTrac Extension Kit (15 pages)
- 1U and 2U Rack Plate (1 page)
- Under-Desk Mounting Bracket (1 page)
- AAP Wiring Guide 68-1054-01 (1 page)
- AAP Wiring Guide 68-1052-01 (1 page)
- AAP Wiring Guide (XLR connectors) (1 page)
- AAP 314 (1 page)
- AAP 301 (1 page)
- AAP Wiring Guide 68-1055-01 (1 page)
- AAP Wiring Guide 68-1058-01 (1 page)
- AAP Wiring Guide 68-1059-01 (1 page)
- AAP-MAAP Rev. A (1 page)
- AAP-MAAP Rev. D (1 page)
- MD Floor Box AAP Bracket Kit AAP 100 MD (1 page)
- AC 100 Power Module Series (1 page)
- AAP 103 Extron Ackerman AKM UK Faceplate Kit (1 page)
- ACMP 100 (2 pages)
- Active Audio AAP (1 page)
- AKM UK Series (4 pages)
- Audio AAP Wiring Guide (1 page)
- Audio Connector Rev. A (2 pages)
- Audio Connector Rev. G (1 page)
- AVTrac Extra Channel Kit (2 pages)
- AVTrac Raceway Transition (2 pages)
- AVTrac Retrofit Transition Adapter (2 pages)
- AVTrac Trim Ring-Rough-in Adapter (2 pages)
- AVTrac Above Floor (1 page)
- BB 1 (2 pages)
- BB 1000M (2 pages)
- BB 700M (2 pages)
- BB 710M (2 pages)
- Blank Rack Panel (1 page)
- BNC to 15-Pin HD (1 page)
- BNC-5 RC Termination (1 page)
- Cable Cubby 1200 (6 pages)
- Cable Cubby 200 (18 pages)
- Cable Cubby 300C (27 pages)
- Cable Cubby 500 (6 pages)
- Flexible Conduit Kit (2 pages)
- Cable Cubby Lid and Trim Ring Replacement Kit (for 300C, 300S, 600, 800) (1 page)
- Cable Cubby Setup Guide (4 pages)
- Cable Cubby Single Space AAP Bracket Kit (1 page)