Evaporator fan belt tension adjustment, Variable frequency drive (vfd) replacement, Condenser-fan adjustment – Carrier 48/50PD05 User Manual
Page 63
63
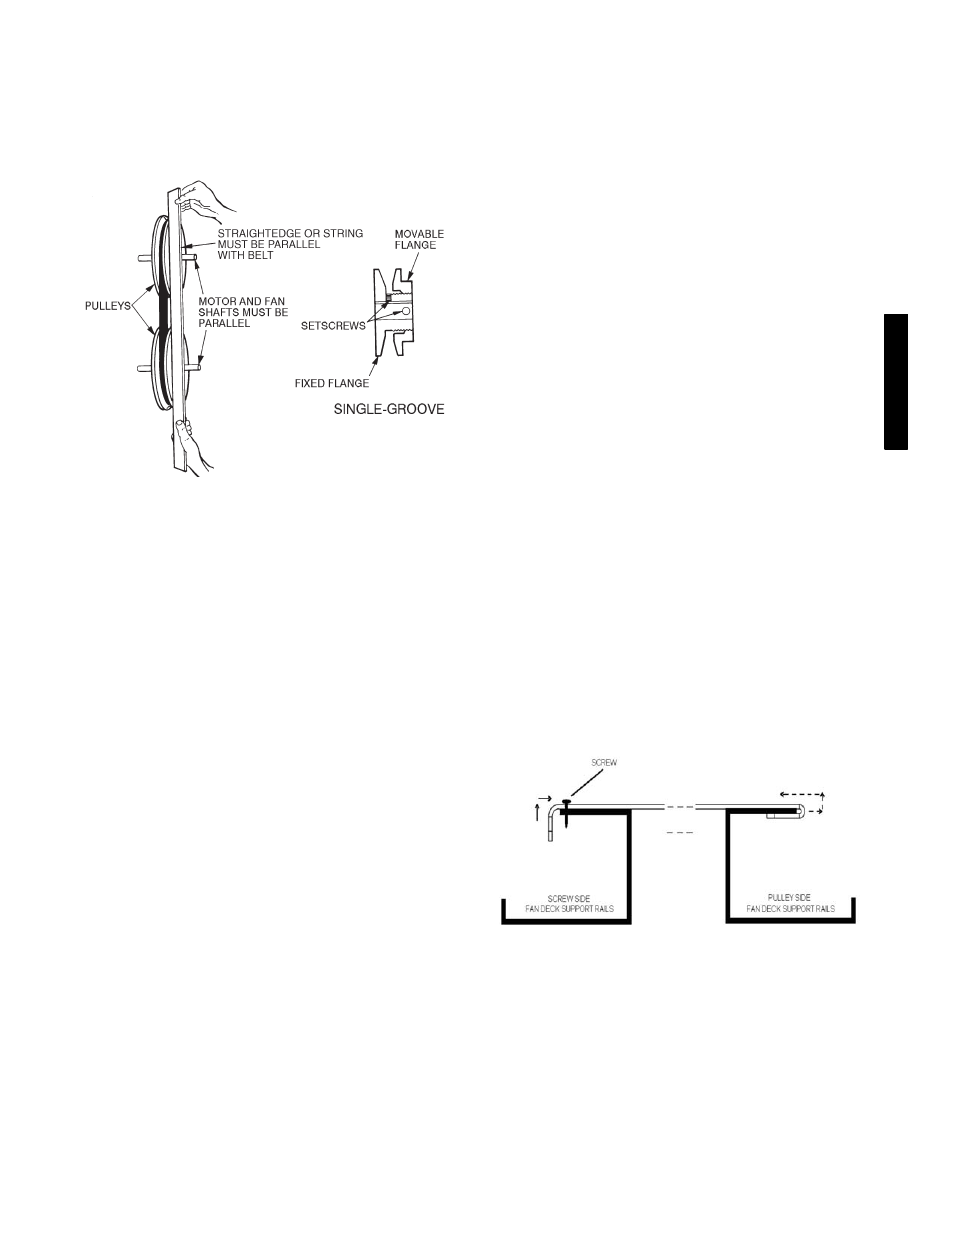
7. Realign fan and motor pulleys:
a. Loosen fan pulley setscrews.
b. Slide fan pulley along fan shaft.
c. Make angular alignment by loosening motor from
mounting plate.
8. Tighten belts.
9. Restore power to unit.
C06041
Fig. 31 -- Evaporator--Fan Alignment and Adjustment
Evaporator Fan Belt Tension Adjustment
To adjust belt tension:
1. Turn off unit power.
2. Slide out fan deck to service position as shown in
Evaporator Fan Service and Replacement section above.
3. Loosen motor mounting plate bolts.
4. Move motor mounting plate to adjust to proper belt tension.
Motor adjuster bolts may be used to tighten belts. (See Fig.
30.) Do not overtighten belt.
5. Check for proper belt alignment. Adjust if necessary.
6. Tighten motor mounting plate bolts to lock motor in proper
position.
7. Return fan deck back into operating position.
8. Restore power to unit.
Variable Frequency Drive (VFD) Replacement
The 48/50PD units are equipped with a VFD that is mounted
behind the blower housing on the fan sled. The VFD’s remote
display is mounted on the front of the fan housing for easier access.
The VFD is mounted to a plate which is mounted to the fan sled.
When accessing the VFD or to remove the VFD, follow the
Evaporator fan service and replacement Steps 1--5 and the
following steps:
IMPORTANT: If fan deck stop screws are removed for further
access, the front of the fan deck MUST BE SUPPORTED.
1. Remove the 2 screws holding the VFD’s mount bracket to
the fan sled. The horizontal cross section of the bottom half
of the mount bracket is shown on Fig. 32.
2. Cut the wire ties holding the VFD power wires to the fan
housing and the two wire ties holding the control wires to
the VFD display/keypad at the top of the fan scroll.
3. With the VFD still attached, remove the mount bracket from
the fan sled. To do this requires a slight lift on the screw
side then a push towards the pulley side of the fan sled.
(See Fig. 32.) Lift out the bracket when the pulley side is
clear from the fan sled.
4. With all the wires stilled attached to the VFD, turn the VFD
assembly so it is parallel with the fan sled.
5. Pull the VFD assembly to the front of the fan sled and place
in a secure flat surface.
6. Disconnect the power, ground, RJ45, and control wiring to
the VFD making sure to note their connections.
IMPORTANT: Wires are marked with VFD terminal labels and
wiring diagram shows the wiring connections.
7. Remove the 4 screws holding the VFD to the mount bracket
and remove the VFD.
8. Remove the replacement VFD cover and install jumper
wires provided with it as shown on the unit wiring diagram.
If jumpers are not provided with the replacement VFD,
remove them from the defective one or field supply the
jumpers.
9. Set AI1 and AI2 DIP switches to the U (off) direction as
indicated on the plastic housing near the DIP switch.
10. Replace the VFD with the new one.
11. Install the 4 screws in the VFD to secure it to the mounting
bracket.
12. Connect the wiring as it was on the previous VFD, refer to
the wiring diagram.
13. Move the VFD assembly to the back of the fan sled.
14. Turn the VFD assembly lengthwise with the fan housing,
making sure the screw side of the bracket lines up with the
screw holes on the fan sled.
15. Make sure the bracket s pulley side U bend is clear of the
fan sled and pull the assembly towards the screw side.
16. Install the 2 screws in the bracket to secure it to the fan sled.
17. Secure power and control wires with new wire ties.
18. Follow the Evaporator fan service and replacement Steps
6--9.
19. Power up VFD and set up its parameters per Table 40 in
Appendix B.
IMPORTANT: If fan deck stops were removed, they must be
reinstalled.
For VFD service and maintenance, refer to Appendix B.
C08662
Fig. 32 -- VFD Mount Bracket Cross Section
Condenser-Fan Adjustment
1. Shut off unit power supply.
2. Remove condenser-fan assembly (grille, motor, motor
cover, and fan) and loosen fan hub setscrews.
3. Adjust fan height as shown in Fig. 33.
4. Tighten setscrews and replace condenser-fan assembly.
5. Turn on power to unit.
48/
50P
D