Caution – Carrier 48/50PD05 User Manual
Page 61
61
UNIT RELIABILITY HAZARD
Failure to follow this caution may result in reduced unit
performance.
High velocity water from a pressure washer, garden hose, or
compressed air should never be used to clean a coil. The
force of the water or air jet will bend the fin edges and
increase airside pressure drop.
CAUTION
!
Totaline Environmentally Sound Coil Cleaner Application
Instructions
1. Proper eye protection such as safety glasses is
recommended during mixing and application.
2. Remove all surface loaded fibers and dirt with a vacuum
cleaner as described above.
3. Thoroughly wet finned surfaces with clean water and a low
velocity garden hose, being careful not to bend fins.
4. Mix Totaline environmentally sound coil cleaner in a
2
1
/
2
gallon garden sprayer according to the instructions
included with the cleaner. The optimum solution
temperature is 100_F.
IMPORTANT: Do NOT USE water in excess of 130_F, as the
enzymatic activity will be destroyed.
5. Thoroughly apply Totaline® environmentally sound coil
cleaner solution to all coil surfaces including finned area,
tube sheets and coil headers.
6. Hold garden sprayer nozzle close to finned areas and apply
cleaner with a vertical, up-and-down motion. Avoid
spraying in horizontal pattern to minimize potential for fin
damage.
7. Ensure cleaner thoroughly penetrates deep into finned
areas.
8. Interior and exterior finned areas must be thoroughly
cleaned.
9. Finned surfaces should remain wet with cleaning solution
for 10 minutes.
10. Ensure surfaces are not allowed to dry before rinsing.
Reapplying cleaner as needed to ensure 10-minute
saturation is achieved.
11. Thoroughly rinse all surfaces with low velocity clean water
using downward rinsing motion of water spray nozzle.
Protect fins from damage from the spray nozzle.
Condensate Drain Pan
Check and clean each year at the start of the cooling season. In
winter, keep drains and traps dry.
To clean the condensate pan:
1. Disconnect condensate drain system from side or bottom
drain connection.
2. Remove and clean trap.
3. Remove 4 screws securing condensate pan access cover to
unit. Save screws and panel.
4. Slide condensate pan out from unit and clean. Pan is made
of non-corrosive plastic. Use a mild cleaner to remove
heavy deposits of dirt and grime.
5. Replace pan in unit.
6. Replace condensate pan access cover with 4 screws saved
from Step 3.
7. Re-attach and prime condensate trap.
8. Connect condensate drainage system.
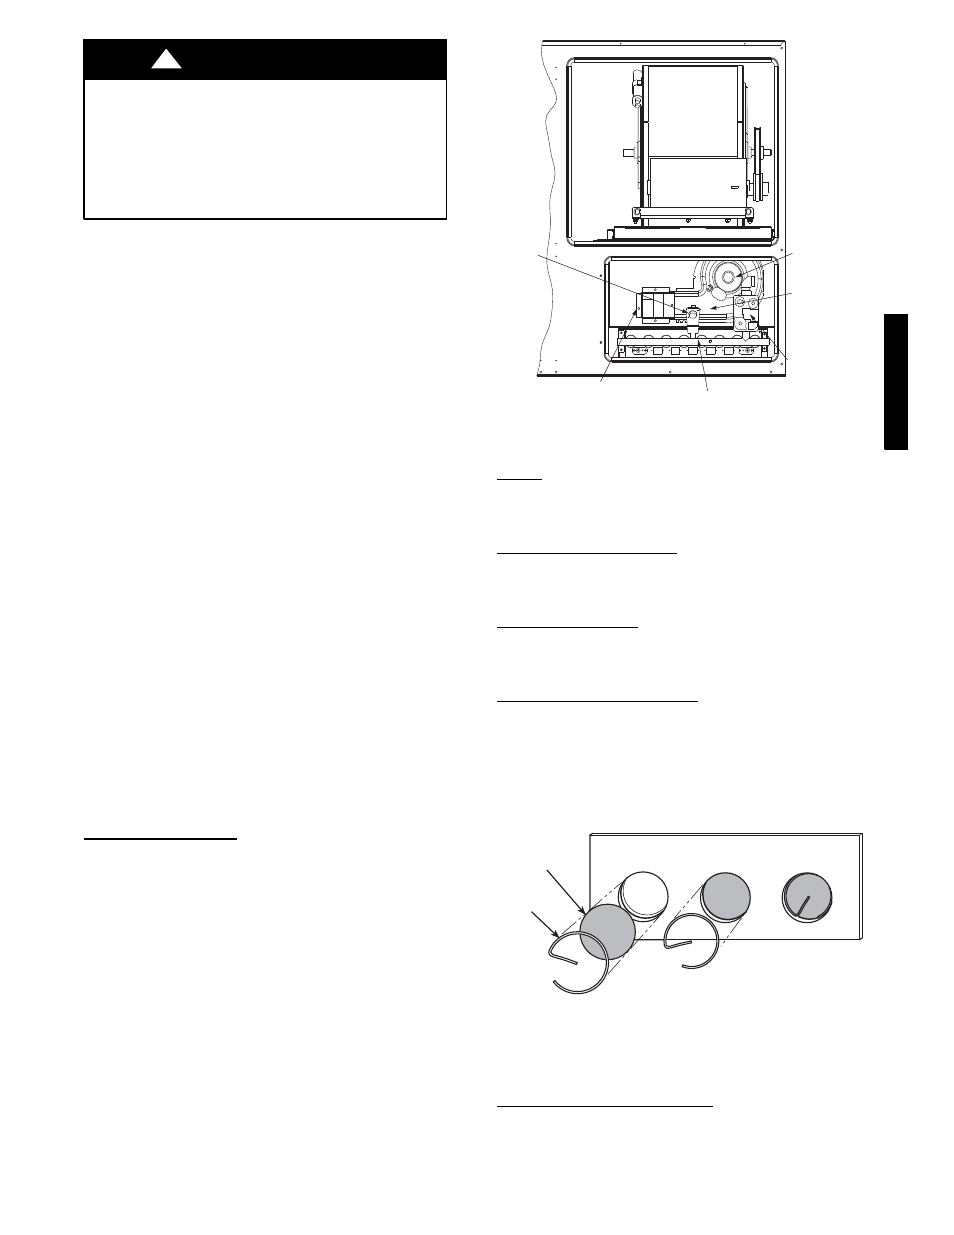
INDUCED
DRAFT
MOTOR
COMBUSTION
FAN HOUSING
MAIN GAS
VALVE
MAIN BURNER SECTION
HEAT EXCHANGER
SECTION
ROLLOUT
SWITCH
C07037
Fig. 28 -- Typical Gas Heating Section
Filters
Clean or replace at start of each heating and cooling season, or
more often if operating conditions require. Refer to unit Installation
Instructions for type and size.
Outdoor--Air Inlet Screens
Clean screens with steam or hot water and a mild detergent. Do
not use throwaway filters in place of screens. See unit installation
instructions for quantity and size.
Main Burner (48PD)
At the beginning of each heating season, inspect for deterioration
or blockage due to corrosion or other causes. Observe the main
burner flames. Refer to Main Burners section.
Flue Gas Passageways (48PD)
The flue collector box and heat exchanger cells may be inspected
by opening heat section access door, flue box cover, and main
burner assembly. (See Fig. 28.) Refer to Main Burners section for
burner removal sequence. If cleaning is required, clean tubes with a
wire brush. Use Caution with ceramic heat exchanger baffles.
When installing retaining clip, be sure the center leg of the clip
extends inward toward baffle. (See Fig. 29.)
CERAMIC
BAFFLE
CLIP
NOTE: One baffle and clip will be in each upper tube of the heat exchanger.
C07260
Fig. 29 -- Removing Heat Exchanger Ceramic
Baffles and Clips
Combustion--Air Blower (48PD)
Clean periodically to assure proper airflow and heating efficiency.
Inspect blower wheel every fall and periodically during heating
season. For the first heating season, inspect blower wheel
bi-monthly to determine proper cleaning frequency.
48/
50P
D