Editing the print string, Msi-9850 – Rice Lake MSI-9850 CellScale RF Digital Indicator - Operator Manual User Manual
Page 78
Page 78 MSI-9850 RF Remote Indicator • User Guide
MSI-9850
HANDHELD RF REMOTE INDICATOR for
C
ELL
S
CALE
®
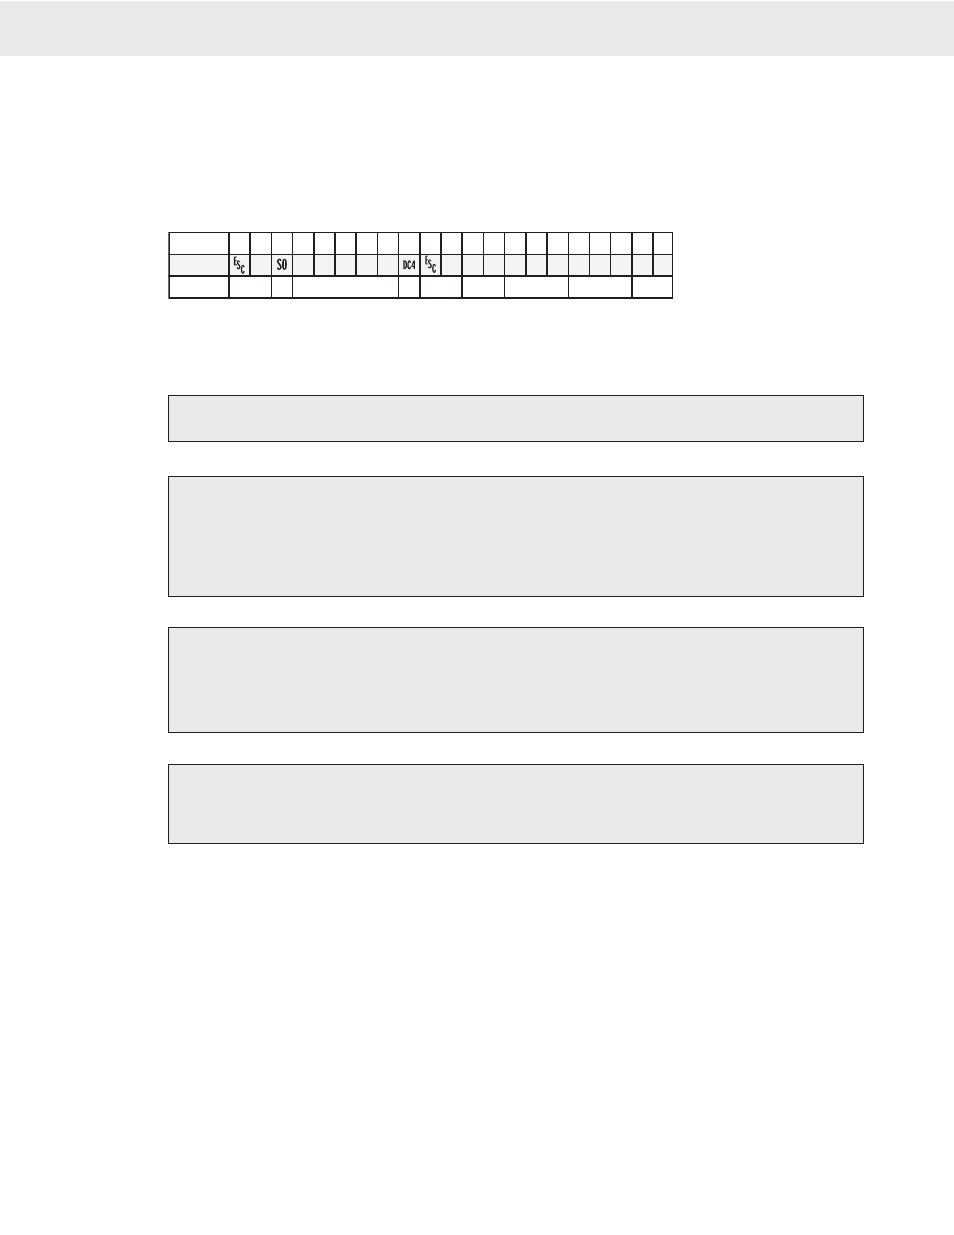
The following diagram shows a typical print string format. The end result of this example produces a printout
similar to this:
PEARS
4.500 lb NET 8/15/2002
In this example we’ll use control characters to both print in red and expand the characters for “PEARS”. Note:
control codes used in this example are unique to a specific printer ( a Star Micronics DP8340) and are used for
example only. Non printing control characters (e.g. ESC, CR, LF, DC4, etc.) are represented by a dot pattern in
the smallest font size. The necessary string will be:
String
ASCII
Notes
�����������������������������
❹
➊
❷
❸
➎
❻
❼
➑
�
� � � � �
� � � � � � � � � � �
1) The 27 is an ESC followed by a 4 which equals “Red Character Print instruction”
2) The 14 is an SO which turns on the Expanded character instruction
3) The 20 is an DC4 which turns off the Expanded character instruction
4) The 27 is an ESC followed by a 5 which turns off the Red Character Print instruction
5) @E causes the end-of-line string to be sent. In this example, the end-of-line string is programmed as CR/
LF.
6) @W3 causes the current Net weight to be printed. If the scale was in the NET mode,
@W1 would have worked as well.
7) @D6 causes the current date to be printed in MM/DD/YYYY format
8) @E causes the end-of-line string to be sent (CR/LF).
PROGRAMMING THE END OF LINE OR START OF LINE STRINGS
The End of Line String is used to terminate print strings and is printer dependent. The default
string is Carriage Return (CR=ASCII 13d), Line Feed (LF=ASCII 10). The Start of Line String is often used for
STX commands or other configuration control characters. The default SOL string is empty.
Refer to the ASCII table in the Appendix for proper codes. Up to 64 characters can be included.
You can also embed @ codes to expand the two strings. However, be careful not to include
@E in the End of Line string, or @F in the Start of Line string.
EDITING THE PRINT STRING
Editing the print string is controlled by the
INS
key (alternate function of
[F3]
). The
INS
key alternates the cursor between the Insert mode (narrow cursor between characters) and
the Replace mode (character highlights).
To insert a character (narrow cursor)
Use the LEFT(
3
), RIGHT (
4
), UP (
5
), and DOWN (
6
) Scroll keys to move the cursor around in the print string. Insert new
characters behind the cursor. Press
ENTER
to store the edited string.
To change a character (highlighted character)
Use the LEFT(
3
), RIGHT (
4
), UP (
5
), and DOWN (
6
) Scroll keys to move around in the print string. Change the cursor
into a highlighted character by pressing the
INS
key. The flashing digit indicates the edit able character which is also shown in
the lower left hand corner of the edit screen. Once the desired character is flashing, use the keypad and the ALPHA key to input
any character. If you need to change it to a character not in the 9850 keypad, press
[F4]
to bring up the alternate character entry
screen. Press
ENTER
to store the edited string.
To delete a character
Use the LEFT(
3
), RIGHT (
4
), UP (
5
), and DOWN (
6
) Scroll keys to move around in the print string. Change the cursor into
a highlighted character by pressing the INS key. The flashing digit indicates the edit able character which is also shown in the
lower left hand corner of the edit screen. Press
CLR
. The remaining characters move over 1 space. Press
ENTER
to store the
edited string.
Pressing the ESC key will exit out of the menu and restore the string as it was. The changes must be saved with the ENTER key.
To Erase the Entire Print String
Go to Index